One Lovely Blog Award

one-blog-lovely-award

Hi there, how’s life? Mine is just settling back to normal after my Mum’s visit, it was a crazy time but it was very nice to have family over and see them after a long time. When you move so far away from home you sometimes lie to yourself about how much you miss the familiarity of your country, family and friends just to make life a bit easier. Even though it is hard to realise how much they are a part of you it is still good to the soul and I am happy to have shared this time with them.

Of course I had no time for crocheting at all though, so my pattern design and project schedule has been pushed back a bit (yes there is a schedule, and lists and organisers!) but I think I am still on track to design a Xmas pattern before New Year 😛 fingers crossed!

As usual I am rambling already, but the reason for this post is to share with you the lovely news that I have been nominated to the One Lovely Blog Award by Crafty Spell. You have no idea how nice it is to get good feedback from readers, you may think it is a small thing but any comments you leave or likes on Ravelry to my patterns really make my day and give me great joy. So thank you so much to Crafty Spell for your nomination!

About this award, here is what it is all about:

The One Lovely Blog Award nominations are chosen by fellow bloggers for those newer or up-and-coming bloggers. The goal is to help give recognition and to also help the new blogger reach more viewers. It also recognizes blogs that are considered to be “lovely” by the fellow-blogger who chose them. This award acknowledges bloggers who share their story or thoughts in a beautiful manner to connect with their viewers and followers. In order to “accept” the award the nominated blogger must follow several guidelines.

The guidelines for the One Lovely Blog Award are:
• Thank the person who nominated you for the award.
• Add the One Lovely Blog Award logo to your post and/or blog.
• Share 7 facts/or things about yourself.
• Nominate 10-15 bloggers you admire and inform nominees by commenting on their blog.

So I have already ticked the first two, and here are 7 facts or things about me:

1. I am from the beautiful country of Chile in South America, so let me know if you need any travel tips!

2. I LOVE cats, have had at least one through all my years until I moved to the UK and left my cat “Pimienta” (pepper in Spanish, you have no idea how much that name suits her) with my sister. This is the reason why I own anything that I have come across that has a cat on it: from pyjamas, to cushions, mugs, kitchen aprons, socks, hats (with cat ears of course), handbags and much, much more.

3. I am very petite, which is a new and nicer way of saying I am 3/4 of an average person.

4. I love dancing and have tried many styles through the years, including: bellydancing, flamenco, salsa, tango, jazz and ballet.

5. Dancing is the only physical activity I really enjoy. I am definitely not an outdoors person (yarn and the outdoors don’t get along) and I love my bed with my life. Have spent whole weekends in bed with only food and shower breaks.

6. My first attempt in the blogging world was a few years ago with a blog about make up, with reviews and tutorials. Now I barely put any make up on in the morning!

7. I have, many times in my life, had ice cream for lunch (or breakfast… or dinner).

Now my nominees, I really spent some time trying to find new blogs but could definitely not reach the target of 10-15 I am afraid. My criteria was to find blogs with less than 100 followers in Bloglovin and that are, of course, lovely. Some are not particularly new but here they are:

crochetime

Pattern Piper Crochet

Primroses and Petticoats

Ginger Twist Studio

Feels good to spread the love! Be sure to check them out 😉

x

Sol


Mitts!

photo 3

Hello everyone! Is it cold where you are? I haven’t taken my thicker coats out of the closet yet but I fear it won’t be long now. I have to say I do like winter and I love to have a cold Christmas (and the excuse to wear Xmas jumpers) but they are still difficult months when it is harder to get out of bed than ever since all you want is to stay in with your crochet and yarn.

My mum and my aunt are visiting me so I haven’t had time to do any crocheting or blogging but they are out doing some shopping so I wanted to show you how my mittens turned out. This pattern is from Bianca Boostra, it is called Velvet Olive Mittens and it appeared on Issue 57 of Inside Crochet. That issue has been one of my favourites, there are so many patterns I would love to give a try so be sure to check them out since you can buy back issues of this magazine.

photo 2

The pattern is easy to follow, I could never get the gauge right and tried with loads of different hooks but since they were for me it was easy to alter them as I went. I really like the effect with both colours and I am sure I will give them a lot of use in the soon to come Scottish winter.

You won’t hear much from me in the next week but hope to be back soon and pick up that vest again, my armhole swatch is half done and my fingers are itching to finish it! Will just have to wait… the only thing that comes before crochet is family I guess 🙂

x

Sol

My custom-fit vest with Dora: Measures and first alteration

swatch

Hello there! Hope you are all doing great and that life is treating you good 🙂 This is my second post of a short series I will be doing called “My custom-fitted vest with Dora”, if you haven’t read the first one you can check it out here. Basically I am taking a new Craftsy class where you learn how to adapt a pattern to fit your measures by altering a vest pattern that uses tunisian crochet.

The last you heard of my vest was what yarn and hook I had purchased for this pattern, and a bit has happened since then. First, I did my swatch to check my gauge and see what hook size to use and what is the right tension to get that gauge. I used a 8mm hook size as recommended for this pattern but I still got more stitches in my swatch than I should so need to use a bigger hook. Since that was the biggest hook I had I am now waiting for an order for bigger sizes and hopefully I will get closer to the gauge.

I have to say I have never been fond of doing swatches for gauge and sometimes you can get away without one, but for any kind of garment it is really important, and it is the base for any alterations you might make so you must get it right.

I continued with the lessons and have learned what measures to take and how to take them, and constructed my own body schematic to help me adapt the pattern. As I mentioned I am a small petite size, so I am smaller than the smallest size in the pattern. The good thing about this is that unless I gain or lose quite a lot of weight I should be able to keep this drawing for my future pattern alterations.

Then you are taught how to adapt the pattern to fit your bust and shoulders. The instructor goes through various scenarios to help you adapt your pattern, such as being between two sizes, being larger than any size and being small but with a large bust. Even though my specific case wasn’t there, I could easily apply the logic for the case when you are larger than any size to work for me. It involves a bit of math but nothing complicated and it didn’t take long at all.

Once you have your changes to that part of the pattern you are asked to do an armhole swatch to check if your alterations actually work the way you expected. I think this is a really good idea and even though it adds to the time it takes to finish the pattern I definitely prefer to take that extra time and make sure everything will fit perfectly. I will have to wait for that hook to start this though…

I have had so much fun altering this pattern that it is really getting a bit geeky, I really enjoy the maths of patterns so it doesn’t bother me at all to pick up my calculator!

I will let you know how my armhole swatch goes and next in the class Dora shows you how to adapt length and hip…stay tuned!

x

Sol

Free Pattern: Uva Shawl

DSCN2545

Ravelry link

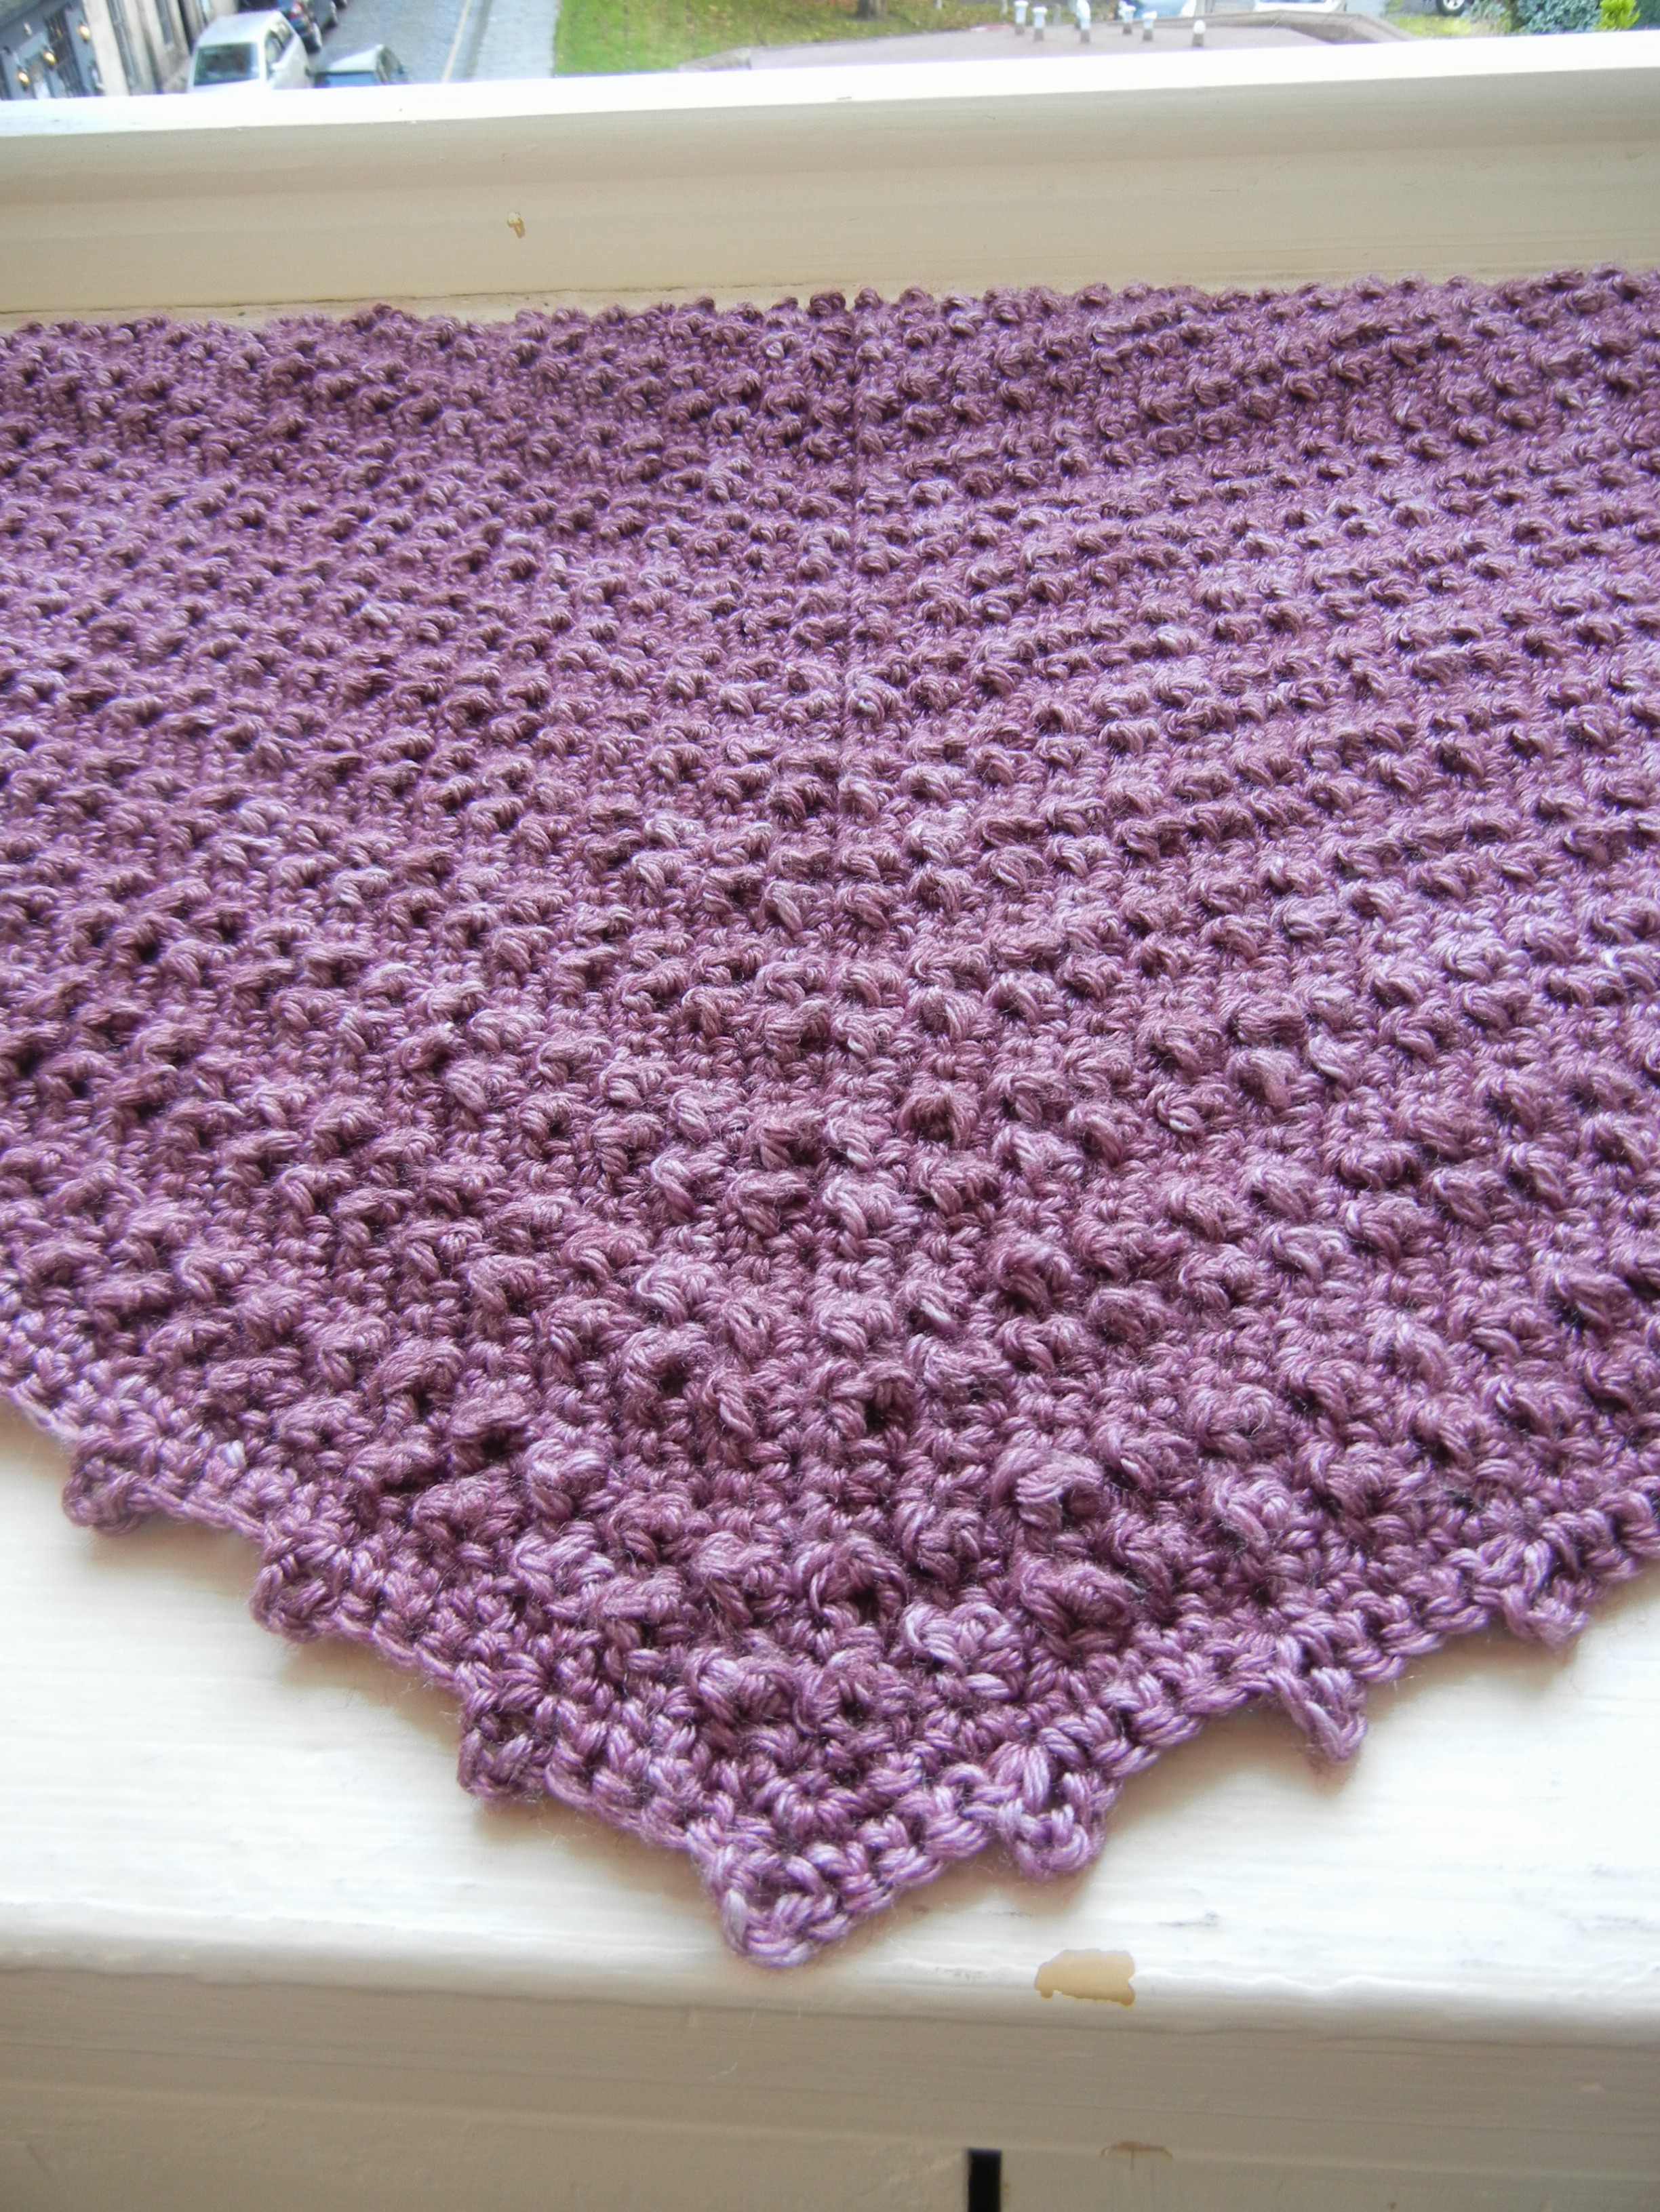
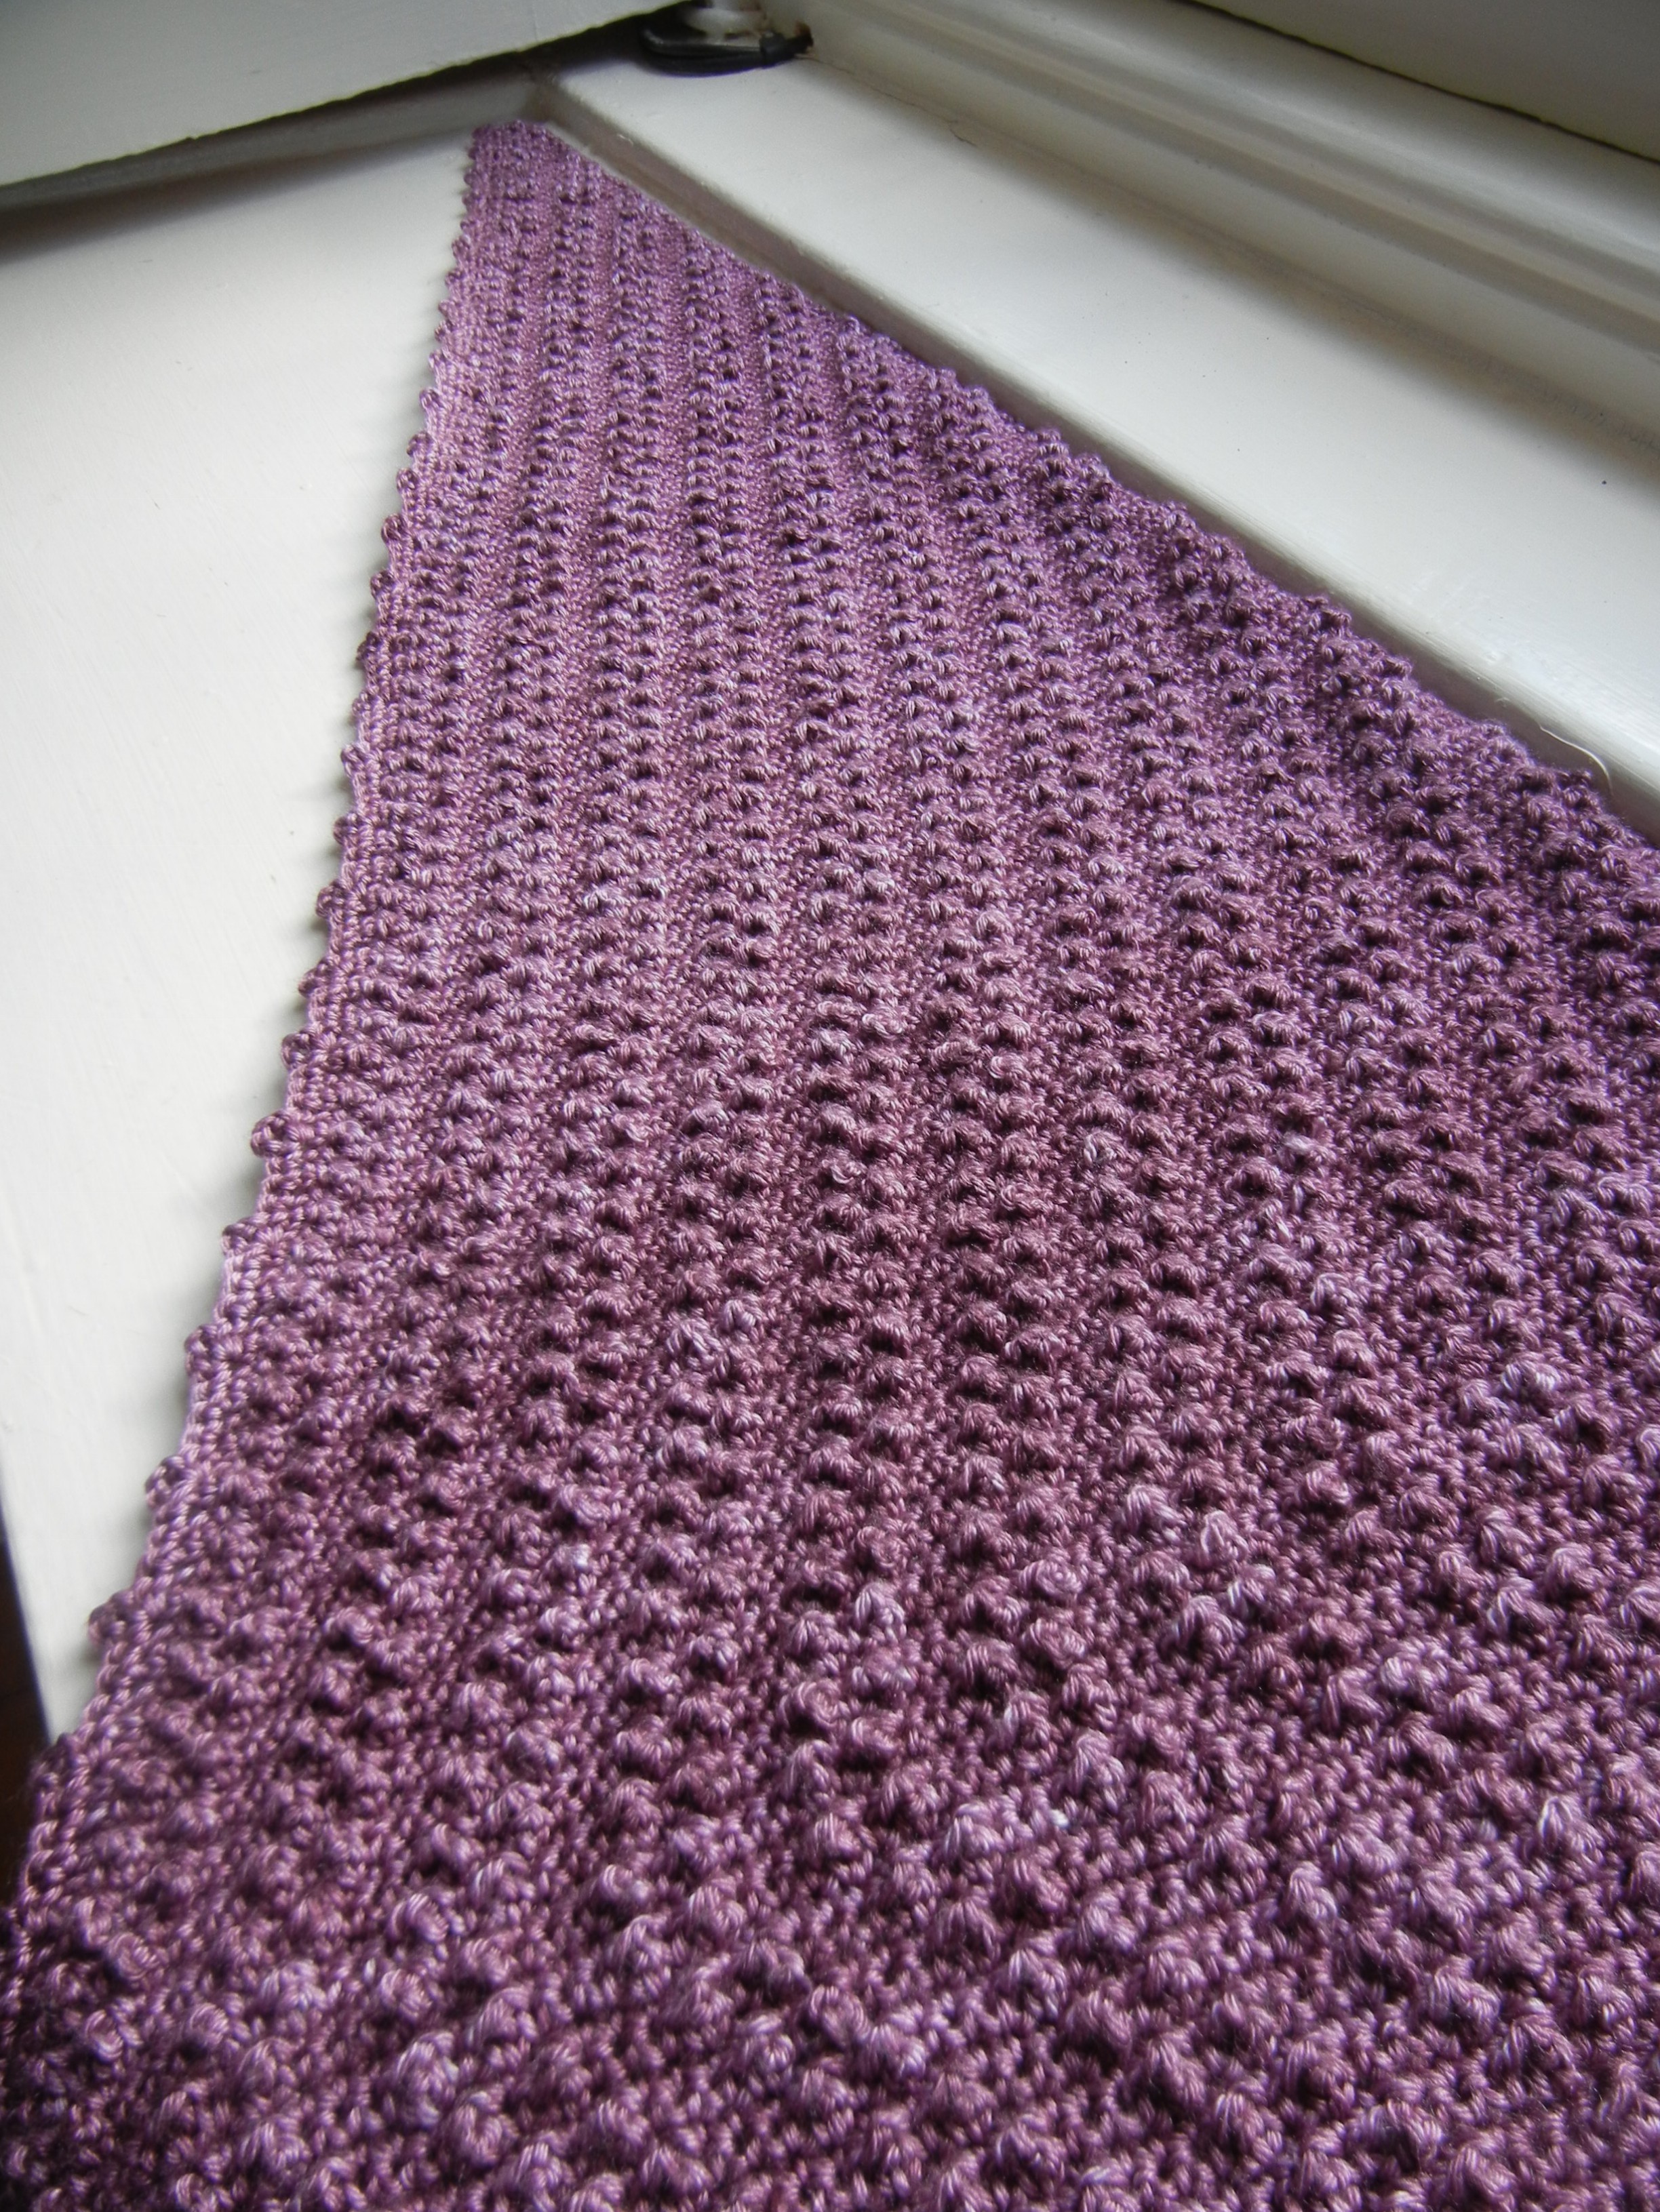
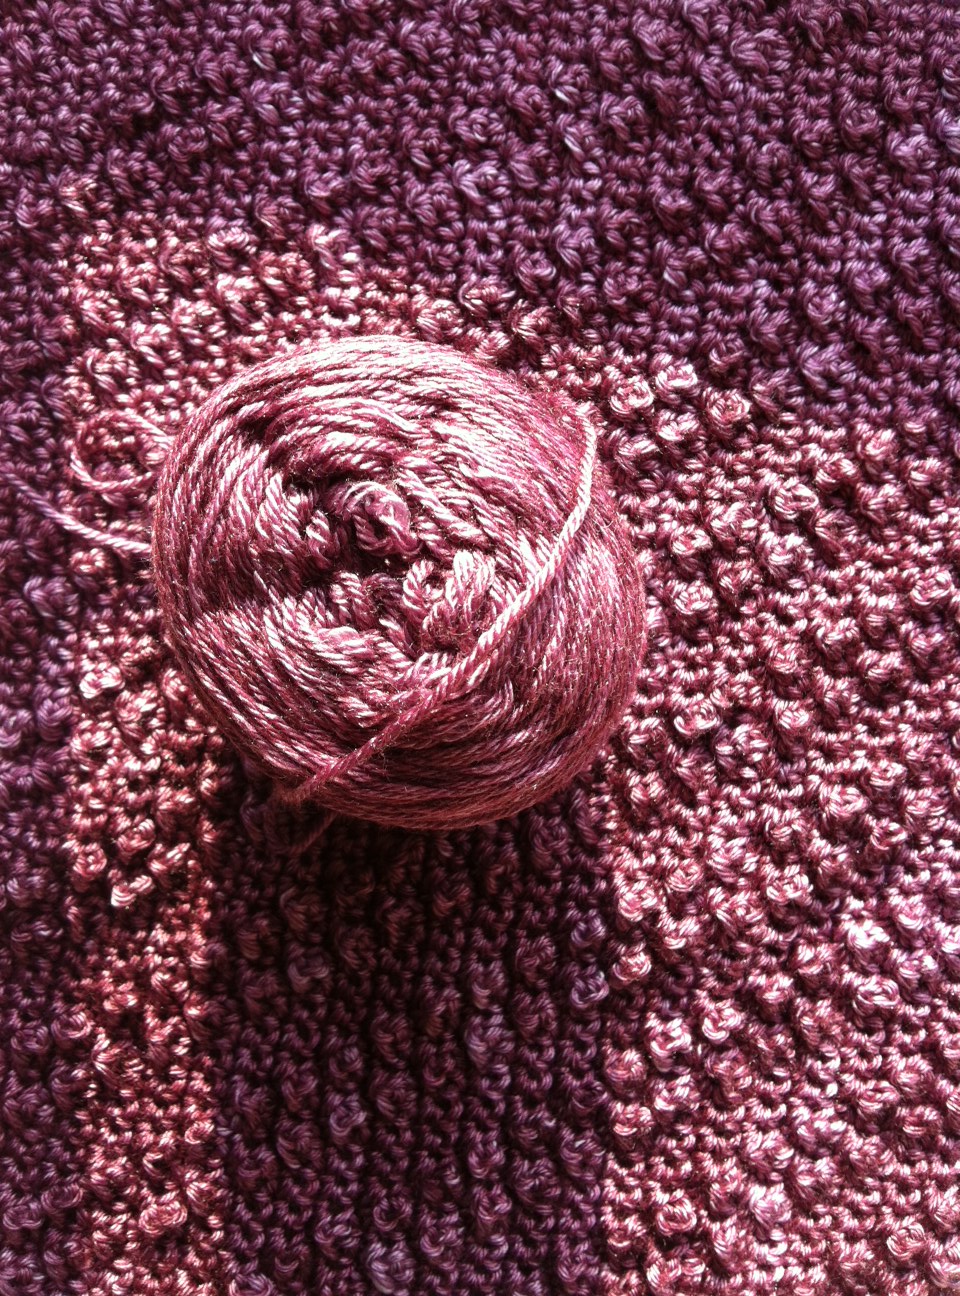
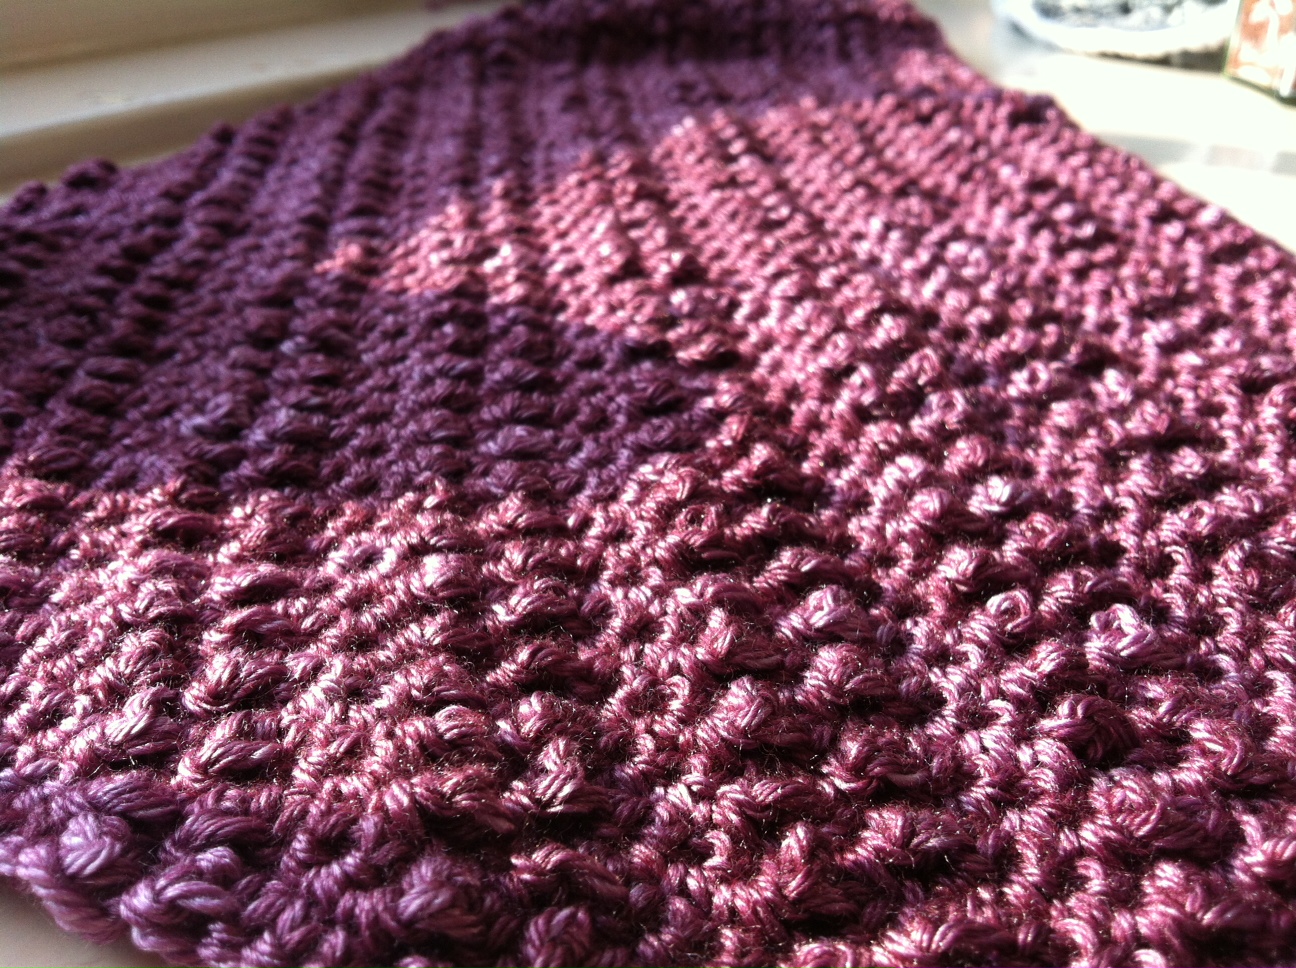
I am very excited to share another pattern with you, this time a shawl I have named “Uva” which means “grape” in Spanish. I just can’t help thinking of grapes when I look at it! This shawl uses just two stitches, dc and dtr, and it is so easy to make. I used Ginger’s Hand Dyed Splendor in Wine O’Clock (read about this yarn here) and I just love the final result.

DSCN2559

I mentioned I would recommend other yarns for this pattern that are a bit more budget friendly (but if you can buy this yarn I definitely recommend it), you could really use any other 4ply yarn, and even a DK one would still be OK, but here are some recommendations for my UK readers:

Yeoman Yarns Sport 4 ply – This yarn is 100% merino wool sold in 400gr cones for a bit less than 20 pounds, I have used it in shawls and it is lovely, great stitch definition. You will have plenty leftover to make other things with it as well.

Wendy Merino 4ply: This is a very nice yarn and it is sold in 50gr balls so that you can just get what you need for this project.

King Cole Merino Blend 4 ply: I used this yarn for my fingerless mitts and I think it is quite good for the price. You can buy it in balls or cones and some stores like Ginger Twist Studio sell them by weight (multiples of 50g) so that you can get just what you need.

Hope that helps 😉 And here is the pattern!

DSCN2547

Uva Shawl Pattern

This pattern has an increase section and a decrease section. Basically you are working the shawl sideways: you start on one end of the shawl with very few stitches and increase every two rows until you get to the middle section, then start decreasing until you have very few stitches again and get to the other end of the shawl.

The shawl measures 140cm long and it is 36cm at the widest part. Gauge is not very important, because of the way the shawl is constructed you can simply work up until you have a bit over half the yarn leftover and then start decreasing. If you prefer to work according to gauge you can work the pattern (one row of the stitch pattern repeat explained below followed by one row of dc). With a 3.5mm hook and 4ply yarn you should get 20 st and 22 rows in 10cmx10cm.

Materials

2 x 100g skeins Ginger’s Hand Dyed Splendor 4ply in Wine O’Clock (used 160gr/640m). See above for other yarn options.

3.5mm hook

Needle to weave in ends

Abbreviations

ch – chain

dc – UK double crochet

dtr – UK double treble

Stitch Guide

UK double treble: yarn over hook twice, insert hook in stitch, yarn over and pull up a loop, (yarn over pull through 2 loops on hook) 3 times.

dc2tog: insert hook in stitch, yarn over and pull up a loop, insert hook in next stitch, yarn over and pull up a loop, yarn over and pull through 3 loops on hook.

DSCN2572

Tip for an easier way to follow the pattern: 

Imagen 4This pattern is very simple an easy to follow without thinking about it much or counting the stitches in each row. The instructions are below and you can just follow each line all the way through the many rows but I thought I would share an easy way to do this pattern that you would find out eventually but why not save you some time!

Ok so, this pattern starts with an increase section and finishes with a decrease section. I will explain it for the increase one since it comes first and after understanding that one the decrease will come easy to you. When you are in the increase section yo do a row of the stitch pattern (let’s call that to the rows that have the little bobbles), followed by a row of dc in every stitch all the way until the last st where you do two dc, therefore you increase 1dc every two rows.

Now, the rows with the stitch pattern (with the bobbles) are very easy to do without thinking about them because there are no increases or decreases, and no matter in what part of the shawl you are a stitch pattern row will be a repeat of 6 stitches with just a couple of things to bear in mind.

Let’s see the 6 stitches: dtr, dc, dtr, dc, dc, dc (or dtr, dc, dtr, 3dc). Now imagine you are in ANY row where you do the stitch pattern repeat: You always ch 1 and dc in first st. Now start your 6-stitch-repeat (dtr, dc, dtr, 3dc) all the way until you get to the last st. No matter in what part of the 6-stitch-repeat you ended up, dc in the last dc and turn for the next row (which in the increase section will be an increase row and in the decrease section will be a decrease row). So that is all: dc in first st, dc in last st, and fill the space in between with as many repeats of the 6-stitch-repeat as you can fit, no matter if the last repeat is not a full one.

So let’s put it in practice so that you see how easy it is. Let’s say you are in Row 18 so you have just finished an increase row that left you with 11 sts to work.

So ch 1, dc in first st, start with the 6-stitch-repeat and stop when you have one stitch left: you do the repeat once, then start the second one: dtr, dc, dtr…. and then you have only one st left, so you stop the repeat and do a dc.

This is for EVERY stitch pattern row, even for the decrease section. In this section the only difference is that you do a decrease row instead of an increase row, meaning that you dc all the way through until the last two stitches, where you do a dc2tog.

I would advise you start following the pattern until Row 11 and then try this tip to continue working your shawl.

Notes

  • Beginning chain does not count as a st.
  • Turn your work after each row.
  • It doesn’t really matter if you chain 1 and then turn, or turn and chain 1. See what you like best and go with that.
  • Stitch number at end of row instruction corresponds to number of sts in that row. If this doesn’t appear in the row it means it has the same number of sts as the last one.

uva1

Instructions

Increase section
Ch4.

Row 1: dc in second ch from hook, 2dc. Turn (3 st).

Row 2: ch 1, 3dc. Turn.

Row 3: ch 1, 2dc, 2dc in last dc. Turn (4st).

Row 4: ch 1, dc in first dc, dtr, 2dc. Turn.

Row 5: ch 1, 3dc, 2dc in last dc. Turn (5st).

Row 6: ch 1, dc in first dc, (dtr, dc) two times, dc. Turn.

Row 7: ch 1, 4dc, 2dc in last dc. Turn (6st).

Row 8: ch 1, dc in first dc, (dtr, dc) two times, dc. Turn.

Row 9: ch 1, 5dc, 2dc in last dc. Turn (7st).

Row 10: ch 1, dc in first dc, (dtr, dc) two times, 2dc. Turn.

Row 11: ch 1, 6dc, 2dc in last dc. Turn (8st).

Row 12: ch 1, dc in first dc, (dtr, dc) two times, 3dc. Turn.

Row 13: ch 1, 7dc, 2dc in last dc. Turn (9st).

Row 14: ch 1, dc in first dc, (dtr, dc) two times, 2dc, dtr, dc. Turn.

Row 15: ch 1, 8dc, 2dc in last dc. Turn (10st).

Row 16: ch 1, dc in first dc, (dtr, dc) two times, 2dc, dtr, 2dc. Turn.

Row 17: ch 1, 9dc, 2dc in last dc. Turn (11st).

Row 18: ch 1, dc in first dc, (dtr, dc) two times, 2dc, (dtr, dc) two times. Turn.

Row 19: ch 1, 10dc, 2dc in last dc. Turn (12st).

Row 20: ch 1, dc in first dc, (dtr, dc) two times, 2dc, (dtr, dc) two times, dc. Turn.

Row 21: ch 1, 11dc, 2dc in last dc. Turn (13st).

Row 22: ch 1, dc in first dc, (dtr, dc) two times, 2dc, (dtr, dc) two times, 2dc. Turn.

Row 23: ch 1, 12dc, 2dc in last dc. Turn (14st).

Row 24: ch 1, dc in first dc; *dtr, dc, dtr, 3dc, rep from * until last st, dc in last dc. Turn.

Row 25: ch 1, dc in each st across until last st, 2dc in last dc. Turn (15st)

Row 26: ch 1, dc in first dc; *dtr, dc, dtr, 3dc, rep from * until last 2 st, dtr, dc in last dc. Turn.

Row 27: ch 1, dc in each st across until last st, 2dc in last dc. Turn (16st)

Row 28: ch 1, dc in first dc; *dtr, dc, dtr, 3dc, rep from * until last 3 st, dtr, 2dc. Turn.

Row 29: ch 1, dc in each st across until last st, 2dc in last dc. Turn (17st)

Row 30: ch 1, dc in first dc; *dtr, dc, dtr, 3dc, rep from * until last 4 st, (dtr, dc) two times. Turn.

Row 31: ch 1, dc in each st across until last st, 2dc in last dc. Turn (18st)

Row 32: ch 1, dc in first dc; *dtr, dc, dtr, 3dc, rep from * until last 5 st, (dtr, dc) two times, dc in last dc. Turn.

Row 33: ch 1, dc in each st across until last st, 2dc in last dc. Turn (19st)

Row 34: ch 1, dc in first dc; *dtr, dc, dtr, 3dc, rep from * across. Turn.

Row 35: ch 1, dc in each st across until last st, 2dc in last dc. Turn (20st)

Repeat Rows 24 to 35 (twelve rows) nine times. You will have 143 rows in total and 74 sts in Row 143.

Row 144: ch 1, dc in first dc; *dtr, dc, dtr, 3dc, rep from * until last st, dc in last dc. Turn.

Row 145: ch 1, dc in each st across until last st, 2dc in last dc. Turn (75st)

Row 146: ch 1, dc in first dc; *dtr, dc, dtr, 3dc, rep from * until last 2 st, dtr, dc in last dc. Turn.

Row 147: ch 1, dc in each st across until last st, 2dc in last dc. Turn (76st)

Row 148: ch 1, dc in first dc; *dtr, dc, dtr, 3dc, rep from * until last 3 st, dtr, 2dc. Turn.

Row 149: ch 1, dc in each st across. Turn (76st)


Decrease Section

Row 1: ch 1, dc in first dc; *dtr, dc, dtr, 3dc, rep from * until last 3 st, dtr, 2dc. Turn.

Row 2: ch 1, dc in each st across until last st, dc2tog in last two st. Turn (75st).

Row 3: ch 1, dc in first dc; *dtr, dc, dtr, 3dc, rep from * until last 2 st, dtr, dc in last dc. Turn.

Row 4: ch 1, dc in each st across until last st, dc2tog in last two st. Turn (74st).

Row 5: ch 1, dc in first dc; *dtr, dc, dtr, 3dc, rep from * until last st, dc in last dc.

Row 6: ch 1, dc in each st across until last st, dc2tog in last two st. Turn (73st).

Row 7: ch 1, dc in first dc; *dtr, dc, dtr, 3dc, rep from * across. Turn.

Row 8: ch 1, dc in each st across until last st, dc2tog in last two st. Turn (72st).

Row 9: ch 1, dc in first dc; *dtr, dc, dtr, 3dc, rep from * until last 5 st, (dtr, dc) two times, dc in last dc. Turn.

Row 10: ch 1, dc in each st across until last st, dc2tog in last two st. Turn (71st).

Row 11: ch 1, dc in first dc; *dtr, dc, dtr, 3dc, rep from * until last 4 st, (dtr, dc) two times. Turn.

Row 12: ch 1, dc in each st across until last st, dc2tog in last two st. Turn (70st).

Repeat Rows 1 to 12 nine times, you will have 120 rows in total and will finish Row 120 with 16 st.

Row 121: ch 1, dc in first dc; *dtr, dc, dtr, 3dc, rep from * until last 3 st, dtr, 2dc. Turn.

Row 122: ch 1, dc in each st across until last st, dc2tog in last two st. Turn (15st).

Row 123: ch 1, dc in first dc; *dtr, dc, dtr, 3dc, rep from * until last 2 st, dtr, dc in last dc. Turn.

Row 124: ch 1, dc in each st across until last st, dc2tog in last two st. Turn (14st).

Row 125: ch 1, dc in first dc; *dtr, dc, dtr, 3dc, rep from * until last st, dc in last dc. Turn.

Row 126: ch 1, dc in each st across until last st, dc2tog in last two st. Turn (13st).

Row 127: ch 1, dc in first dc, (dtr, dc) two times, 2dc, (dtr, dc) two times, 2dc. Turn.

Row 128: ch 1, dc in each st across until last st, dc2tog in last two st. Turn (12st).

Row 129: ch 1, dc in first dc, (dtr, dc) two times, 2dc, (dtr, dc) two times, dc. Turn.

Row 130: ch 1, dc in each st across until last st, dc2tog in last two st. Turn (11st).

Row 131: ch 1, dc in first dc, (dtr, dc) two times, 2dc, (dtr, dc) two times. Turn.

Row 132: ch 1, dc in each st across until last st, dc2tog in last two st. Turn (10st).

Row 133: ch 1, dc in first dc, (dtr, dc) two times, 2dc, dtr, 2dc. Turn.

Row 134: ch 1, dc in each st across until last st, dc2tog in last two st. Turn (9st).

Row 135: ch 1, dc in first dc, (dtr, dc) two times, 2dc, dtr, dc. Turn.

Row 136: ch 1, dc in each st across until last st, dc2tog in last two st. Turn (8st).

Row 137: ch 1, dc in first dc, (dtr, dc) two times, 3dc. Turn.

Row 138: ch 1, dc in each st across until last st, dc2tog in last two st. Turn (7st).

Row 139: ch 1, dc in first dc, (dtr, dc) two times, 2dc. Turn.

Row 140: ch 1, dc in each st across until last st, dc2tog in last two st. Turn (6st).

Row 141: ch 1, dc in first dc, (dtr, dc) two times, dc. Turn.

Row 142: ch 1, dc in each st across until last st, dc2tog in last two st. Turn (5st).

Row 143: ch 1, dc in first dc, (dtr, dc) two times, dc. Turn.

Row 144: ch 1, dc in each st across until last st, dc2tog in last two st. Turn (4st).

Row 145: ch 1, dc in first dc, dtr, 2dc. Turn.

Row 146: ch 1, dc in each st across until last st, dc2tog in last two st. Turn (3st).

Row 147: ch 1, 3dc. Turn.

Row 148: ch 1, dc in first dc, dc2tog in last two st. (2st).

Don’t cut yarn.


Edging 

With right side of shawl facing you, turn to work on bottom edge of the shawl.

Row 1: ch 1, 1dc per row until middle of the shawl (Row 149), 3dc, 1dc per row until the end. Turn (301 sts). Don’t worry too much about where you do the dc and it is fine if you miss a row at some point, try to get the amount of stitches required to get the edge to match up better, though it is not the end of the world if it doesn’t 😉

Row 2: ch 1, *(dc, ch3, dc) in next st, skip 1dc, 3dc, repeat from * until last st, (dc, ch 3, dc) in last st.

Fasten off.

Block lightly (steam block or pin it to the size you want, spray it with some water and let it dry).


As usual, please let me know if you have any questions, hope you like it!

x

Sol

My custom-fit vest with Dora: Materials

custom-fit-tunisian-crochet-600x284

Hello! Hope you are all doing great 🙂 Today I wanted to start a series of posts about this new class I am taking on Craftsy. If you haven’t heard of Craftsy before go to my Craftsy Fair Isle Class Review for more information. After taking that class I was completely hooked with online classes so I decided to take advantage of another one of their sales and buy a new one: Custom Fit Tunisan Crochet by Dora Ohrenstein.

The whole idea of this class is to teach you how to adapt patterns to your size, especially something like a sweater. It includes the pattern for the vest on the picture above and the instructor takes you through the process of making sure that the final piece fits you just like you wanted, which could of course mean giving more ease to the pattern in certain areas and less in others.

This is such a great topic for a class, I can’t believe I haven’t seen more of these before. Who hasn’t looked at a pattern for a garment and realised that your size isn’t in the pattern? I am a petite size, it is quite difficult to find clothes let alone patterns that fit my measures so I am very excited about this class and have decided to take you, my lovely readers, through my learning process. At the end of it we will see if it worked for me or not. I have to say, if it does work, I will be forever grateful.

Now, this class is for a tunisian pattern, but don’t fear! First, the instructor does dedicate a few lessons to the basic stitches, increasing, decreasing, and everything you need for the pattern. Second, from what I have seen so far, the process she teaches to adapt a pattern can be applied to regular crochet as well, especially patterns that work with simple stitches such as dc, hdc and tr, where increasing and decreasing more or less than what the pattern calls for is easy and won’t change the look of the final piece. It might be a bit trickier for patterns that use a stitch-repeat of a certain number of stitches, but it could still work in theory.

So in this first post I would like to share with you the materials I have purchased for my vest. I will start with the yarn, the pattern calls for a worsted weight and the only one I know that I can find in the UK is the Cascade 220 Superwash. This is such a squishy yarn, I love it… I decided to get two colours and add stripes to the vest in a berry and light grey colour.

dora2

I also decided to treat myself to some new tunisian crochet hooks. For this project you should be able use the long 30cm hooks with a stopper, but the instructor showed a few options in the lessons and I fell in love with these Knit Pro Interchangeable Tunisian Hooks.

dora3

dora4


There are a few of reasons why I decided to invest on them, since they are not cheap. First, they are beautiful wooden coloured hooks! I believe Knit Pro sells a cheaper option for interchangeable tunisian hooks but I just loved these. Second, I have a shoulder problem and the long hooks always made one of my shoulders ache since it can become quite heavy to handle. These hooks are light and short so when you are using them only a few stitches will be on your hook and the cord will hold the rest. Finally, there are many different lengths for cords, up to 2 meters, so I am no longer limited by the amount of stitches I can fit in without the risk of starting to loose them.

So now that I have all my materials ready I will continue with the class and keep you updated on my progress so that you can see how the vest is turning out. Hopefully it will fit perfectly once I’m finished, fingers crossed!

x

Sol


Books in my journey

Hello my dear readers! I am enjoying this Saturday very much, it is sunny outside after a lot of rain, my shawl is being blocked as I write (so excited!), I bought a lovely tea from Eteaket that is just sooo nice and I am looking forward to an evening of relaxing and catching up with shows (anyone else caught up with Outlander? Episode 3 here I come!).

I wanted to talk about books today and share which ones have been useful to me in this crochet journey of mine. In a world that is getting more and more digitalised it is hard to hold on to paper books sometimes, but not all books are digital so I still use paper books to learn about new techniques or use as reference. I will do another post with online resources I use for crochet (including ebooks), specifically for finding crochet stitches so keep an eye out for it if you are interested.

Before I get on to it I just want to mention that I got access to all these books (except one) through my local library, so make sure you check your library to see what they have in their catalogue.

The first book I want to mention is Crochet Stitches Visual Encyclopedia, by Robyn Chachula.

9781118171653

If you don’t have a crochet stitches dictionary I really recommend this one, books like this really open up a world of possibilities for new projects. When I first got it I used to try stitches out by making a cowl with the ones I liked, a simple and easy project that allows you to see how the stitch feels and looks and that you can actually wear after you are done. I like this book because it has loads of lovely stitches, it is organised into clear chapters (including one for tunisian crochet stitches), the instructions are clear and you get a chart for each stitch as well. You also get granny squares, motifs and edgings so you are covered for all crochet stitch necessities!

Next, as you may have guessed, I have a tunisian crochet book: Tunisian Crochet: The look of knitting with the ease of crocheting by Sharon Hernes Silverman. This was the book that first introduced me to this technique. I was browsing in the crafts section of my library when I saw the title and was instantly intrigued: the look of knitting but without the hassle of knitting? You may disagree completely with me but I have always found crochet easier than knitting, and a lot more forgiving with mistakes as well. I do like how knitting looks so this sounded like the perfect combination and it is! If you follow my blog you know I love tunisian crochet and it was this book that taught me how to do it (plus a few youtube videos here and there). It also includes patterns for projects, and even though I didn’t like them all, my first ever tunisan crochet project was a lovely cushion from this book. So if you find this in your library catalogue I would recommend you take a look.

My other current obsession at the moment is fair isle crochet. Even though I haven’t found any books for this technique with crochet you don’t really need them with all the great books for fair isle knitting. The principle is the same: create a chart and knit it or crochet it, so if you are looking to create your own charts to crochet I would recommend the following:


scandinavian

fair isle designs

colourwork stitches

They all have loads of different charts that you can mix and adapt and they also show knitted swatches of each. I particularly like the first one, 150 Scandinavian Knitting Designs by Mary Jane Mucklestone, it has some lovely charts to play with.

So there you have it! Hope you find it useful and that you find some of these in your local library, go have a nosey 🙂

Now that the shawl is finished I will post the pattern for it soon, I will also post about this new Craftsy class I am taking and the lovely yarn and hooks I bought because of it!

Have a great weekend 😀

x

Sol


Craftsy Class Review: Fair Isle Crochet

Imagen 3

Hello there! How’s autumn (or spring) treating you? I think I am still in denial and have refused to turn the heating on yet but I know the time will come sooner rather than later. As I mentioned in my journey update  I want to do some reviews for you of online classes and books I have found useful and I will begin with the first online class I took called “Fair Isle Crochet”.

Before I get on with the review I would like to make clear that I have not been sponsored by Craftsy (trust me I am not that popular), I bought this class with my own money and the opinions written here are my own. So first, if you haven’t heard of Craftsy they offer online classes of various things such as knitting, crocheting, cooking, sewing, gardening, cooking, quilting and much more. The videos are available on any device you want, in HD quality and you can keep them forever, there is an app for iPad and iPhones and you can even watch the class offline. You will get your list of materials and patterns needed for the class to download and then you are ready to go. You should note that Craftsy is US based so their patterns will be in US terms.

First, I really liked the quality of Craftsy classes. Videos are in good quality, you can slow them down, make notes on the video, ask questions to the instructor, join discussions and share your projects. If I had an iPad I would find the app very useful, wouldn’t really watch the videos on my phone but maybe some of you would like that.

full_8155_174592_FairIsleTrivet_4

The class was Fair Isle Crochet by Karen Whoolie and covered the following: introduction to fair isle crochet, reading charts and working fair isle crochet. After this you are talked through 3 patterns using this technique: a shawl, a trivet and a hat.

The first three lessons teach you about this technique and how to work it, and I learned some really good things such as how to keep your designs from leaning, how to get nice floats, what type of stitch is good to use for fair isle, how to change colours and I specially loved the way she weaves in ends, which applies to any crochet project and not just fair isle. The instructor is very clear in her explanations and I think someone that has never done fair isle before could follow it with no problem.

The only thing I didn’t like is her way of getting a reversible fair isle fabric with clean colour changes and no leaning of the design. I was quite excited to learn how she would achieve this because it is something I have always wondered and only have been able to do it in the round. If you are working flat once you turn your work around the designs look a bit distorted unless they are big shapes, anything more intricate gets a bit lost. She does achieve this but her method is so painfully slow and it leaves a million ends to weave in so I was a bit disappointed. It is fine for a trivet and she does explain how to make it easier to hide the ends but I just wouldn’t use her technique in a project because I would get bored very quickly. Otherwise, I really enjoyed the first three lessons to apply them for projects in the round.

full_6729_174591_PoetShawl_1

Finally there were the projects. Of course not everyone is going to like all the patterns but they each teach you a bit more about how to work fair isle. The only one I would do for myself would be the hat, but I still enjoyed seeing the lessons for the other projects and seeing the technique in action.

Overall, I recommend this class to anyone interested in learning fair isle crochet, if you already know the basic technique then maybe you should see if you like the patterns and decide if it’s worth it for you. The class costs £25 full price but to be honest I wouldn’t have bought it at that price. They do sales VERY often and got mine at £9.50 which is very reasonable for the content and three patterns. 

Hope that was useful 😉 I just started another class on Craftsy about tunisian crochet so stay tuned because this time I am going to share my learning experience with you guys step by step… more soon!

x

Sol


Interweave Crochet Magazine at only US$1.99

inter

Hi everyone! I just wanted to write up a quick post because I just found out that Interweave Store is doing a sale for their digital magazines at only US$1.99 per issue. If you don’t know Interweave magazines they are very popular in the United States and they not only have crochet but many other types of crafts.

I have seen many of their patters in Ravelry and have been thinking of buying an issue but I am not fond of digital magazines. Of course at only US$1.99 I can’t really complain! I just bought two winter issues of Interweave Crochet (2013 and 2014) and after a quick look I can tell you a few things:

– It doesn’t look like there are many beginner patterns, loads of garments and nice shawls so if you are looking to move into these kind of projects then it looks like this magazine could offer some possibilities for you.

– There are quite a few tunisian crochet patterns! As you may know I LOVE tunisian crochet so thumbs up for this magazine in that respect.

– In each issue there is a technique tutorial, in one it was for tunisian cables and the other one on how to construct mittens and adapt to sizes, quite interesting!

So at first glance there are some beautiful patterns in this magazine and hope to try one out soon, go check them out here if you are interested! (Offer ends 30th September)

x

Sol


A journey update

shawl

Hello everyone! I wanted to keep you updated on what I have been working on lately and share some ideas of posts to come. I am still working on my shawl pattern, not long to go to show you the final result and I am writing the pattern as I go so shouldn’t be that long to have it up on the blog for you guys. I am sharing some pictures of the progress, really loving this pattern so far!


shawl 4

shawl1

I also started working on a pair of mittens that I found by Bianca Boonstra on the last issue of Inside Crochet. I am using that Jawoll yarn I bought in the Edinburgh Yarn Crawl, I think I am doing the tip on the mustard colour and the rest in the nice pink/purple one.

mitt1

I am also in the lookout for at least a couple of hats for this winter. I have thought of designing a nice fair isle beanie but I am not sure… it might take a while and I may need it sooner rather than later! So I have been looking for patterns on Ravelry and I am still deciding between a few. There is the beautiful Knarled Bark Hat by Joanne Scrace which has a very autumn look to it, the Pizzelle Beret by Linda Permann with those stunning cables or the oh so cute Molly Hat by Claire Montgomerie. I can also give another try to the Phoenix Hat by Aoibhe Ni since the one I finished fits like two heads inside.

Knarled Bark by Joanne Scrace


Pizzelle Beret by
Pizzelle Beret by Linda Permann
Molly Hat by Claire Montgomerie
Phoenix Hat by Aoibhe Ni

Hard to decide! So that is what I have been up to lately, I am also just finishing a Craftsy class about fair isle crochet (which I started months ago) and would like to do a review for you guys. I am buying Inside Crochet every month lately so might do a favourites of the month post and I would also like to share some useful books to help you find stitches or inspiration. Hope that is OK with everyone 😉

Stay tuned!

x

Sol

Creative Blog Hop

Hello! Hope you are having a nice Sunday, I have finally finished all my house chores and have sat down for a lazy evening. As I mentioned in my last post, I was nominated on Jess’s blog for the Creative Blog Hop, it is basically four questions you need to answer about your creative process which in my case is designing crochet patterns. So here it goes!

What am I working on?

Sneak peak of my latest pattern in progress!

I am currently working on a new pattern for a shawl in Ginger’s Hand Dyed Splendor 4 ply. This is definitely the most luxurious yarn I have ever worked with and because the yarn is so amazing by itself I decided to make a really simple pattern with it. It has been so relaxing to crochet without counting or following a chart! I am also doing a swatch for a pair of mittens I liked in the last issue of Inside Crochet. I definitely want to get some more mittens and hats done before the (cold Scottish) winter comes.

How does my work differ from others of its genre?

I have consciously tried to create patterns that use techniques or stitches that are not very common or even known sometimes to people who crochet. I have been crocheting for many years and was getting a bit bored of it until I realised there was more to crochet than just a couple of stitches and granny squares (though I still love granny blankets and have one in progress). I wanted something different, a bit more challenging and refreshing. First I discovered tunisian crochet and fell in love with the fabric that it creates, and later on I decided to dive into colourwork simply because I wanted to try fair isle and I can’t knit even if my life depended on it. So I guess my work differs from others in the sense that it challenges what you think crochet can and can’t do, if that makes any sense? 😛

Why do I create what I do?

I started creating patterns as a personal challenge to be a bit more creative and less… structured, logical and well, less the engineer I am by profession. I wanted to see if I had it in me to create something from scratch, from idea to pattern to sample. It has always been really hard for me, in any aspect of life, to be creative. Well it turns out I am now an structured, logical engineer that can design patterns. We are who we are, but I have learned we can always be more and better. That is why I started designing patterns but the reason why I keep on doing it is simply because it makes me happy. I struggle most of the time, it takes forever to finish and I could definitely finish more projects if I just followed other designers patterns all the time, but that won’t make me feel the joy I feel when I share a pattern with the world and contribute to an amazing community of crafters, makers and creators.

How does my creative process work?

I usually start with the yarn: I have a big stash so have been wanting to get rid of some and save money (which of course hasn’t  happened). After the yarn comes the research to find stitches and techniques, I go and get books from my local library and search online as well. I really enjoy this part of the process but it can take quite some time! For any pattern I will have in my head the feeling and type of project I want for that yarn (is it lacy or textured, does it go around the neck, or my hands, etc.), so as I go through stitches something eventually clicks into place and I can see the final project. Then comes the shaping, which is supposed to be just math but I have to say years of calculus and algebra doesn’t mean you get it right the first time around! After a few attempts I have a sample, then I write down the pattern and wait for you guys to point out all my mistakes 😛 It doesn’t always start with the yarn though, for the pattern I am working on right now it started with a stitch I fell in love with and the shawl just came to my head.


That was really fun to answer 🙂 This is the part where I nominate people to do this but I don’t know who! I don’t know many bloggers… does it have to be someone you know? I am not sure… Feeling really dumb right now but if you create anything (doesn’t have to be crochet), please welcome to nominate yourself by me, you can even let me know and I can make it official!

Thanks for stopping by, I will post a “journey update” in the week with what I have been working on lately.

Cheers!

x

Sol