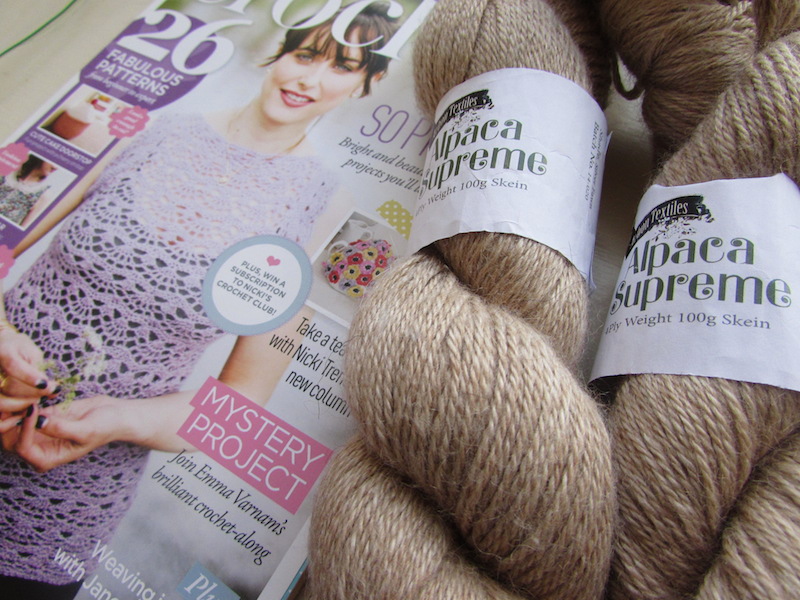
Hello everyone, how are you? I thought it would be good to start the month by sharing what has been on my hook lately and what I plan to start soon as well. I have so many projects I want to work on (and so much yarn waiting to be used), particularly all the summer garments that are on my queue since I want them finished by those two weeks in July that are called “summer” in Scotland.
First, I thought I should show you how my Freyja shawl is coming along. Last time you saw it I was starting my repeats and I am afraid there is still long to go. This shawl is beautiful but oh dear how much time it takes! I am about a third of the way but hope to finish it this month, have some travelling to do for work next week and have decided to bring this project along to make sure I work on it.
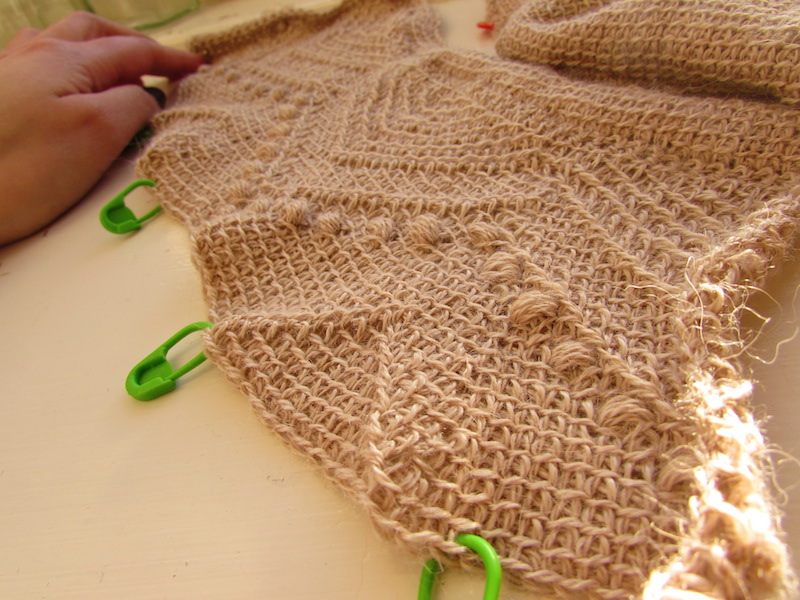
What has been taking most of my crochet time is this awesome Lorelei Pullover by Dora Ohrenstein. It appears in a tunisian crochet book by Dora called The New Tunisian Crochet: Contemporary Designs from Time Honoured Traditions, it is a great book for learning new stitches in tunisian crochet but unfortunately the patterns didn’t really catch my eye, except for this one. I knew I had to make this as soon as I saw it, and after I found the perfect yarn for it it wasn’t long until this was on my hook.
The yarn I am using is Ginger’s Hand Dyed Swanky Lace which is a beautiful blend of 70% baby alpaca, 20% silk and 10% cashmere in the colour Girl on Fire. This is the most luxurious yarn I have ever worked with, Jess has a great eye for colour and this one is no exception: it is just beautiful. It is definitely more on the bright side of what I usually wear but the colour suits me (after doing a quick poll in the shop) and since it is a summery item I think that is the best bet to go a bit more colourful.
The stitch pattern for this pullover was adapted by Dora from a vintage magazine, and it is very special and unique. As you may have noticed I love working on things that don’t look like crochet at first sight, and this definitely fits the bill. Gauge is tricky since the length of the stitches are determined by how much you pull that loop in each stitch, and it can vary a lot. Halfway through I realised that even though my swatch had a very loose row gauge I was now crocheting a lot tighter, so I am having to add a few more rows to make sure it is not too small.
This is also a project where you can see the magic of blocking. It makes SUCH a difference, from an uneven fabric with a huge bias to beautiful and drapey. It is hard to see how it fits before blocking so I am just trusting that it will all work out in the end, a bit of crochet faith!
So that is what is on my hook just now, very proud to have only two projects on. I am eager to start more and so I will start swatching soon for my next garment to make sure I can start as soon as I finish one of these two WIPs (definitely the pullover). Here is a sneak peak at what I will be working on next!
What are you guys working on? Let me know in the comments!
I have been so overwhelmed this last week by the response to my Moroccan tote pattern that had to write a post to say a simple but huge: THANK YOU!
I enjoyed so much while working on this design, as those of you who follow my blog may know this project was my companion through many train journeys as I travelled for work at the beginning of the year. That gold colour really did brighten up my mood every time I worked on it, isn’t it stunning?
I could not have predicted though what the response to the pattern would be and I just wanted to let you know how happy it makes me to know that I have inspired you or brighten up your own day as a result. I couldn’t find a better motivation to keep designing than that.
Thank so much to all of you who have stopped by, favourited or left a comment to let me know how much you liked the pattern. I am eager to see your projects and how your totes come to life so please post them on Ravelry or send me an email with your pictures.
I had a busy week at work so I will start catching up with the blog again now, I have some WIPs to share with you, news and events and some more summer crochet top patterns for you to check out. Will be back soon!
I know, it was so long ago when I first shared my Moroccan tote and promised to write a pattern for it. Life has been busy as usual and I have been focusing more on crocheting than designing lately since it was getting a bit too crazy: full-time job, blogging and pattern design weren’t leaving much time for anything else! So I took my time, posted a tutorial for the technique I used and now I can finally share the pattern with you. As usual, it is for free, but please refer back to me if you post it online or sell a finished product, including the chart which I created myself from the picture I used as inspiration.
Royal Design Studio Stencils
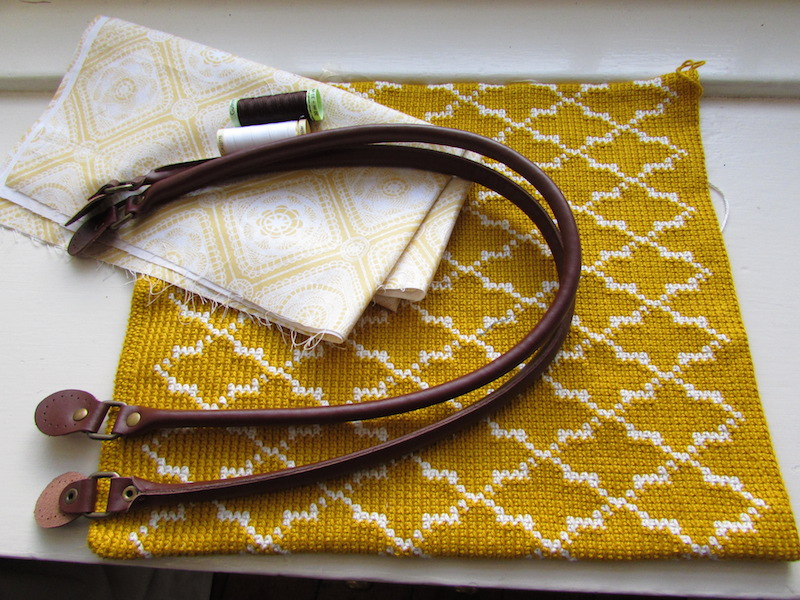
The pattern is for a tote and therefore it doesn’t have a big base for it. If you want it more as a handbag you can adapt the pattern to make the base bigger, just make sure you get a final count of stitches that is a multiple of 12, which is the stitch repeat for the pattern. I added leather handles, fabric lining and a magnetic clasp and I think those finishing touches really made the difference. You can find the handles and clasp I used here. The yarn is Cascade Ultra Pima, it has a beautiful shine to it which I really love and that gold colour is my favourite.
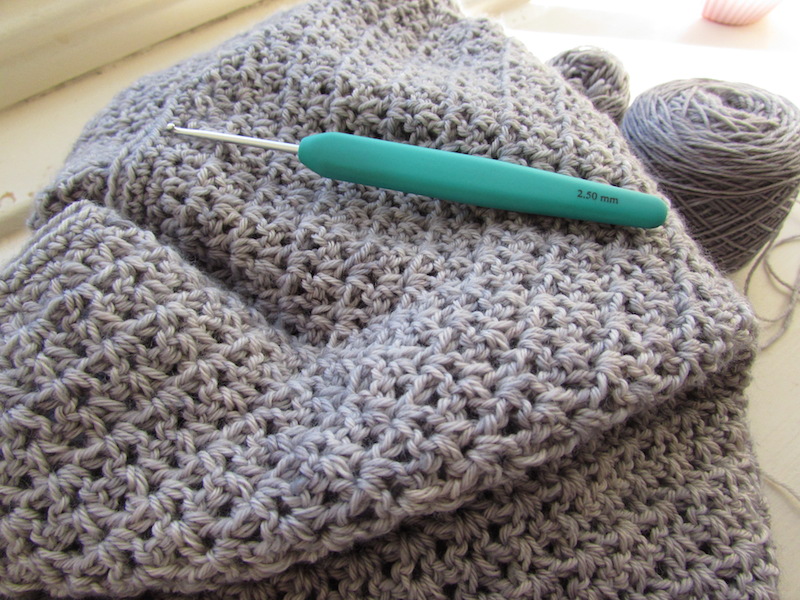
Before getting to the pattern I wanted to note that tapestry crochet can be tough on the hands. This bag is crocheted using a 2.5mm hook with a DK yarn, which is a lot smaller than what you would use for that yarn weight. If crocheting causes pain in your hands or wrists then please be aware that this pattern may be difficult for you, the stitches are very tight and you have to put more effort to get the yarn through so make sure you use a crochet hook that is comfortable for you. You could go up a hook size, but that will make the fabric a lot less dense and sturdy, which is what makes it good for a bag. It’s up to you, I just thought it would be good to make it clear from the start.
Moroccan tote pattern
This bag uses tapestry crochet to create a nice dense fabric for a small tote. A small base is crocheted first and then the rest of the bag is worked in a beautiful moroccan pattern. The bag is worked in spirals all the way through, meaning that you don’t join each round which eliminates that sometimes noticeable slip stitch. Leather handles and a fabric lining complete the pattern to create the perfect summer tote.
The tote measures 36cm x 30cm, with a gauge of 28 stitches and 22 rows in a 10cm square. You don’t have to get exact gauge, I prefer it tight like this since it creates a stiff fabric but see what works for you.
Materials
Cascade Ultra Pima DK, 2 skeins in Gold, 1 skein in Natural.
The base is not worked in tapestry crochet, I find it a bit difficult to carry the other colour inside for these first few rounds but you are welcome to try if you prefer a thicker base.
As I have mentioned before, the hook size and yarn weight for this pattern create a very tight fabric, which makes stitches a bit more difficult to work. I find the easiest way to work a dc when working with a small hook like this is to always work one loop at a time, meaning: insert hook on st, yarn over and pull a loop. Now instead of yarning over and pulling through the two loops in one step you can do the following: yarn over pull through one loop, and now pull that loop through the last loop on your hook.
Ch 79.
Round 1: dc in 2nd ch from hook, place marker in st just made, 76dc, 4dc in last ch, turn and start working on other side of chain, 76 dc, 3dc in same ch where you worked marked st. Don’ turn (160 st)
From here onwards you will work in spirals, meaning that you won´t join the last and first st of each round with a sl st. You will move your marker up each row to know which is the first st of each round. Also, you will never turn your work.
Round 2: 2dc in marked st (remember to move your marker up to the first dc of those two to mark the first st of this row), 76dc, *2dc in next st, repeat from * for next 3 st, 76dc, **2dc in next st, repeat from ** twice (168 st).
Round 3: dc in marked st, move marker up, dc in each st across (168 st).
Body
For the body of the bag you will work using tapestry crochet, meaning that you will always carry the unused colour inside your stitches, even if the round is only one colour (like Rounds 1 and 2). You will also continue to move your marker up to know where your round started and you will ALWAYS work in the back loop only.
Rounds 1 to 77:Follow chart from right to left for each round. Each square is a dc worked in the back loop only, if you don’t know how to change colours in each round check this tutorial. Remember to bring the marker up at the beginning of each round (marked st is St 1 in chart for each round), and to work in spirals without joining each round. I recommend marking the first st of the first round of the body, and using another st marker to move up each round, so that if you forget to move your marker up you can use that first marker to work your way up and know which one is the first stitch (you can tell I am talking by experience here!).
As indicated in chart, repeat Rounds 3 to 18 a total of four times and follow the top chart for Rounds 67 to 77. When finished, sl st to first st of last round.
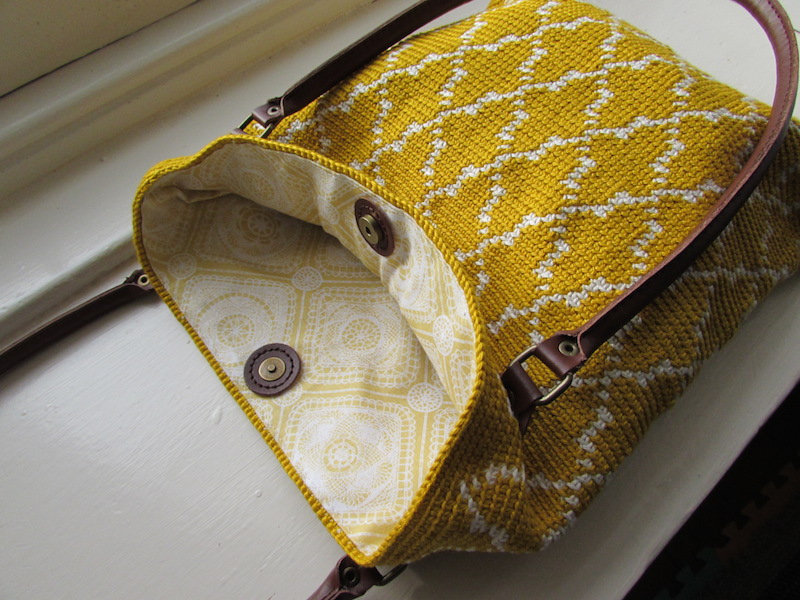
To create a lining I always follow this tutorial by Futuregirl, just omit the zipper part of the tutorial. Sew on the handles before sewing on the lining to hide the stitches, and use a strong thread for the handles. Finally, sew in the magnetic clasp.
And your tote is finished! Let me know if you have any questions,
I love finishing projects, especially now that I am on my handmade wardrobe journey and there is more chance I will actually wear my finished object (FO). The other great part of it is that you get to start another project and that is always such a joy.
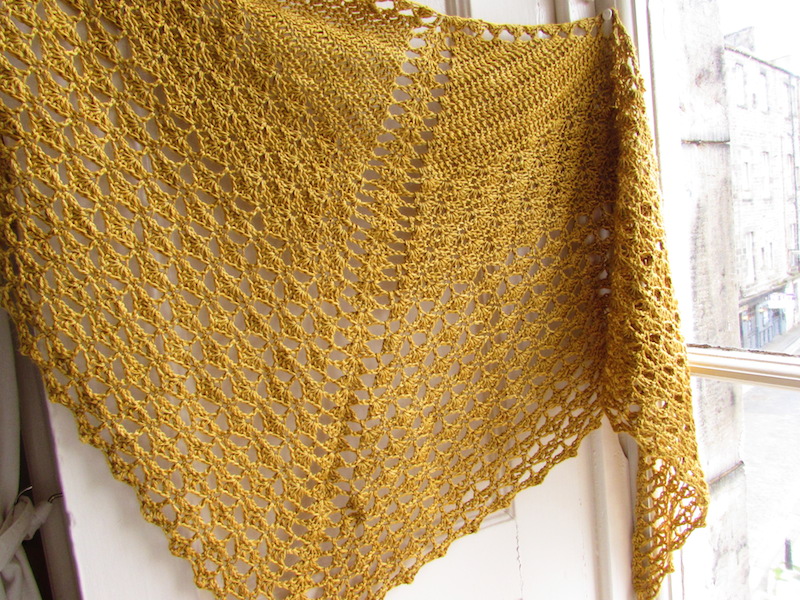
I made this shawl as part of the Crafts from the Cwtch Make-Along. The idea was to crochet or knit a shawl using a construction you hadn’t used before, which is such an awesome idea. Since I had been wanting to try one of the patterns from The Shawl Project by Joanne Scrace I though this was the perfect opportunity and started looking for which one to choose. I realised then that when it comes to crochet shawls, I haven’t really worked any of them that haven’t used tunisian crochet (weird right?) so any of them would be a new construction for me. So I decided to go with the one that first caught my attention after I bought the book, the Transposition shawl.
This shawl is worked from the centre-out and the pattern becomes more open as you work your way down. It is so gorgeous! I used Titus 4ply by Eden Cottage Yarns in the colour Marigold and I love this colour so much. Now, I had been wanting to try a yellow-gold-mustardy colour for ages now, but I always thought it wouldn’t go with my South American complexion. When I saw this yarn on Victoria’s Instagram feed though, I knew I had to try it. I figured that a shawl would be a smart way to see if the colour suited me and if it didn’t I could give it to someone as a gift. It turns out I can pull off this colour, yay! I see a gold cardigan in my future… 🙂
This pattern was so quick to make, it only uses one 100g skein of 4-ply yarn so you can use something a bit more luxurious without having to invest too much money in the project, I definitely recommend you try the pattern.
Have you finished anything recently? Would love to hear what you are working on 🙂
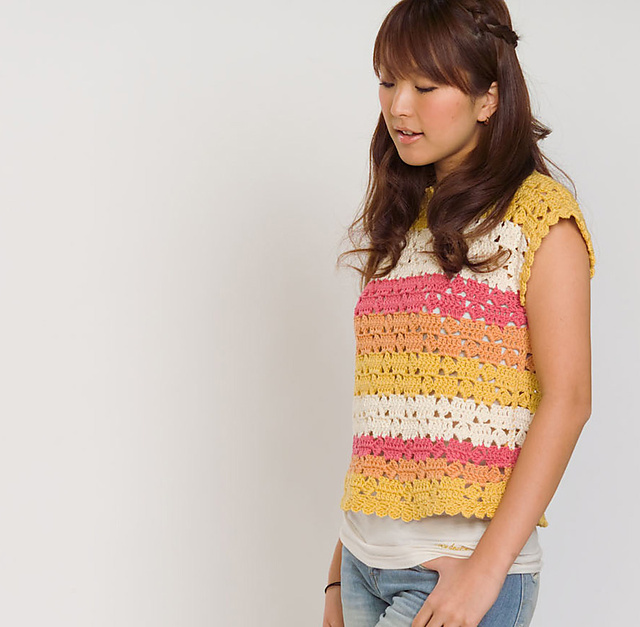
I listened to the latest episode of A Playful Day this week in which Kate was talking about her handmade wardrobe inspirations including a few patterns for knitted tops she was interested in making. I have been wanting to post about crochet patterns that have caught my eye in terms of wearability and I think summery crochet tops would be a great place to start since this would be a good time to begin your project if you want it ready for the summer months.
I went to look in my Ravelry library, searched some of my favourite designers and came up with a stupidly long list of patterns! I decided then to split it up into a couple of posts since I realised I had two categories of tops: lace crochet tops (which are back in fashion, yay!) and well… everything else 🙂
This post focuses on that first category: the lace crochet top, which I would say is what people think of when they hear “crochet top”: a very open design, maybe with some motifs that scream summer like nothing else. When I say lacy though, I don’t mean that it has to be worked with a lace-weight yarn or cotton thread, a few of the designs here use heavier yarns such as DK. What I mean is that it has a lace design which is so typically crochet and which I personally haven’t explored as much as I would like to.
I have chosen patterns, both free and paid, which celebrate this style of crochet top and which I think would fit great in my (and anyone’s) wardrobe. I prefer more loose and flowy tops than fitted ones and this style of top is usually worked with no waist shaping making not only quite straightforward for beginners but also suitable to many different body shapes.
I have not tried any of this patterns personally so as with any pattern I would advise to check projects and comments on Ravelry before running to buy yarn (don’t deny it!) since depending on the weight it could be a long project. Click on the pictures to see the pattern on Ravelry and let me know if you are thinking of giving a try to any of them. Personally I have long admired the Pond Ripples pattern but I am not a big fan of joining motifs!
Hello there! I am posting today to share a fun tutorial with you. Remember my Moroccan bag? Well the pattern is still in the works but I realised it would be very useful to create a tutorial for the crochet colourwork techniques I use in my patterns and then I can refer you to them whenever necessary.
I currently use two crochet colourwork techniques: stranded colourwork and tapestry crochet. Both techniques allow you to change between two (or more) colours in a single row and unlike knitting it doesn’t matter if your design has long colour changes. You can use these techniques to play with colour in any way you want but I particularly like to use them to create designs based on charts. For working with charts, UK double crochet (US single crochet) is a good stitch to use, since it is sort of like a small square. Also, for both techniques I work on the back loop only (BLO) since in my opinion it gives the best result.
My Moroccan bag pattern uses tapestry crochet
Stranded colourwork, as its name indicates, creates a fabric where the unused colour is carried at the back of the work as a strand (this is basically what you do for fair isle knitting). If you are working something like a hat or glove make sure your strands are quite short so that you don’t catch them with rings, hair pins, etc. I make my strands 3 stitches long maximum which works for me.
My Night to Day wrist warmers use stranded colourwork
With tapestry crochet the unused colour is carried inside the stitches, creating a bulkier and stiffer fabric, however I have seen beautiful blankets done with this technique so you can adapt it to your needs by changing hook sizes and yarn weights.I leave you with a photo tutorial for each of these techniques, as usual let me know if you have any questions and I hope to post the pattern for the Moroccan bag soon!
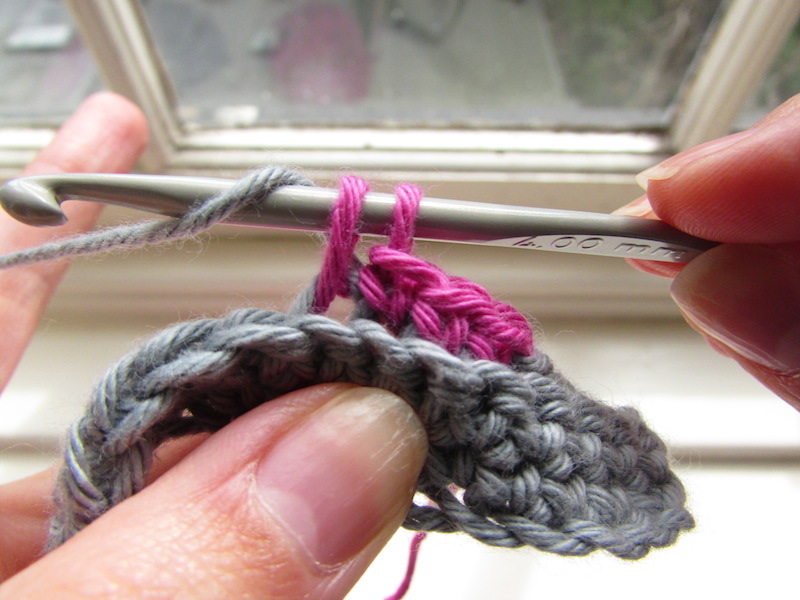
Tapestry crochet tutorial (UK terms)
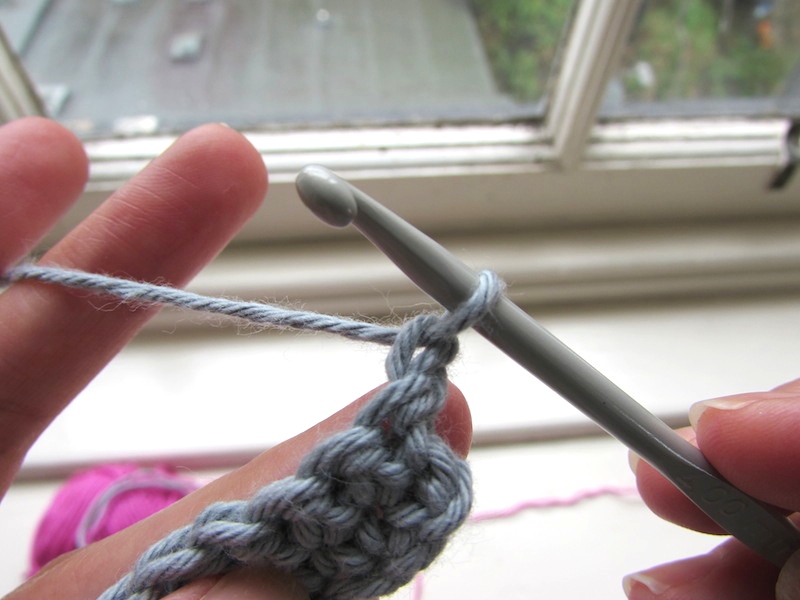
As I mentioned before, I always work on the back loop only (BLO) for any colourwork technique. For demonstration purposes, let’s say that we have a chart that tells us that we need to work 4 stitches in one colour and then 4 stitches on a different colour, alternating them along the row. Remember that with tapestry crochet you always carry the unused colour inside the stitches, and you do this from the first stitch of the row.
I have worked a couple of rows of dc to use as a base and make it easier to show you, but it would be the same instructions if you were working your first row into a chain. It also applies if you are working in the round.
Chain 1.
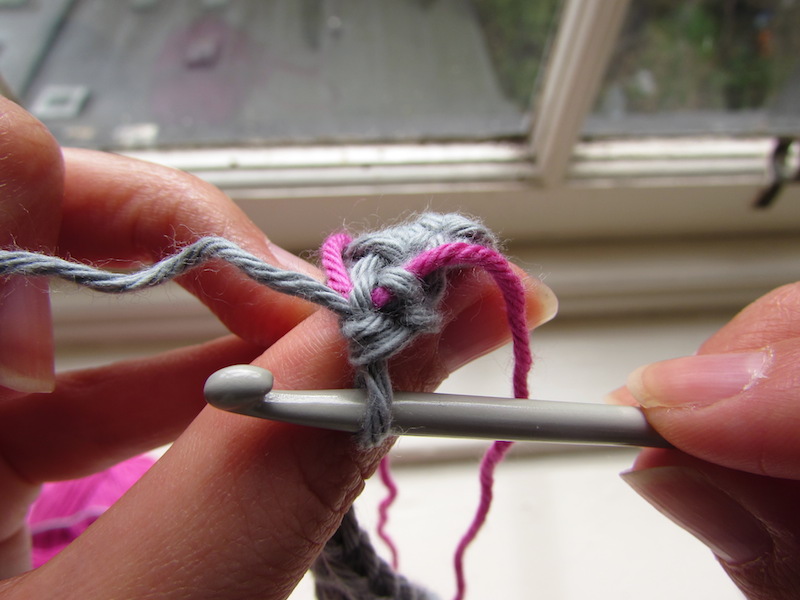
2. Insert your hook on the BLO of the first stitch.
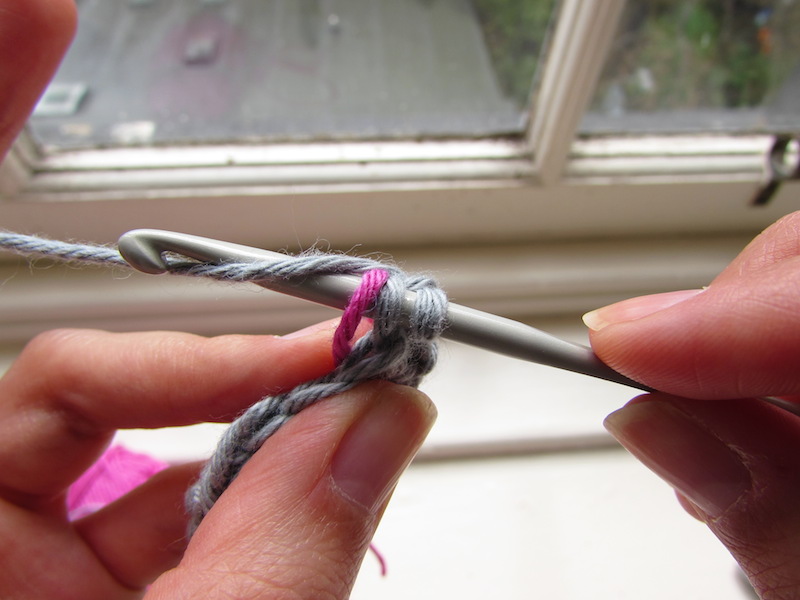
3. Grab your second colour and hold it behind the back loop and over your hook.
4. Yarn over and pull up a loop.
5. Yarn over and pull through two loops on hook. First dc completed, and the pink yarn is secured inside the first stitch.
6. According to our chart we have to work 4 stitches before changing colour so let’s continue in the same way.
Insert hook in BLO, place unused colour behind back loop and over hook, yarn over and pull up a loop.
7. Yarn over and pull through two loops. Second dc completed. Repeat the same steps to complete the third dc.
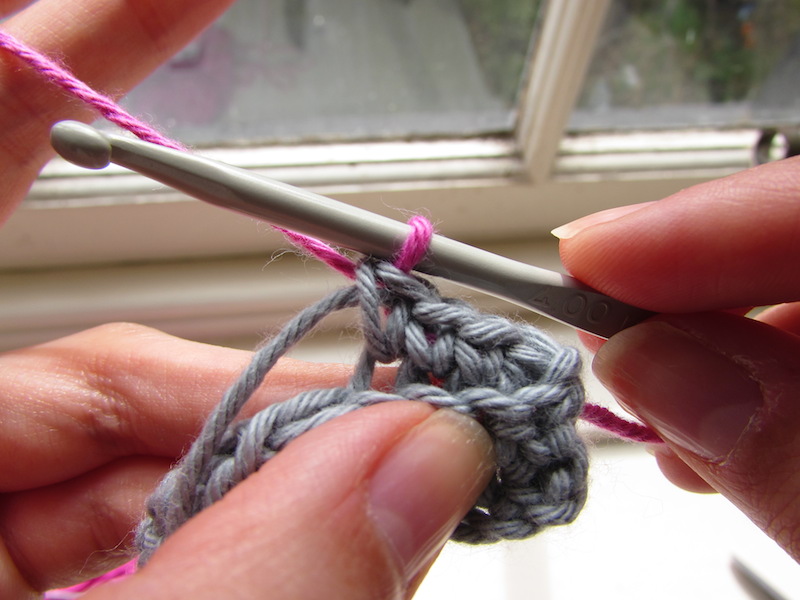
8. Now, to get a neat colour change we need to change colours one stitch before: if I need my fifth stitch to be a different colour, I need to change yarns on the fourth stitch.
So let’s begin the fourth stitch as normal, which is still in grey.
Insert hook in BLO, place unused colour behind back loop and over hook, yarn over and pull up a loop.
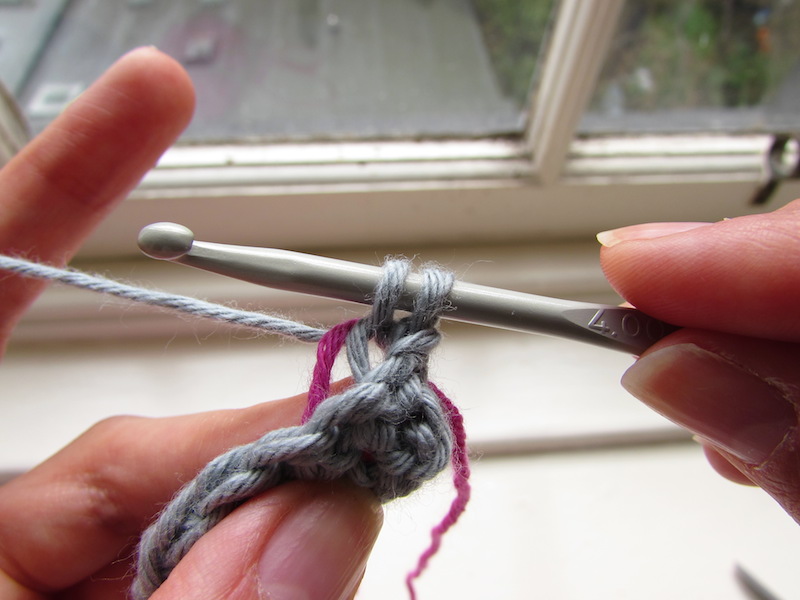
9. Now drop the colour you have been working with (grey), yarn over with the other colour (pink) and pull through both loops on hook.
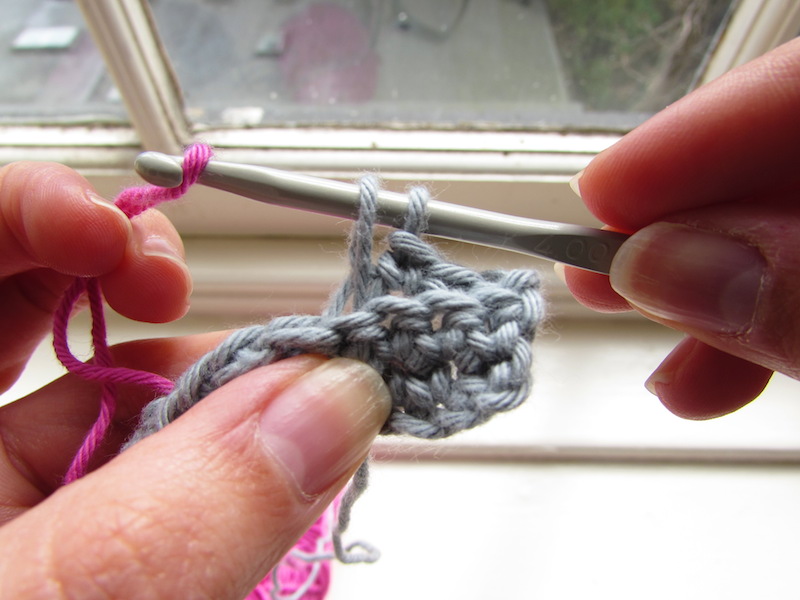
10. Perfect! We will need some adjustment here to make sure all stitches are the same size so before continuing pull that grey yarn to make that last stitch look nicer.
11. And now we just continue the same way, let’s work until the next colour change to make sure it is all clear.
Insert your hook in BLO, place unused yarn (now grey) behind back loop and over hook, yarn over and pull up a loop.
12. Yarn over and pull through two loops on hook. Repeat for next two stitches.
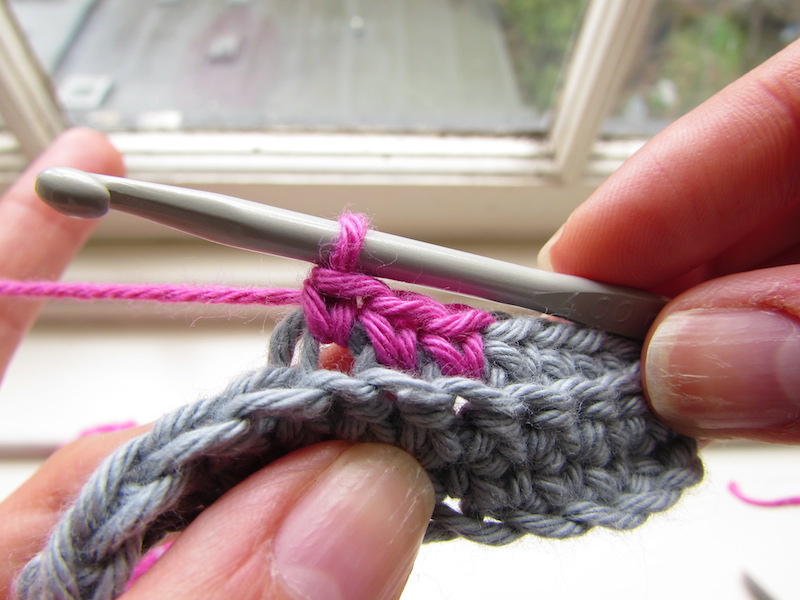
13. Since we need to have four stitches of each colour we will need to change colour on the next stitch.
Insert hook in BLO, place unused yarn behind back loop and under hook, yarn over and pull up a loop.
14. Drop the yarn you have been working with (pink), grab unused yarn (grey), yarn over and pull through both loops on hook.
15. Now adjust your stitch so that it looks just like the others and you are ready to continue your row! You should have something that looks similar to this on both sides, it creates a reversible fabric.
Stranded colourwork tutorial
For stranded colourwork you change colours the same way, you just don’t catch the yarn inside the stitches like tapestry crochet. Because you leave strands of yarn at the back you can only work this technique in the round, however for demonstrating purposes I am using a flat piece to show you the technique just so that it looks more clear.
Let’s assume we have the same chart that tells us to change colour every four stitches for each round (remember we can’t work rows with stranded crochet).
1. Chain one. Work 3dc in BLO.
2. Insert hook in BLO, yarn over and pull up a loop.
2. Drop the colour you have been working with, grab the second colour (you can do a slip knot here but it is not necessary), yarn over and pull through both loops on hook.
3. Adjust that last stitch by pulling that grey yarn to make it look more like its brothers…
4. Pick up the pink yarn again to continue with this colour. Work 3dc in BLO.
5. Insert hook in BLO, yarn over and pull up a loop.
6. Drop the colour you have been working with, grab the other colour, yarn over and pull through both loops on hook.
7. Repeat the previous steps to finish your round. You will have something like this on the back of your work.
Finally, I want to show you how to make those strands shorter if you wanted. The strands are as long as the stitches between colour changes (in this case four) but this may not always be the case or maybe you think these strands of 4 stitches are too long for you. To shorten the strands we simply use the technique we already learned for tapestry crochet to “catch” the yarn inside the stitch. Let me show you.
If we continue with the round we are working with, let’s say we want to the strands half as long, meaning we need to “catch” that unused strand between two colour changes.
1. Work one dc in BLO.
2. We want to catch the yarn in the next stitch. So, insert hook in BLO, place unused yarn behind back loop and over hook, yarn over and pull up a loop. Yarn over and pull through two loops.
3. Continue normally until next colour change and then catch the yarn again before the following colour change. I caught the yarn on the second stitch of each set of four stitches, but you could do it on the third or wherever you want. You will get something like this on the back. Shorter strands!
Handmade wardrobe in the air! I seem to have decided to go on this journey just at the right time, everyone seems to be talking about a handmade wardrobe lately and it is so exciting. I have a finished object (FO) to share with you but first let me tell you a bit of what has been going on:
This month is Me Made May 2015, a challenge to encourage people to wear and love their handmade items, how awesome is that? There are a few hashtags going around in social media (#memademay, @memademay15) with people posting pictures of them wearing their handmade garments or accessories and it is so inspiring. I am not officially taking part (not good at taking pictures of me every day) but definitely cheering on and enjoying to see everyone’s posts.
Joanne Scrace from The Crochet Project has created a Facebook group called “Make it. Wear it”. The group is aimed at people interested in wearable knitted and crochet garments or accessories. The group already has quite a few members so be sure to check it out if you want to join the chat.
Kate from A Playful Day has a topic for each month as part of her “inspired 2015” theme and this month is all about a handmade wardrobe (I am telling you there is something in the air!). She has a podcast out with this theme which I haven’t listened to yet but I love her podcast so I am sure it will be a good one.
Finally, Sarah from Crafts from the Cwtch has kicked off her make-along this month, the idea is to make a shawl using a craft, technique or construction you haven’t tried before. There are quite a few knitters making crochet shawls and crocheters trying out their knitting skills which I think is amazing! I am taking part on this make-along with a shawl from The Shawl Project by Joanne Scrace. Check out the Ravelry group if you want to take part!
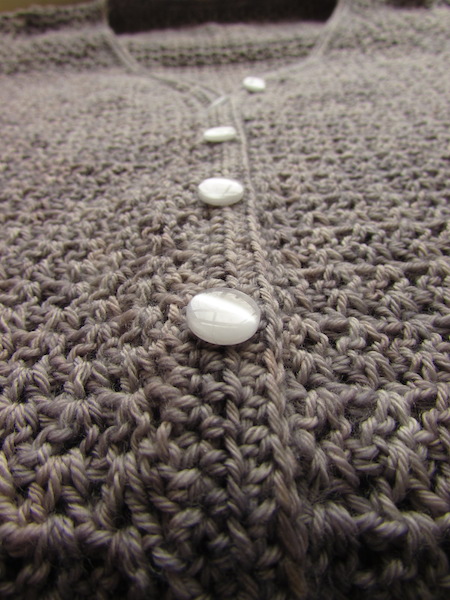
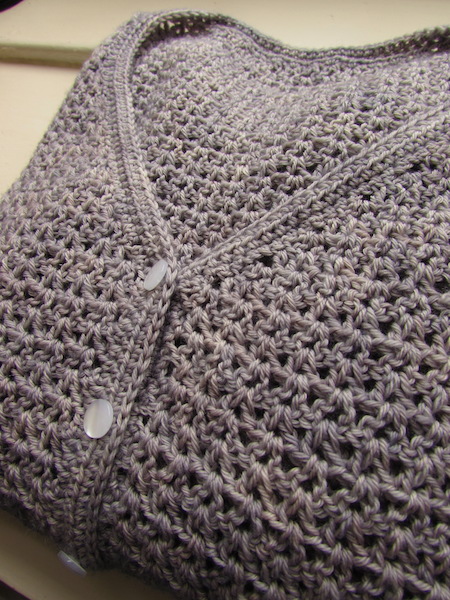
So now to the reason for this post: I finished my Alyssium cardigan! I am so excited to share this FO with you guys because I am completely and absolutely in love with this cardigan.
The pattern is the Alyssium cardigan by Joanne Scrace and I knew I had to make it since the first time I saw it. It is really hard for me to like a pattern for a crochet garment, mostly because they don’t have any drape and I am in a I-only-want-to-wear-very-loose-clothes phase. But then I saw this cardigan and it looked just perfect: drapey, with a beautiful but simple stitch pattern and that ribbing is such a lovely design detail.
I decided to use the same yarn as the pattern and it was at the top of my shopping list for the EYF since I knew Victoria from Eden Cottage Yarns had a stall at the event. I ended up picking the same colour as the sample, it was the one I liked the most and the one that matched what I have in my wardrobe best.
For this project I really embraced the whole idea of a handmade wardrobe and I am so happy that I did because the result is everything I thought it would be. Here are a few of the things I did differently from my usual way to tackle a project to make sure that this garment was something I would love to wear:
Swatching: I not only swatted but also blocked it and made a note of my gauge before and after blocking. This allowed me to keep track of my gauge as I was working on the cardigan, it made me realise if I was crocheting too loose or too tight that day and adjust accordingly.
Length adjustments: This is a top-down cardigan so making adjustments is very easy. I made the body a bit longer to make sure the ribbing finished right where I wanted it.
Sleeve trial and error: I made a mistake on the body at some point which meant that the pattern for the sleeves short rows wouldn’t work for me. I had to re-think the short rows to match what I had and it took a lot of charting, drawing and counting to get it to work. Once I had the math I had to work the sleeve to make sure it looked good and if not, go back to drawing again. I won’t even tell you how many times I worked those short rows until I was finally happy with the result, and I would’ve never done this if I wasn’t determined to get a cardigan I would love to wear.
Sleeve length: The length of the sleeves was another story, I changed the length three times on one sleeve before deciding on a long sleeve, and for each time I had to un-do the cuff to change the length but I am so glad I did because now it is perfect.
I have been wearing this cardigan a lot on the past week and have received quite a few compliments about it. First garment made with intention and it is a success! The first of many more to come…
How’s it going? I am here today with another update of this Freyja journey. Remember Laura from Made in Oxford is also blogging about her Freyja so make sure to check it out.
Since my last post I have been working slowly away with the charts on the pattern. It requires all my attention, I don’t even put music on to avoid mistakes. I am definitely getting more used to the rhythm and since I will have to repeat each chart more than 20 times I know it will get easier. Patience is required and I am giving all I have 🙂
I am loving to see how it is taking shape, it is such a smart pattern. You know when you are working on a pattern and you see all these crazy charts or instructions and you really can’t tell how it will translate into your project? I was definitely on that stage a week ago, I couldn’t see the end game but now it is all fitting into place and it is looking amazing.
Isn’t it unbelievable how some designers can come up with such gorgeous creations? Their talent will never cease to amaze me, how they can take individual stitches and play with them in such intricate ways to turn them into a beautiful piece of art.
I will continue to share short posts with my progress but probably less often since it will take some time to get through these charts and it is just more of the same.
Thank you again for reading and keeping us company in this Freyja journey.
Hello everyone, hope you had a nice weekend wherever you are. I am here with the last prompt for the Love Your Blog Challenge by A Playful Day and this time it is all about gratitude.
Life can get so busy sometimes that we often don’t take the time to be thankful for what life has given to us. I am very guilty of this, especially since I am more of a glass half-empty kind of girl. As part of my goals for the year the first one was: Appreciate the wonderful things in my life more often and write them down at least once a month. I am so embarrassed to say I have only done this once but I guess it is never too late to pick it up so without further ado, here are a few things I am grateful for right now:
The arrival of spring: longer days and colour.
A good cup of tea: especially after a long day.
Free yoga videos: I can’t believe I managed without them until now.
People who love yarn as much as I do: the only ones with whom you can be your true self without odd looks.
My yarn and my hook: for the lovely time we have spent together.
This blog and you guys: for every view and comment.
Finally, I just want to thank Kate from A Playful Day and everyone who took part of the Love Your Blog Challenge, it has been so fun to take part and to discover some new blogs, I would definitely agree now that the blog is not dead: it is alive and kicking and we are not going anywhere.
As part of the Love your Blog Challenge by A Playful Day I shared with you recently that I have created a new little section around the theme of a handmade wardrobe (you can find a link on the main menu). The idea is that every time I post something relating to this theme you will be able to find it in the new section.
But what is this theme all about? It is quite simple really, I have become very interested in creating beautiful items for my wardrobe that are made with my own two hands, so I decided to use the blog as a tool to stay inspired and keep track of what I am doing to achieve this.
Why a handmade wardrobe? This is of course not a new concept and many of us who crochet, knit or sew are actually working towards this without a proper label for it. I first heard someone mention it as such while listening to an episode of Woolful featuring Karen from Fringe Association. At the time I was just starting to dive in to the challenge of crochet garments so this idea really spoke to me and started to circle in my head with no plans to leave any time soon.
It made me think about what finished projects I actually wear which led to the stunning realisation that I was wearing hardly any. Even my designs were in a drawer somewhere gathering dust. While doing a sample for a design a few months ago for a pair of fingerless mitts I suddenly stopped. Why am I doing another pair of these when I don’t even like fingerless mitts! It has never made sense to me to leave the fingers uncovered, along with sleeveless jackets they are a mystery to me. But here I was making another pair to go on the drawer with the first pair and the wrist warmers I don’t wear either. What is the point of investing all these time and effort on something that I will never wear? Over the years I have made hats that are too loose or too tight, scarfs and wraps I don’t like the colour of, sweaters that don’t fit and the list goes on and on.
The point of a handmade wardrobe for me is to create pieces that you will not only love to make but also love to wear. And for that you need to use the right yarn, the right colour and make the right size. Karen talks in the podcast about “making with intention” and that is the key to achieve this: you really need to think about what you need in your wardrobe in the context of everything else in it, what colour it has to be, what outfits you can create with it, and of course make sure that the fit is just right.
Currently I have two shawls and two cowls which were made with a bit of more thought into colours and wearability and I am happy to say that I do wear them and most importantly, I love to wear them. My WIPs consist at the moment of one shawl, one cardigan and one cowl, and I also think they will all be a happy addition to my wardrobe once finished. The colours go well with what I usually wear, they are practical, stylish and I have put a lot of effort to make sure everything fits just right.
Another reason to embark in this new journey relates to the environmental impact of the clothing industry and my wish to buy less industrially manufactured clothes. This is quite a big thing for me since I have always been a bit of a shopaholic and even though since moving to the UK I have been a lot better I still buy clothes many times just because I am in the mood of buying clothes and not because I really need them. There is a lot of info out there so I´ll probably dedicate another post to this and how we can be a bit more sustainable when buying clothes and making our own.
My Alyssium cardigan in progress
Regarding what content I’ll create for the section I am not completely sure yet to be honest, I do know that I want to feature crochet patterns that catch my eye, also more exploring about why this is a good choice for me and of course, how is it working in practice. I am almost finished with my first crochet cardigan so expect to see that soon 🙂
This space will continue to be all about my crochet journey, this is just a new light to that same journey that will help support it, shape it and give it purpose.


