Hello there! I am posting today to share a fun tutorial with you. Remember my Moroccan bag? Well the pattern is still in the works but I realised it would be very useful to create a tutorial for the crochet colourwork techniques I use in my patterns and then I can refer you to them whenever necessary.
I currently use two crochet colourwork techniques: stranded colourwork and tapestry crochet. Both techniques allow you to change between two (or more) colours in a single row and unlike knitting it doesn’t matter if your design has long colour changes. You can use these techniques to play with colour in any way you want but I particularly like to use them to create designs based on charts. For working with charts, UK double crochet (US single crochet) is a good stitch to use, since it is sort of like a small square. Also, for both techniques I work on the back loop only (BLO) since in my opinion it gives the best result.
My Moroccan bag pattern uses tapestry crochet
Stranded colourwork, as its name indicates, creates a fabric where the unused colour is carried at the back of the work as a strand (this is basically what you do for fair isle knitting). If you are working something like a hat or glove make sure your strands are quite short so that you don’t catch them with rings, hair pins, etc. I make my strands 3 stitches long maximum which works for me.
My Night to Day wrist warmers use stranded colourwork
With tapestry crochet the unused colour is carried inside the stitches, creating a bulkier and stiffer fabric, however I have seen beautiful blankets done with this technique so you can adapt it to your needs by changing hook sizes and yarn weights.I leave you with a photo tutorial for each of these techniques, as usual let me know if you have any questions and I hope to post the pattern for the Moroccan bag soon!
Tapestry crochet tutorial (UK terms)
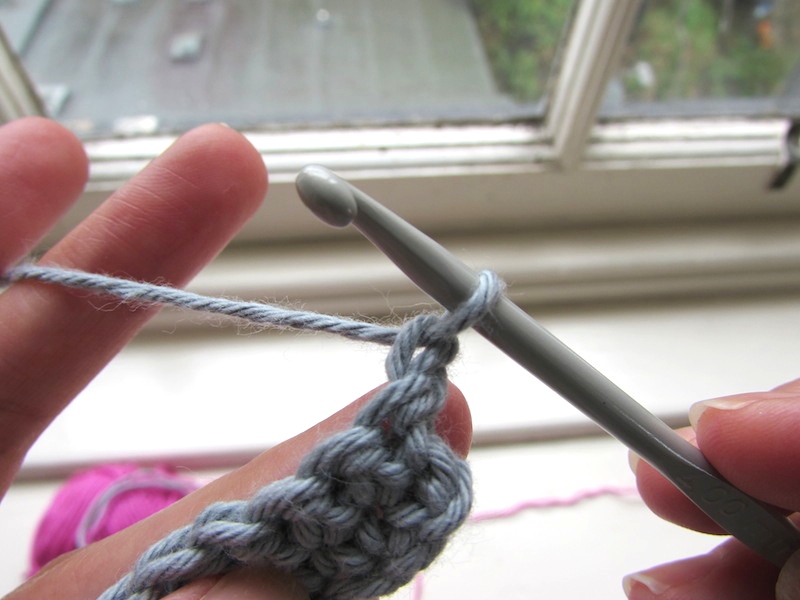
As I mentioned before, I always work on the back loop only (BLO) for any colourwork technique. For demonstration purposes, let’s say that we have a chart that tells us that we need to work 4 stitches in one colour and then 4 stitches on a different colour, alternating them along the row. Remember that with tapestry crochet you always carry the unused colour inside the stitches, and you do this from the first stitch of the row.
I have worked a couple of rows of dc to use as a base and make it easier to show you, but it would be the same instructions if you were working your first row into a chain. It also applies if you are working in the round.
Chain 1.
2. Insert your hook on the BLO of the first stitch.
3. Grab your second colour and hold it behind the back loop and over your hook.
4. Yarn over and pull up a loop.
5. Yarn over and pull through two loops on hook. First dc completed, and the pink yarn is secured inside the first stitch.
6. According to our chart we have to work 4 stitches before changing colour so let’s continue in the same way.
Insert hook in BLO, place unused colour behind back loop and over hook, yarn over and pull up a loop.
7. Yarn over and pull through two loops. Second dc completed. Repeat the same steps to complete the third dc.
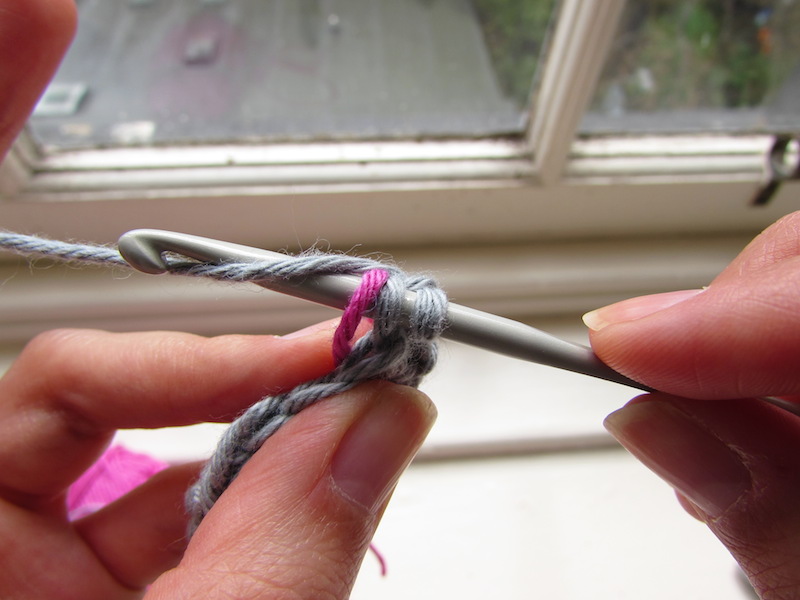
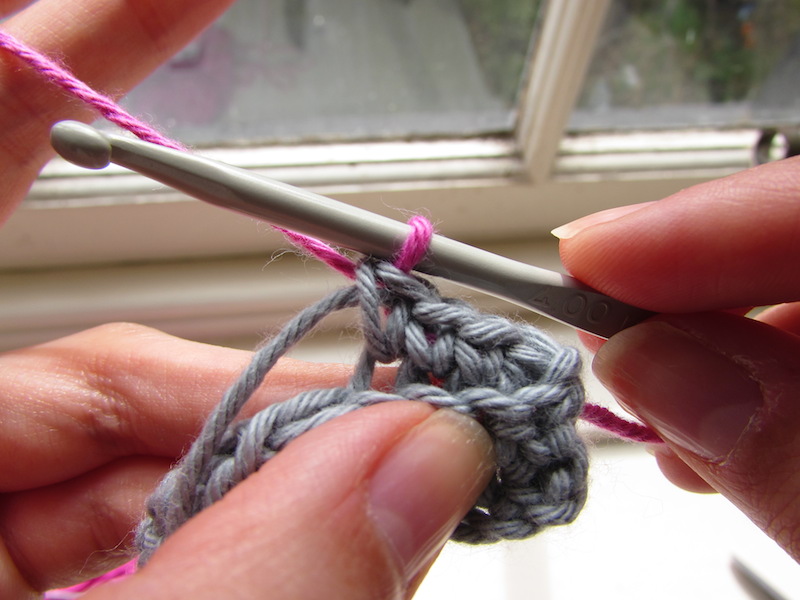
8. Now, to get a neat colour change we need to change colours one stitch before: if I need my fifth stitch to be a different colour, I need to change yarns on the fourth stitch.
So let’s begin the fourth stitch as normal, which is still in grey.
Insert hook in BLO, place unused colour behind back loop and over hook, yarn over and pull up a loop.
9. Now drop the colour you have been working with (grey), yarn over with the other colour (pink) and pull through both loops on hook.
10. Perfect! We will need some adjustment here to make sure all stitches are the same size so before continuing pull that grey yarn to make that last stitch look nicer.
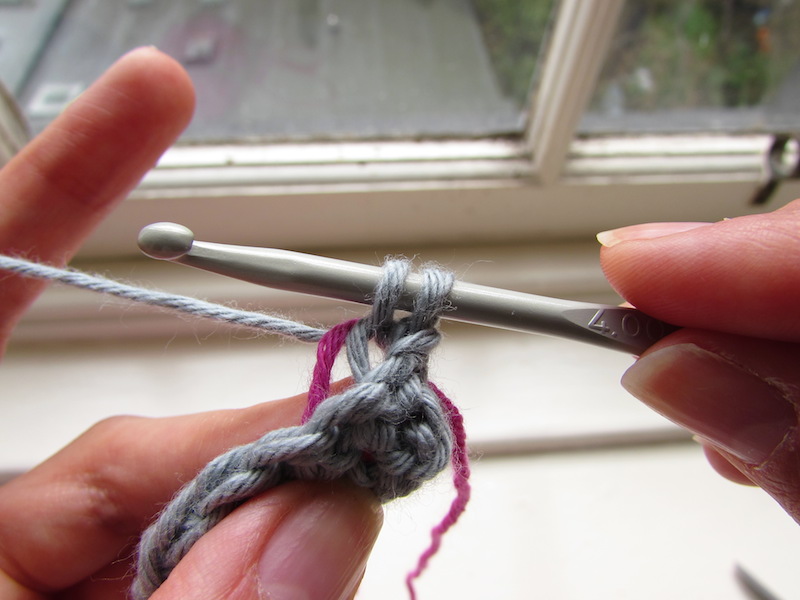
11. And now we just continue the same way, let’s work until the next colour change to make sure it is all clear.
Insert your hook in BLO, place unused yarn (now grey) behind back loop and over hook, yarn over and pull up a loop.
12. Yarn over and pull through two loops on hook. Repeat for next two stitches.
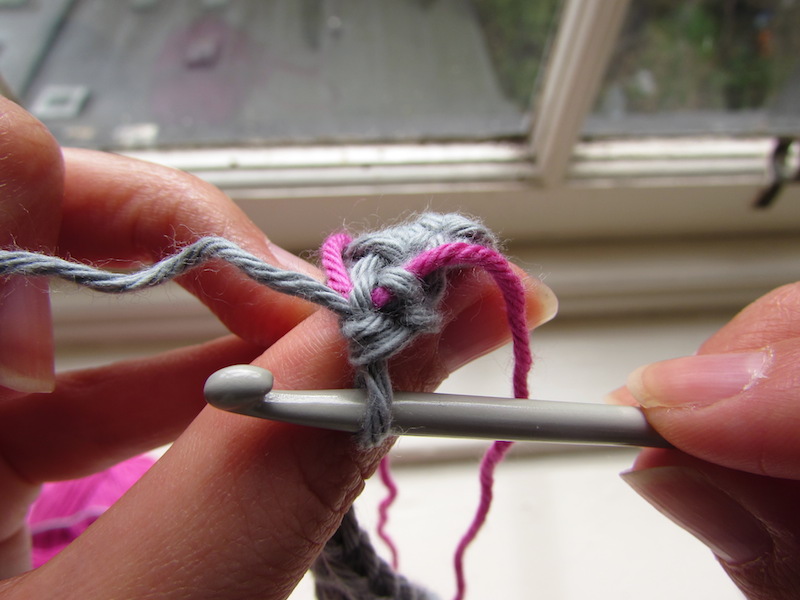
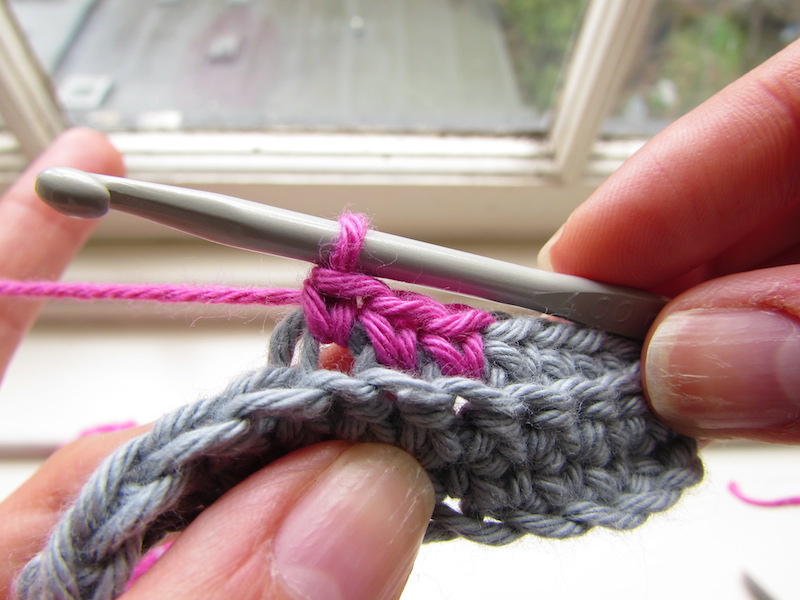
13. Since we need to have four stitches of each colour we will need to change colour on the next stitch.
Insert hook in BLO, place unused yarn behind back loop and under hook, yarn over and pull up a loop.
14. Drop the yarn you have been working with (pink), grab unused yarn (grey), yarn over and pull through both loops on hook.
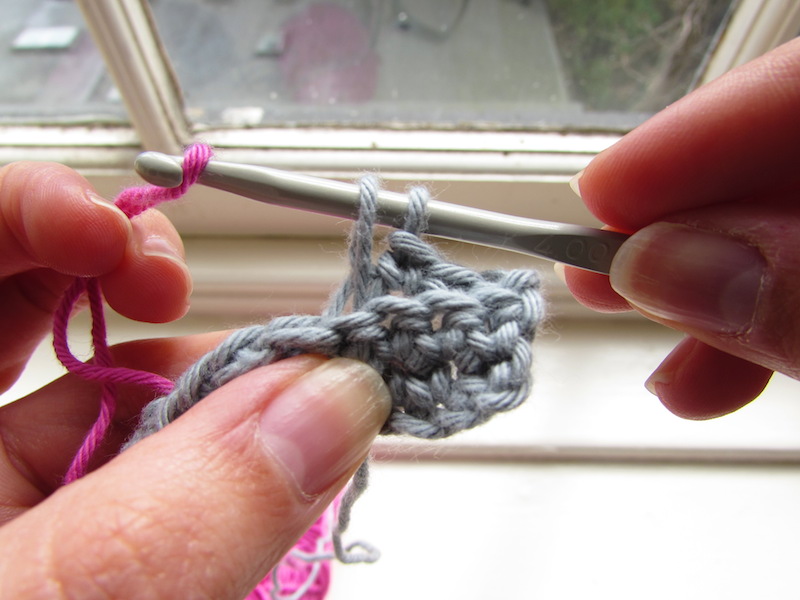
15. Now adjust your stitch so that it looks just like the others and you are ready to continue your row! You should have something that looks similar to this on both sides, it creates a reversible fabric.
Stranded colourwork tutorial
For stranded colourwork you change colours the same way, you just don’t catch the yarn inside the stitches like tapestry crochet. Because you leave strands of yarn at the back you can only work this technique in the round, however for demonstrating purposes I am using a flat piece to show you the technique just so that it looks more clear.
Let’s assume we have the same chart that tells us to change colour every four stitches for each round (remember we can’t work rows with stranded crochet).
1. Chain one. Work 3dc in BLO.
2. Insert hook in BLO, yarn over and pull up a loop.
2. Drop the colour you have been working with, grab the second colour (you can do a slip knot here but it is not necessary), yarn over and pull through both loops on hook.
3. Adjust that last stitch by pulling that grey yarn to make it look more like its brothers…
4. Pick up the pink yarn again to continue with this colour. Work 3dc in BLO.
5. Insert hook in BLO, yarn over and pull up a loop.
6. Drop the colour you have been working with, grab the other colour, yarn over and pull through both loops on hook.
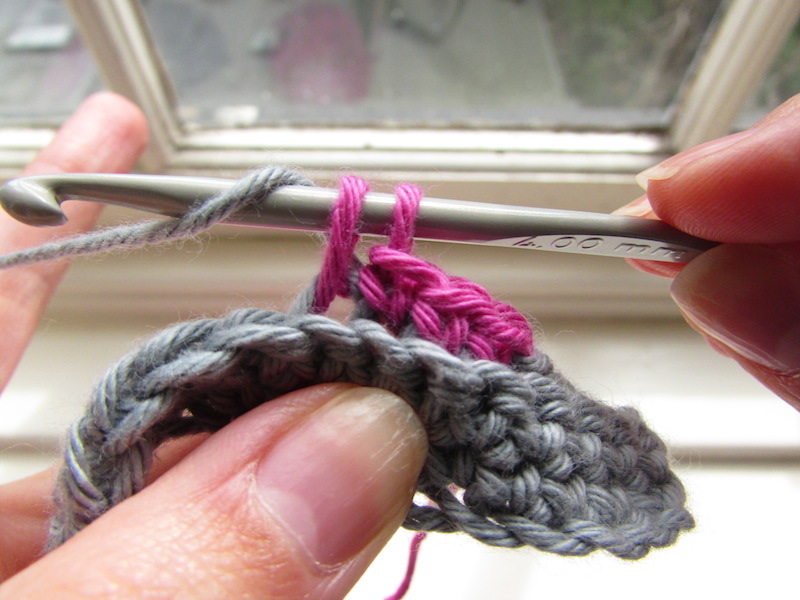
7. Repeat the previous steps to finish your round. You will have something like this on the back of your work.
Finally, I want to show you how to make those strands shorter if you wanted. The strands are as long as the stitches between colour changes (in this case four) but this may not always be the case or maybe you think these strands of 4 stitches are too long for you. To shorten the strands we simply use the technique we already learned for tapestry crochet to “catch” the yarn inside the stitch. Let me show you.
If we continue with the round we are working with, let’s say we want to the strands half as long, meaning we need to “catch” that unused strand between two colour changes.
1. Work one dc in BLO.
2. We want to catch the yarn in the next stitch. So, insert hook in BLO, place unused yarn behind back loop and over hook, yarn over and pull up a loop. Yarn over and pull through two loops.
3. Continue normally until next colour change and then catch the yarn again before the following colour change. I caught the yarn on the second stitch of each set of four stitches, but you could do it on the third or wherever you want. You will get something like this on the back. Shorter strands!
Thank you for your comment, I created this tutorial because most of the ones you see around assume that you know certain things or skip valuable tips. Hope you try colourwork soon!
Great tutorial, I’m new to colourwork so this really helped me to understand. Just wanted to clarify though, you said you can only work stranded colourwork in the round because of the threads but I don’t understand why? Do you mean because of how the back side looks? Or is it there a technical reason? I am thinking of trying to recreate an existing cardigan pattern in colourwork but it isn’t worked in the round so want to make sure I’m not missing anything!
 Hello there! I am posting today to share a fun tutorial with you. Remember my Moroccan bag? Well the pattern is still in the works but I realised it would be very useful to create a tutorial for the crochet colourwork techniques I use in my patterns and then I can refer you to them whenever necessary.


Lookin good! I’ve had my phone stolen, so its best to either reach me on the shop phone or via email.
Just wanted to say that the pima cotton should be back in stock next week and shipped out. Wooohooooooooo!
*Jessica James*
*Owner* *Ginger Twist Studio *
Find us on:
– Facebook
– Twitter
– Ravelry
Brilliant! I pinned it 🙂
Yay! Thanks 🙂
What a wonderful tutorial, thankyou for sharing.
Thank you! Glad you found it useful 🙂 > > >
Excellent tutorial, as usual. Love that bag!
Thank you so much 🙂 I have a goal to get that pattern out this month, fingers crossed!
Thanks for this guide to colour work I always struggle to get my colour changes to look neat. This will be very useful for me 🙂
Hi!
Thanks for your comments, I love colourwork so I am happy to spread the love hahaha Hope you try the technique soon 🙂
Thank you very much, This is very helpul .
Thank you for your comment, I created this tutorial because most of the ones you see around assume that you know certain things or skip valuable tips. Hope you try colourwork soon!
Hi admin ! I read your content everyday and i must say you have hi quality posts here.
Your page deserves to go viral. You need initial boost only.
How to go viral fast? Search for: forbesden’s tools
This is very helpful – I was wondering how colour changes were done for crochet. Fortunately it’s very similar to managing it while knitting.
Great tutorial, I’m new to colourwork so this really helped me to understand. Just wanted to clarify though, you said you can only work stranded colourwork in the round because of the threads but I don’t understand why? Do you mean because of how the back side looks? Or is it there a technical reason? I am thinking of trying to recreate an existing cardigan pattern in colourwork but it isn’t worked in the round so want to make sure I’m not missing anything!