
I know, it was so long ago when I first shared my Moroccan tote and promised to write a pattern for it. Life has been busy as usual and I have been focusing more on crocheting than designing lately since it was getting a bit too crazy: full-time job, blogging and pattern design weren’t leaving much time for anything else! So I took my time, posted a tutorial for the technique I used and now I can finally share the pattern with you. As usual, it is for free, but please refer back to me if you post it online or sell a finished product, including the chart which I created myself from the picture I used as inspiration.

The pattern is for a tote and therefore it doesn’t have a big base for it. If you want it more as a handbag you can adapt the pattern to make the base bigger, just make sure you get a final count of stitches that is a multiple of 12, which is the stitch repeat for the pattern. I added leather handles, fabric lining and a magnetic clasp and I think those finishing touches really made the difference. You can find the handles and clasp I used here. The yarn is Cascade Ultra Pima, it has a beautiful shine to it which I really love and that gold colour is my favourite.

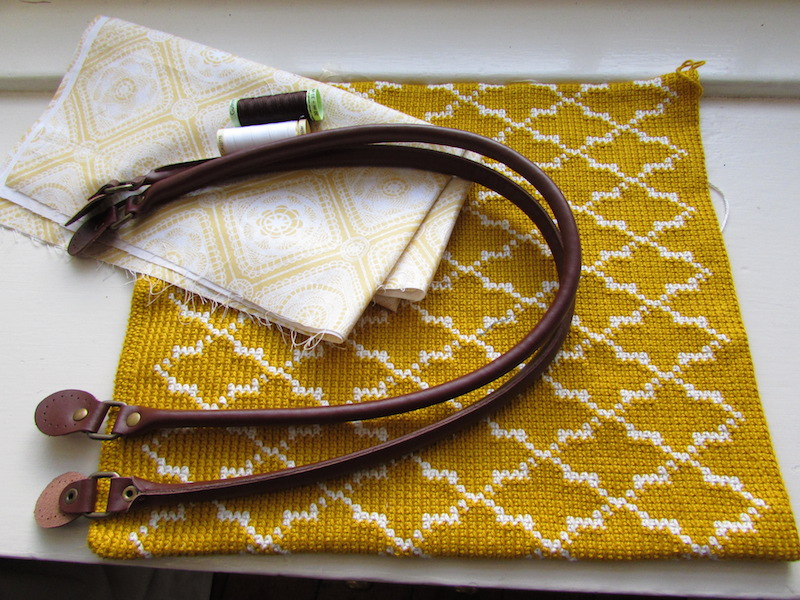
Before getting to the pattern I wanted to note that tapestry crochet can be tough on the hands. This bag is crocheted using a 2.5mm hook with a DK yarn, which is a lot smaller than what you would use for that yarn weight. If crocheting causes pain in your hands or wrists then please be aware that this pattern may be difficult for you, the stitches are very tight and you have to put more effort to get the yarn through so make sure you use a crochet hook that is comfortable for you. You could go up a hook size, but that will make the fabric a lot less dense and sturdy, which is what makes it good for a bag. It’s up to you, I just thought it would be good to make it clear from the start.
Moroccan tote pattern
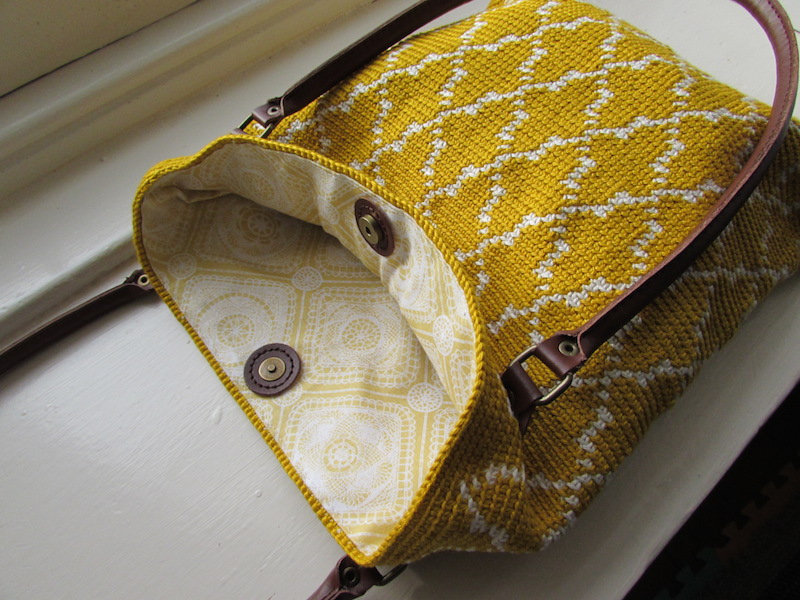
This bag uses tapestry crochet to create a nice dense fabric for a small tote. A small base is crocheted first and then the rest of the bag is worked in a beautiful moroccan pattern. The bag is worked in spirals all the way through, meaning that you don’t join each round which eliminates that sometimes noticeable slip stitch. Leather handles and a fabric lining complete the pattern to create the perfect summer tote.

The tote measures 36cm x 30cm, with a gauge of 28 stitches and 22 rows in a 10cm square. You don’t have to get exact gauge, I prefer it tight like this since it creates a stiff fabric but see what works for you.
Materials
Cascade Ultra Pima DK, 2 skeins in Gold, 1 skein in Natural.
2.5mm hook
Tote leather handles
Magnetic clasp
Thread to match the colour of your handles
Fabric for lining
Stitch marker or yarn in contrasting colour
Abbreviations
Ch – Chain
St – Stitch(es)
Sl st – Slip stitch
dc – UK double crochet
Instructions
*If you don´t know how to work tapestry crochet you can check my tutorial here.
Base
The base is not worked in tapestry crochet, I find it a bit difficult to carry the other colour inside for these first few rounds but you are welcome to try if you prefer a thicker base.
As I have mentioned before, the hook size and yarn weight for this pattern create a very tight fabric, which makes stitches a bit more difficult to work. I find the easiest way to work a dc when working with a small hook like this is to always work one loop at a time, meaning: insert hook on st, yarn over and pull a loop. Now instead of yarning over and pulling through the two loops in one step you can do the following: yarn over pull through one loop, and now pull that loop through the last loop on your hook.
Ch 79.
Round 1: dc in 2nd ch from hook, place marker in st just made, 76dc, 4dc in last ch, turn and start working on other side of chain, 76 dc, 3dc in same ch where you worked marked st. Don’ turn (160 st)
From here onwards you will work in spirals, meaning that you won´t join the last and first st of each round with a sl st. You will move your marker up each row to know which is the first st of each round. Also, you will never turn your work.
Round 2: 2dc in marked st (remember to move your marker up to the first dc of those two to mark the first st of this row), 76dc, *2dc in next st, repeat from * for next 3 st, 76dc, **2dc in next st, repeat from ** twice (168 st).
Round 3: dc in marked st, move marker up, dc in each st across (168 st).
Body
For the body of the bag you will work using tapestry crochet, meaning that you will always carry the unused colour inside your stitches, even if the round is only one colour (like Rounds 1 and 2). You will also continue to move your marker up to know where your round started and you will ALWAYS work in the back loop only.
Rounds 1 to 77: Follow chart from right to left for each round. Each square is a dc worked in the back loop only, if you don’t know how to change colours in each round check this tutorial. Remember to bring the marker up at the beginning of each round (marked st is St 1 in chart for each round), and to work in spirals without joining each round. I recommend marking the first st of the first round of the body, and using another st marker to move up each round, so that if you forget to move your marker up you can use that first marker to work your way up and know which one is the first stitch (you can tell I am talking by experience here!).
As indicated in chart, repeat Rounds 3 to 18 a total of four times and follow the top chart for Rounds 67 to 77. When finished, sl st to first st of last round.
To create a lining I always follow this tutorial by Futuregirl, just omit the zipper part of the tutorial. Sew on the handles before sewing on the lining to hide the stitches, and use a strong thread for the handles. Finally, sew in the magnetic clasp.
And your tote is finished! Let me know if you have any questions,
Enjoy!
x
Sol

May I ask where you got the leather rounds for the clasp? Did you perforate them yourself or did they come like that? I would love to get some that I do not have to perforate.
I made this for my sister’s birthday. I made a shorter, taller version and it turned out sweet.
I machine stitched the lining to the bag and you can’t see any of the stitches unless you look very close.
I did have trouble with the pattern lining up at each round but made it work. Also my white stitches didn’t always line up directly on top of the others-is there a trick?
Overall-I’m going to make myself one-thank you for sharing this pattern!
I would love to share a picture but don’t see how.