
I know, it was so long ago when I first shared my Moroccan tote and promised to write a pattern for it. Life has been busy as usual and I have been focusing more on crocheting than designing lately since it was getting a bit too crazy: full-time job, blogging and pattern design weren’t leaving much time for anything else! So I took my time, posted a tutorial for the technique I used and now I can finally share the pattern with you. As usual, it is for free, but please refer back to me if you post it online or sell a finished product, including the chart which I created myself from the picture I used as inspiration.

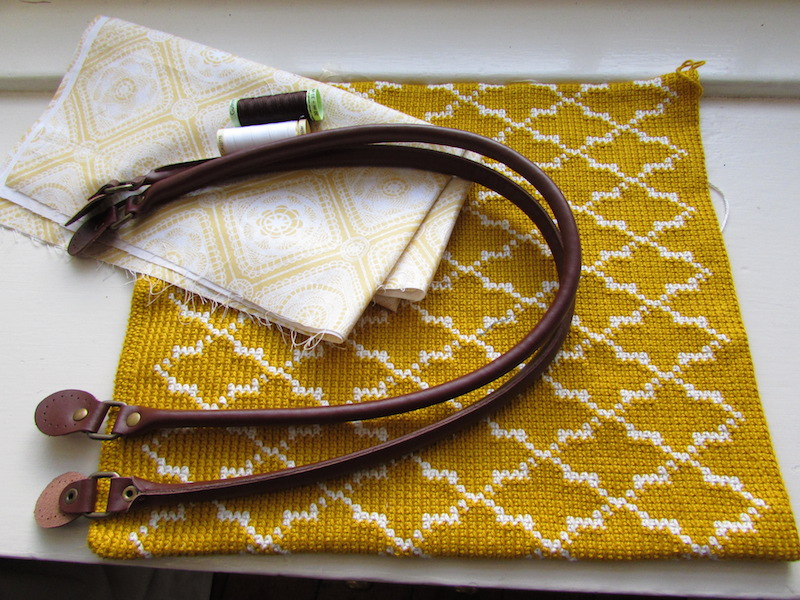
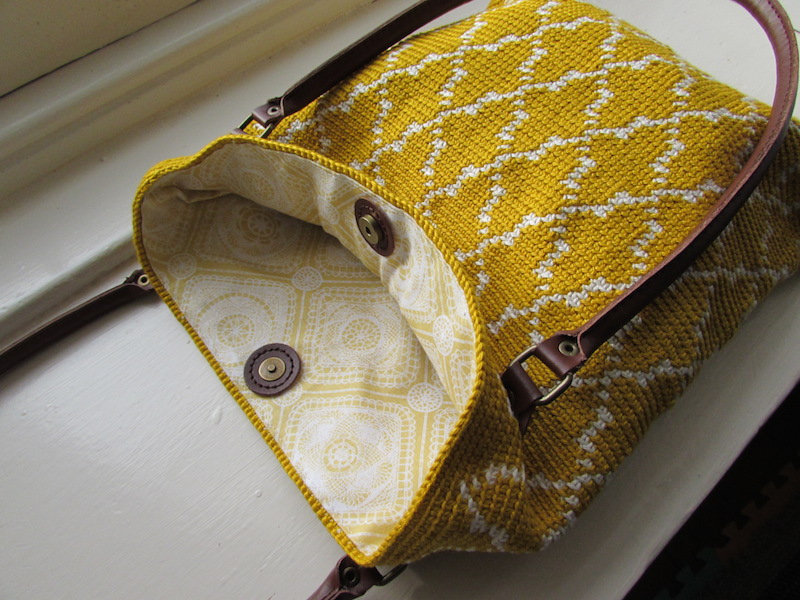
The pattern is for a tote and therefore it doesn’t have a big base for it. If you want it more as a handbag you can adapt the pattern to make the base bigger, just make sure you get a final count of stitches that is a multiple of 12, which is the stitch repeat for the pattern. I added leather handles, fabric lining and a magnetic clasp and I think those finishing touches really made the difference. You can find the handles and clasp I used here. The yarn is Cascade Ultra Pima, it has a beautiful shine to it which I really love and that gold colour is my favourite.

Before getting to the pattern I wanted to note that tapestry crochet can be tough on the hands. This bag is crocheted using a 2.5mm hook with a DK yarn, which is a lot smaller than what you would use for that yarn weight. If crocheting causes pain in your hands or wrists then please be aware that this pattern may be difficult for you, the stitches are very tight and you have to put more effort to get the yarn through so make sure you use a crochet hook that is comfortable for you. You could go up a hook size, but that will make the fabric a lot less dense and sturdy, which is what makes it good for a bag. It’s up to you, I just thought it would be good to make it clear from the start.
Moroccan tote pattern
This bag uses tapestry crochet to create a nice dense fabric for a small tote. A small base is crocheted first and then the rest of the bag is worked in a beautiful moroccan pattern. The bag is worked in spirals all the way through, meaning that you don’t join each round which eliminates that sometimes noticeable slip stitch. Leather handles and a fabric lining complete the pattern to create the perfect summer tote.

The tote measures 36cm x 30cm, with a gauge of 28 stitches and 22 rows in a 10cm square. You don’t have to get exact gauge, I prefer it tight like this since it creates a stiff fabric but see what works for you.
Materials
Cascade Ultra Pima DK, 2 skeins in Gold, 1 skein in Natural.
2.5mm hook
Tote leather handles
Magnetic clasp
Thread to match the colour of your handles
Fabric for lining
Stitch marker or yarn in contrasting colour
Abbreviations
Ch – Chain
St – Stitch(es)
Sl st – Slip stitch
dc – UK double crochet
Instructions
*If you don´t know how to work tapestry crochet you can check my tutorial here.
Base
The base is not worked in tapestry crochet, I find it a bit difficult to carry the other colour inside for these first few rounds but you are welcome to try if you prefer a thicker base.
As I have mentioned before, the hook size and yarn weight for this pattern create a very tight fabric, which makes stitches a bit more difficult to work. I find the easiest way to work a dc when working with a small hook like this is to always work one loop at a time, meaning: insert hook on st, yarn over and pull a loop. Now instead of yarning over and pulling through the two loops in one step you can do the following: yarn over pull through one loop, and now pull that loop through the last loop on your hook.
Ch 79.
Round 1: dc in 2nd ch from hook, place marker in st just made, 76dc, 4dc in last ch, turn and start working on other side of chain, 76 dc, 3dc in same ch where you worked marked st. Don’ turn (160 st)
From here onwards you will work in spirals, meaning that you won´t join the last and first st of each round with a sl st. You will move your marker up each row to know which is the first st of each round. Also, you will never turn your work.
Round 2: 2dc in marked st (remember to move your marker up to the first dc of those two to mark the first st of this row), 76dc, *2dc in next st, repeat from * for next 3 st, 76dc, **2dc in next st, repeat from ** twice (168 st).
Round 3: dc in marked st, move marker up, dc in each st across (168 st).
Body
For the body of the bag you will work using tapestry crochet, meaning that you will always carry the unused colour inside your stitches, even if the round is only one colour (like Rounds 1 and 2). You will also continue to move your marker up to know where your round started and you will ALWAYS work in the back loop only.
Rounds 1 to 77: Follow chart from right to left for each round. Each square is a dc worked in the back loop only, if you don’t know how to change colours in each round check this tutorial. Remember to bring the marker up at the beginning of each round (marked st is St 1 in chart for each round), and to work in spirals without joining each round. I recommend marking the first st of the first round of the body, and using another st marker to move up each round, so that if you forget to move your marker up you can use that first marker to work your way up and know which one is the first stitch (you can tell I am talking by experience here!).
As indicated in chart, repeat Rounds 3 to 18 a total of four times and follow the top chart for Rounds 67 to 77. When finished, sl st to first st of last round.
To create a lining I always follow this tutorial by Futuregirl, just omit the zipper part of the tutorial. Sew on the handles before sewing on the lining to hide the stitches, and use a strong thread for the handles. Finally, sew in the magnetic clasp.
And your tote is finished! Let me know if you have any questions,
Enjoy!
x
Sol

Very lovely!! I want to try that type of crochet 🙂
Thank you, you should try it out! I have a tutorial for it so there is no excuses 🙂
good, I will try it, thanks!! 🙂
Thank you for the pattern. Gorgeous tote!
Thank you!
What an absolutely stunning bag! Thank you for so generously sharing your pattern and techniques.
Hi, you are very welcome! I am so happy that people like it and want to make one themselves. Enjoy!
x
Sol
love this pattern!!! where do you get those handles and the leather bits on the magnetic clasp?
Hi! Thank you 🙂 I loved making it! I got the handles and matching magnetic clasp here: http://www.bag-clasps.co.uk/
Hope you give it a try!
x
Sol
Oh my God. I found this pattern via Facebook, and I immediately clicked onto view its beauty. I am totally in love with this bag and the leather handles just make it even more attractive. Thank you so much for the pattern. I am definitely gonna try this as my next to-do project. 🙂
Best Regards,
Salma
http://made-in-craftadise.blogspot.com/
Hi Salma,
Thank you so much for your lovely comment! I have really been blown away by the response. I was checking your blog and you have such good tips and resources, have just subscribed!
à une précédente remarque, le fait d’être daltonien n’empêche pas du tout de voir en 3D. En revanche, certaines personnes qui ont des problèmes d&;oousraccqmmodation peuvent ne pas réussir à voir en ces film en 3D. L’effet peut être très différent d’une personne à l’autre, du spectaculaire pour certain au simplement désagréable pour d’autres…
Sol, I am crazy in love with your pattern and started it right away. I have done rounds 3 and 4 multiple times and there is always something off at the end. I know the markers are important. Since this is a spiral I assumed that all tiles were complete, but maybe the tile at the “start here” on the chart should end up as half a tile? I can’t see the side in the pictures.
Thank you for the wonderful pattern and any help you can offer me.
Susie
Hi Susie,
I am so sorry you are struggling with the pattern. I am not sure I understand the problem, I will take a few pictures of the side to show you how it looks when I get home but basically you get a full tile but it doesn’t match exactly in the middle (where the round ends) because of the spiral. If you can take a picture of your work send it over to my email acrochetjourney@gmail.com and I may be able to help you better, and will post the pictures of the side later today.
Hope that helps!
X
Sol
> > >
Hi Susie,
Here is a picture of the side of the bag where the rounds begin/end. The top arrow is pointing at one of the “tiles” where you finish each round which as you can see it is a bit distorted because of the spiral. I am also marking the first stitch of a round for you to see how it ends up looking. When you finish Round 3, you end with a yellow stitch, the first stitch of Round 4 is a white stitch, which sits on top of the first stitch of Round 3, where you have your marker. You are probably doing it right but you won’t see how it is coming along until you do a few more rounds. The only other reason I can think of why it wouldn’t look right is if you don’t have the right amount of stitches so make sure you count them. I hope this helps!
x
Sol
Sol, I am crazy in love with your pattern and started it right away. I have done rounds 3 and 4 multiple times and there is always something off at the end. I know the markers are important. Since this is a spiral I assumed that all tiles were complete, but maybe the tile at the “start here” on the chart should end up as half a tile? I can’t see the side in the pictures.
Thank you for the wonderful pattern and any help you can offer me.
Susie
Sol,
You are the sweetest. Thank you so much for the picture. Now I see that I was on the right course. I hope to be posting my tote soon.
Susie
No problem! Can’t wait to see it 🙂
I love this bag and I also have a love of mustardy gold yarn at moment it’s such a summery colour 🙂
Hi!
I love your tote it is beautiful! I am having a problem with round 2….when it says 2dc into the next stitch and then from * into next 3 stitches, does that mean do 2 dc into those 3 stitches and then 1dc into each of the next stitches until you get to the end of the row where you do the last 2dc?
Hi Sarah,
Basically what you have in that round is 2dc worked into each of 4 stitches in the two ends and 76dc in between. So you are right, you work the first 2dc on one side, work the 76dc, then you need to work 2dc in each of next 4 st, continue with the 76dc and then work 2dc only in the next 3st since with the first 2dc of the round you get 4 st in total with 2dc each as on the other side.
Let me know if that helps!
X Sol
> > >
Thanks that does help! I was also wondering is their another type of yarn that is comparable to the cascade you used? In my area I cannot find it anywhere so I thought maybe you would have some ideas on what is close in comparison to it.
Thanks!
Sarah
Hi Sarah,
In theory any cotton yarn would do, I chose cotton since it creates a more stiff fabric. The only think I would be careful is to make sure not to use any splitty cotton, cause that would be a pain to work with, especially with the small size hook. I am afraid I haven’t used much cotton so am not sure I am the best person to ask! You could of course use another type of fibre and try it out, and there is always online shops if you can’t find the yarn at any of your LYS.
Sorry I wasn’t more helpful!!
x
Sol
Really nice.
Thank you so much for sharing this pattern! I have been looking for a long time for a crochet pattern like this and couldn’t find one anywhere. If I found anything close, I had to pay a lot of money for it. I was so excited to start this pattern! Thank you so much!!! 🙂
You are very welcome! Thank so so much for taking the time to comment here, it means the world 🙂
Thank you for the pattern!!!!! I made it up in regular acrylic yarn I had laying around and it is beautiful!!! Thank you again!!!
Awesome! Thank you so much for your kind comment, can I see it somewhere? 🙂 That is the best part!
I created a pin – https://www.pinterest.com/pin/467459636300258503/ – Hope this works. I added a magnetic snap and a cell phone pocket. I did my lining a little different – I added a “facing” to fold down over the fabric lining.
Thank you again!!!!!
I love this pattern so much! Thank you for it!
I’m having a bit of trouble though. I’m working on the body, and I decided to work in both loops for the gold stitches (I’m using blue yarn for the gold) and then only in the back loops of the white stitches. The design is slanting to the right quite a bit, however, and your design does not seem to slant at all. Is the slant because I am working in both loops and not just the back loops?
Did you yarn under or over? I read some articles that said yarning under decreases the slant. I think I’m gonna try it,
Hi Lydia,
That is correct, working on the back loop prevents the slanting of the design, I find it a lot easier than yarning under so have not tried that technique, let me know if it works!
x
Sol
thank you so much! love this bag!
Made one myself. Thanxs for the pattern.
I just saw this featured in Simply Crochet magazine and fell in love! Thank you so much for sharing the pattern! Would this work up well with a thicker crochet cotton thread? And, for some reason, I was thinking that this was Tunisian crochet, so I’m very glad I read it more carefully. Tapestry crochet is much easier (and thank you for the tip to pull through the loops one at a time).
You are not the first one to ask me if it is Tunisian, its funny! I think its because it looks so different that people assume it is tunisian. Hope you give it a try!
Lovely! I’m putting this on my list of things to try. You’ve created a gorgeous bag!!
🙂
Hi, first of all thank you for the pattern:) i’m just about to finish it and i made it so tight it’s 3cm smaller than yours… Do you think i can imprive it with blocking?
Thanks in advance,
Viki
Hi Viki,
You are very welcome! And wow, you are one tight crocheter to get it even smaller! I think blocking may help but it will depend on the fibre you used. The other thing to consider is that it will loose some of the stiffness and that one of the colours may bleed.
How about turning it into one of those fold over clutches?
Let me know how it goes!
Xx Sol
> > >
Thank you for the quick response:) i finished it, gave it a little bit of steam with the iron and pulled it bigger. It is still smaller than yours but i like it. I’m still waiting for the straps, hope it is going to arrive soon:) i’ll send you a picture when i finished:)
Thanks,
Viki
Hi Viki,
Glad to hear it all worked out in the end 🙂 Look forward to seeing it!
x
Sol
> >
Almost finished! Are the handles sewn through the crocheted bag and lining or only through the crocheted part of the bag? Thank you
Hi Susie,
Great to hear you’re almost done! I sewed the handles before stitching the lining to cover up the stitches since I used a thick brown thread, but of course you can have the stitches showing through the lining if you are better at sewing than me 😛
Looking forward to seeing the finished product so please share!
Xxx
Sol
> > >
Hi Sol,
It’s me again. My bag is finished, however, I’ve encountered a problem. When I put anything in the bag the top sags down all around. At first I thought readjusting the lining might help, but now I’m wondering if it’s the handle placement and I need to move them further up to the top of the bag. Right now the stitching begins about 1-1/4″ from the top. I’m a bit worried though to move the firmly stitched handles and ruin the tapestry.
How can I send you some pictures? Any suggestions would be helpful. I love this tote!
Thank you, Susie
Hi Susie,
You can send me an email at acrochetjourney@gmail.com with pictures to understand the problem, I am having an extremely busy week so I may take a few days to reply, sorry!!
Xx
Sol
> > >
Sol,
Thank you for the quick reply. I didn’t think about the brown thread showing through until after I sewed the lining. I’m going to undo the lining, because as you said I would not want the brown thread to stick out on the lining.
Susie
Hello,
Thanks for sharing your pattern, I really love to knit it, but I cannot get the pattern. The link is not working! Could you send it to me? Thanks in advance!!
Hello,
Thanks for sharing your pattern, I really love to knit it, but I cannot get the pattern. The link is not working! Could you send it to me? Thanks in advance!!
Sorry!! Now it’s working…
This is absolutely STUNNING! Beautiful work. I am going to try and make this. Thank you so much for posting the pattern.
Hi firstly thanks for the pattern, the tote is amazing. I started to make it however I keep getting stuck at the 2nd row count. Something seems to be off.i mean mine doesn’t match with your 168 stitches total. Have opened and reworked almost four times now. Can you please help in any way.
Hi Ash,
So sorry the pattern is giving you trouble, how many stitches do you end up with? You should be working 2dc in the four stitches at either end, adding a total of 8 stitches. My email is acrochetjourney@gmail.com if you want to send pictures 🙂
x
Sol
Lovely, I think I will try and make that. But I’d like a bigger one. I don’t really understand your explanation for making the bag bigger. What is multiplied by 12? The first 79 chains? I’d appreciate it if you could explain it to me 🙂
The “diamond” pattern is 12 stitches wide for one diamond. So if you increase the base, do so by 12 stitch increments, by adding either 12, 24, 36 and so on, to the base chain of 79.
The chain is really 70 (+6 for half a diamond to complete the round +1 turning chain), which is a multiple of 12.
There’s no delete button so yeah, that response is not correct. 🙂 Whatever stitch number the pattern arrives to after the increases is likely divisible by 12.
I cannot find anywhere how you do the moroccan pattern. What am I missing please.
Reblogged this on Poeticallypeachy and commented:
I will have to try this pattern!
I cannot believe I didn’t notice the stitch being UK double crochet!! I just finished my first repetition and it looked NOTHING like the picture, LOL!! Very “elongated” to say the least, haha! And running out of my first ball already.
This’ll be the third time I frog the thing, but at least I finally figured it out. It’s always a good idea to really READ the pattern before starting. 🙂
Thanks for a very lovely pattern. I’m using colonial blue in place of gold.
If we are a custom to US patterns, then we should do the purse in “single crochet” correct? Your pattern is written in UK? Just want to verify before I get started.. Thanks! Lynn
Hi Lynn,
That is correct, the pattern is written in UK terms so you would have to work US single crochet for the bag. Hope you enjoy the pattern!
xx
Sol
I send you some pictures of my stitches to acrochetjourney@gmail.com I think I’m crocheting the pattern correctly, then I doubt myself. I sent them last week. hope you can look at them..
Glad I read the last comment of this long thread. I was going to say the bag looks like single crochet. I’ve just crocheted 6 tapestry pouches so a single crochet is emblazoned in my brain.Thanks and looks great!
Hi Sol,
Where can I buy the yarn, handle and the clasp? The link for the handle and clasp does not work.
Vasanti
For the yarn look up Cascade ULTRAPIMA on the web. Many yarn places have Cascade ULTRAPIMA, or “Craftsy” has it for sure because I had a friend watch for me when they had a sale.
The link is still there.. just shorten the web link to: http://www.bag-clasps.co.uk/
How much yarn do I need to make the bag.
Closer to the top of this page..
Materials
Cascade Ultra Pima DK, 2 skeins in Gold, 1 skein in Natural.
Thanks for the beautiful pattern. It wasn’t easy, but I did it!
For dutch chrocheters (is that a word🤔) I can the advise the yarn from Natura Medium DCM. Its easier to purchase here in the Netherlands.
Thanks!
there is no pattern ??
Love this pattern, and I’m not having any problem following it. However, my two yarns keep getting twisted together every time I change colors. Eventually, I have to stop and untwist them before I can proceed. Am I doing something wrong? My stitches appear to be the same as the tutorial video. Help!
I love the pattern…and will start learning to crochet to make it. I’ve knitted for years and did crochet granny squares a good 30 years ago. Where did you get the handles for the bag?
Sorry, I saw the information in the pattern after I posted!
I have noticed you don’t monetize your page, don’t waste your traffic, you can earn additional cash every month because you’ve got hi quality content.
If you want to know how to make extra money, search for: Boorfe’s tips best adsense alternative
This is a beautiful bag, such a lovely pattern and great colours. I have purchased yarn for this project, hope to start soon with this, which will be my first tapestry crochet ever.
Hi. I love this pattern. The instructions say to begin a color change one stitch before. How is this done when the new color is only one stitch and the next stitch goes back to the other color as is the case in the third row of this pattern. Thanks, Judy
When you are finishing the last stitch of a color you pull through a loop of the new color that loop sits on top of the next stitch.
Ive tried this countless time and just cannot get it right. My stitch count is correct but I always having problem with the last tile. It