I am writing this post but I am not really here. I work, eat, sleep, crochet and go around my day but the truth is that my head and body are being pulled into a different world, one much more exciting, magical and adventurous than mine.
Ever since I found my passion for reading it has been very hard to pull away from the gravity of an unfinished book that has me enthralled. Every day activities seem even harder and so mundane in comparison to what I have been living through the words of the author. Never does it bother me so much to be ordinary than times like this.
Soon the words will end and I will remember how much I enjoy my ordinary life and how it is also filled with love and adventure. For now, I still wish I was in a different skin, living a life that is not real nor my own, but that feels as real as these words.
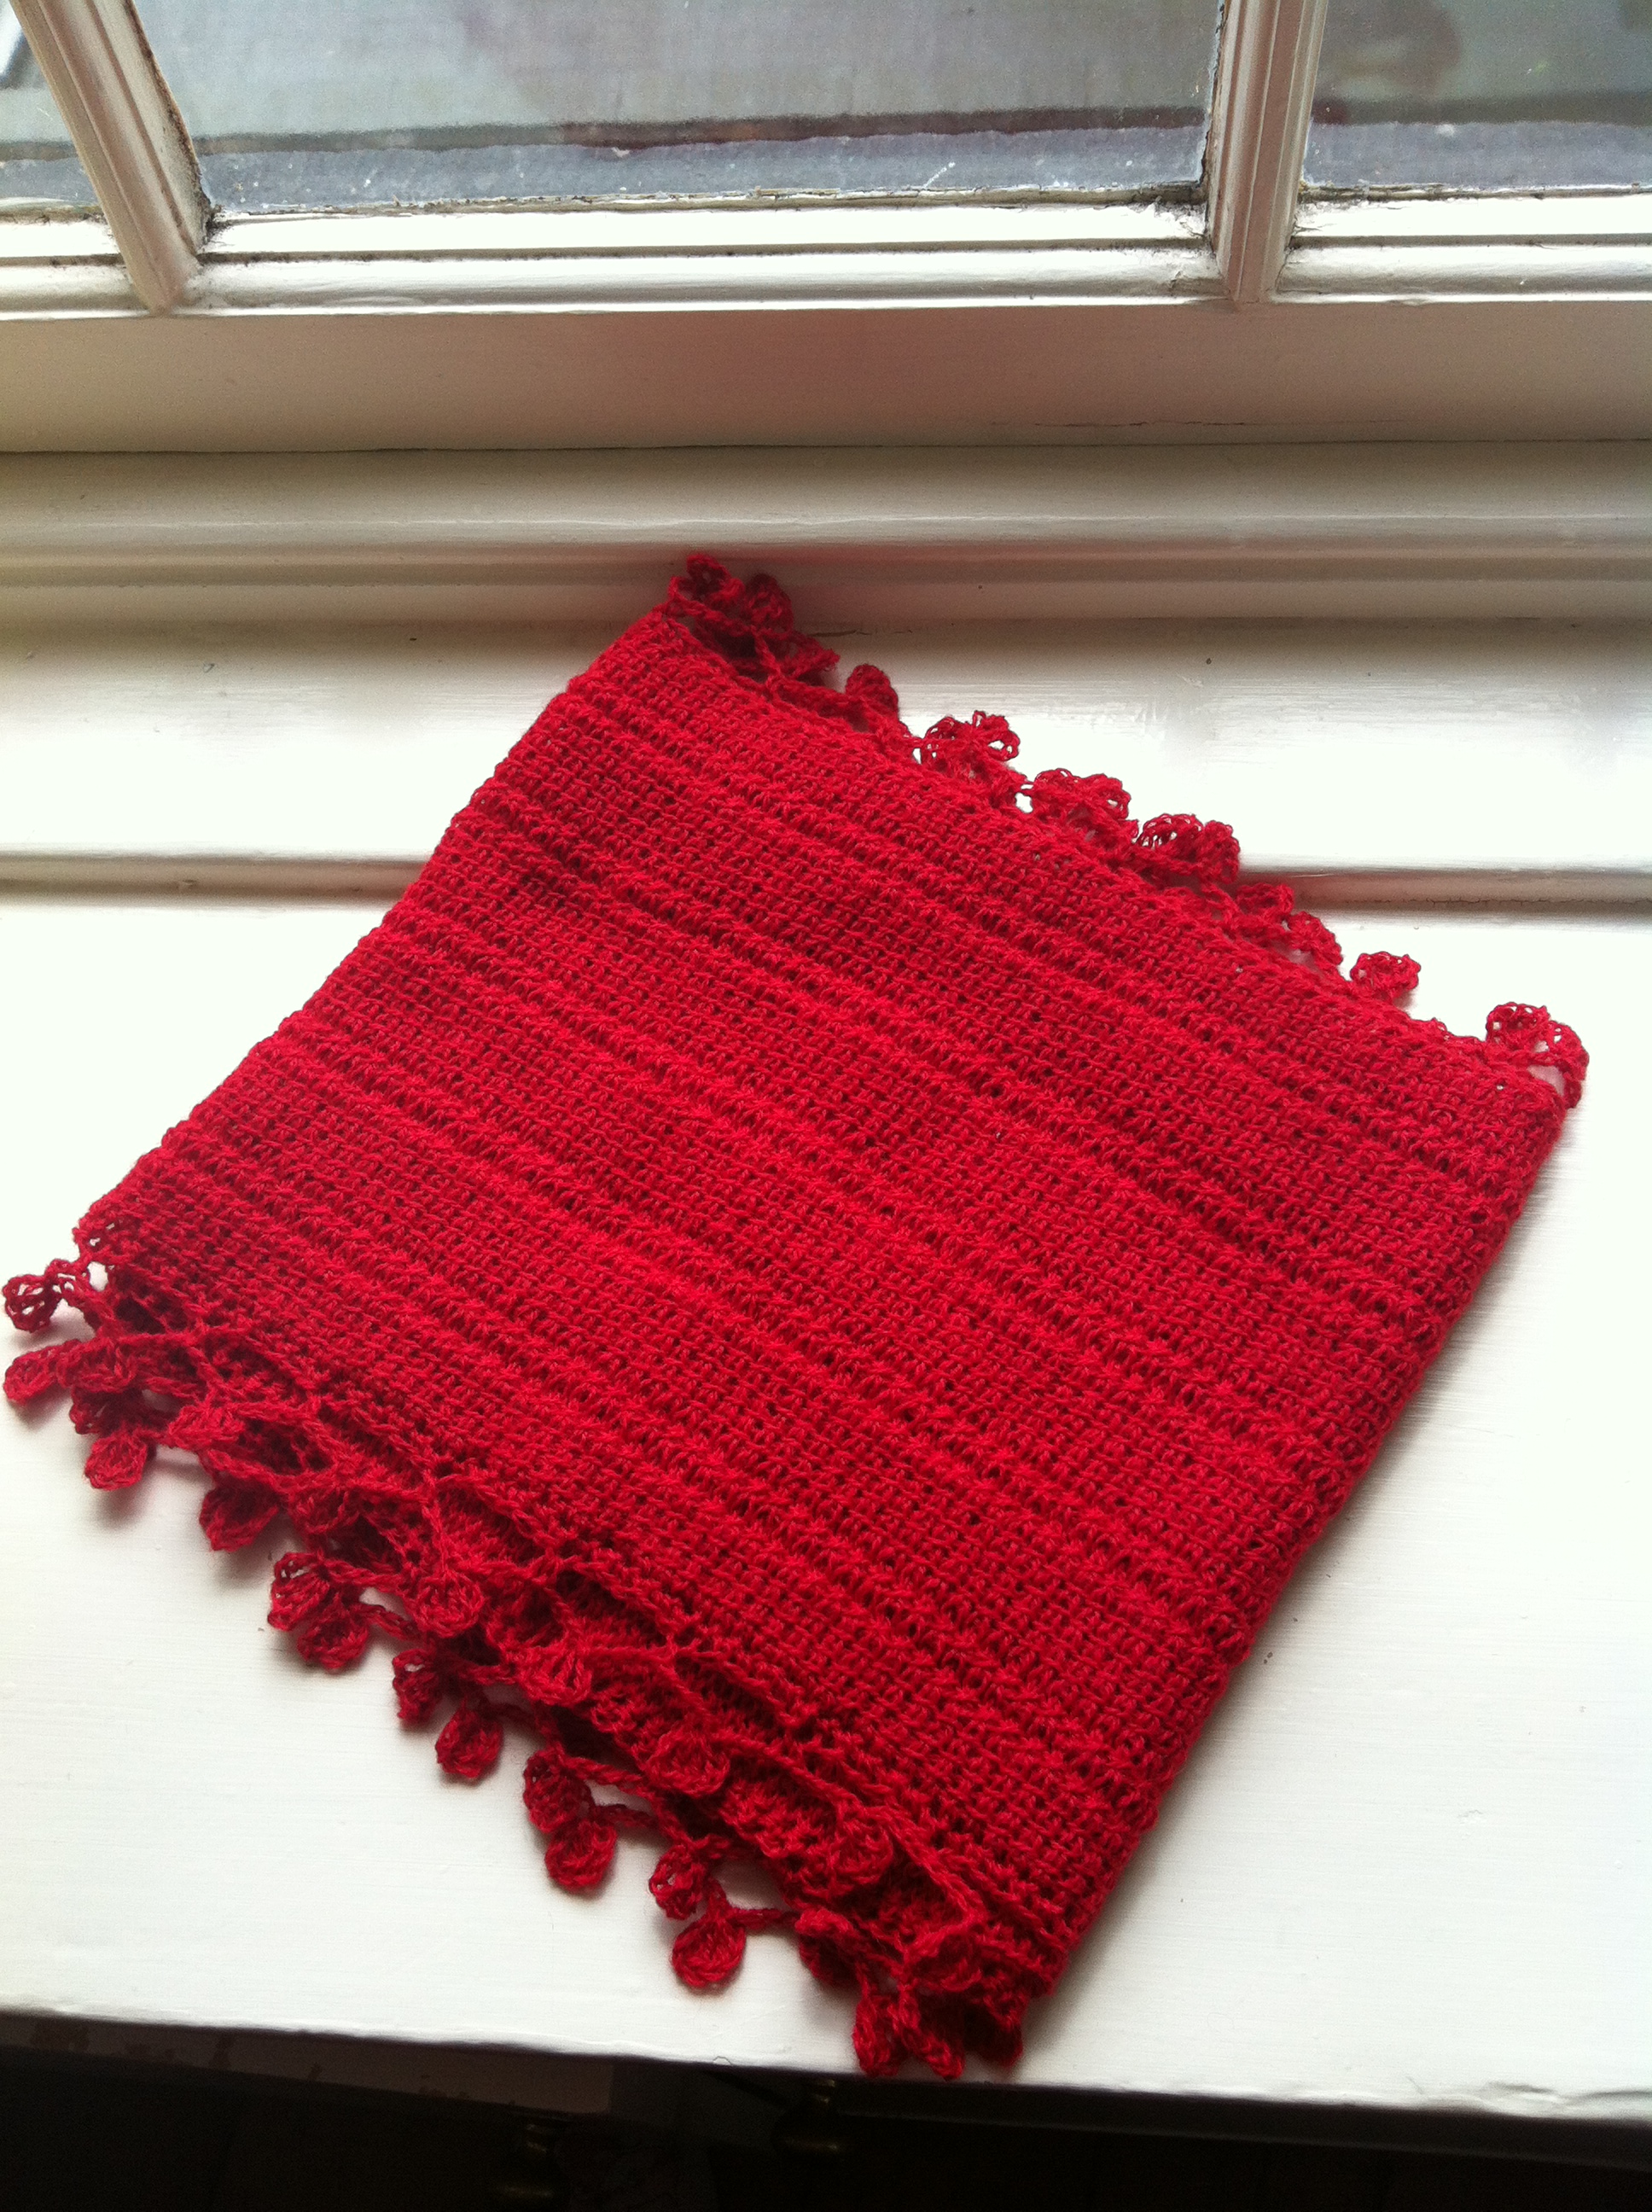
I promised this pattern long ago, sorry for the wait! Have been working on my geometric pattern and hadn’t been able to get my head out of it long enough to write this one, but it is finally here. This pattern uses Tunisian and normal crochet. If you are not familiar with Tunisian crochet this pattern is really simple, check out the following videos to get the basics and a detailed explanation of the two stitches I used.
I crocheted the scarf first, then did the edging and finally joined it to make it a cowl/infinity scarf. I blocked it after I had done this so it was folded, it wasn’t ideal but worked just fine. You could block it before joining it if you have somewhere big enough to do this.
Toreador Pattern
Materials:
6mm Tunisian crochet hook (30cm long)
5mm crochet hook
Yeoman Fifty/Fifty 2ply in Toreador (I used 72g)
Needle to weave in ends.
Abbreviations
Ch – Chain
End st – Last stitch on forward pass
Lp – Loop(s)
Sk – Skip
Sl st – Slip stitch
St – Stitch(es)
Tss – Tunisian simple stitch
Txs – Tunisian cross stitch
YO – Yarn over
dc – UK double crochet
tr – UK treble
Stitch Guide
Foundation forward pass: Insert hook on back bump of second ch from hook, YO and pull up a loop, *insert hook on back bump of next ch, YO and pull up a loop, repeat from * until last ch.
Return pass: YO and pull through 1 lp, *YO and pull through 2 lps, repeat from * until you have 1 lp on hook.
Txs: Skip 1 st, Tss in next st, return to sk st and Tss over last st made.
End St: Last st of the forward pass is made into ch created by the return pass. Insert your hook under the vertical bar where you usually do it AND the strand behind it and pull up a loop (check the video links to see this in detail).
Binding off: As with every row you start with one lp on your hook. For each stitch, insert hook as normal (depending on weather it is a Tss or Txs), YO and pull through both loops (through the st and the loop you had already). Continue until the last st.
Ch 44. Work foundation forward pass (44st, each lp on the hook is a st). Work return pass.
Row 1: Skip first vertical bar, Tss in next 3 st, Txs 2 times, *Tss in next 4 st, Txs 2 times, repeat 4 times from *, Tss in next 3 st, End st. Work return pass. (44 st)
Row 2 – 197: Repeat Row 1.
Row 198: Repeat Row 1 binding off each st (not leaving the st on the hook). Don’t cut yarn.
Edging
The edging requires a number of stitches multiple of 6. I found it in a Japanese crochet book and have written instructions as clear as I can and also pasted an image of the chart to make it easier to understand.
Turn your work so that you are working on the long edge of the scarf. Change to a 5mm crochet hook.
Row 1: Ch 1, dc in next stitch until the end. Turn (198st).
Row 2: Ch 1, dc in next st, *ch 7, 2tr on 4th ch from hook, ch 3, sl st to ch where you did the 2tr, ch 3, sk 5st from previous row, dc in next st, repeat from * until last st. Cut yarn, fasten off.
Repeat Rows 1 and 2 for other long edge. Join two shorter edges and wet block.
Crochet Lace Japanese Crochet Book – ISSUU
Here is the Ravelry link. Please let me know if you have any questions!
Hello everyone! Sorry I haven’t been posting much this week but I have been very busy, it was my boyfriend’s birthday a few days ago and there has been little time to crochet or update the blog. We had a lovely time and the weather couldn’t have been nicer, I even made a cake and it turned out so good I will have to have an excuse to make it again before next year!
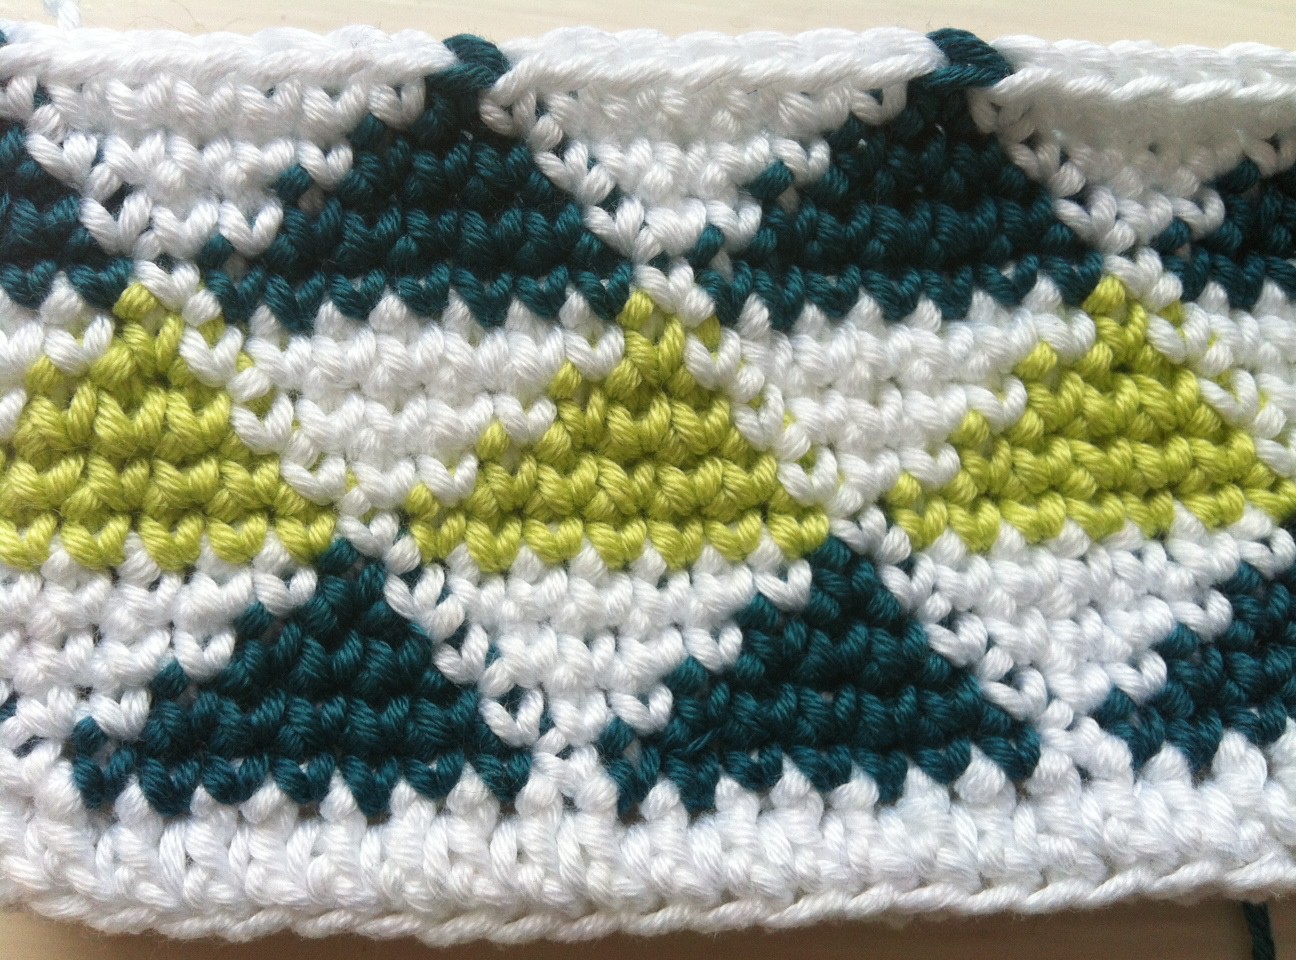
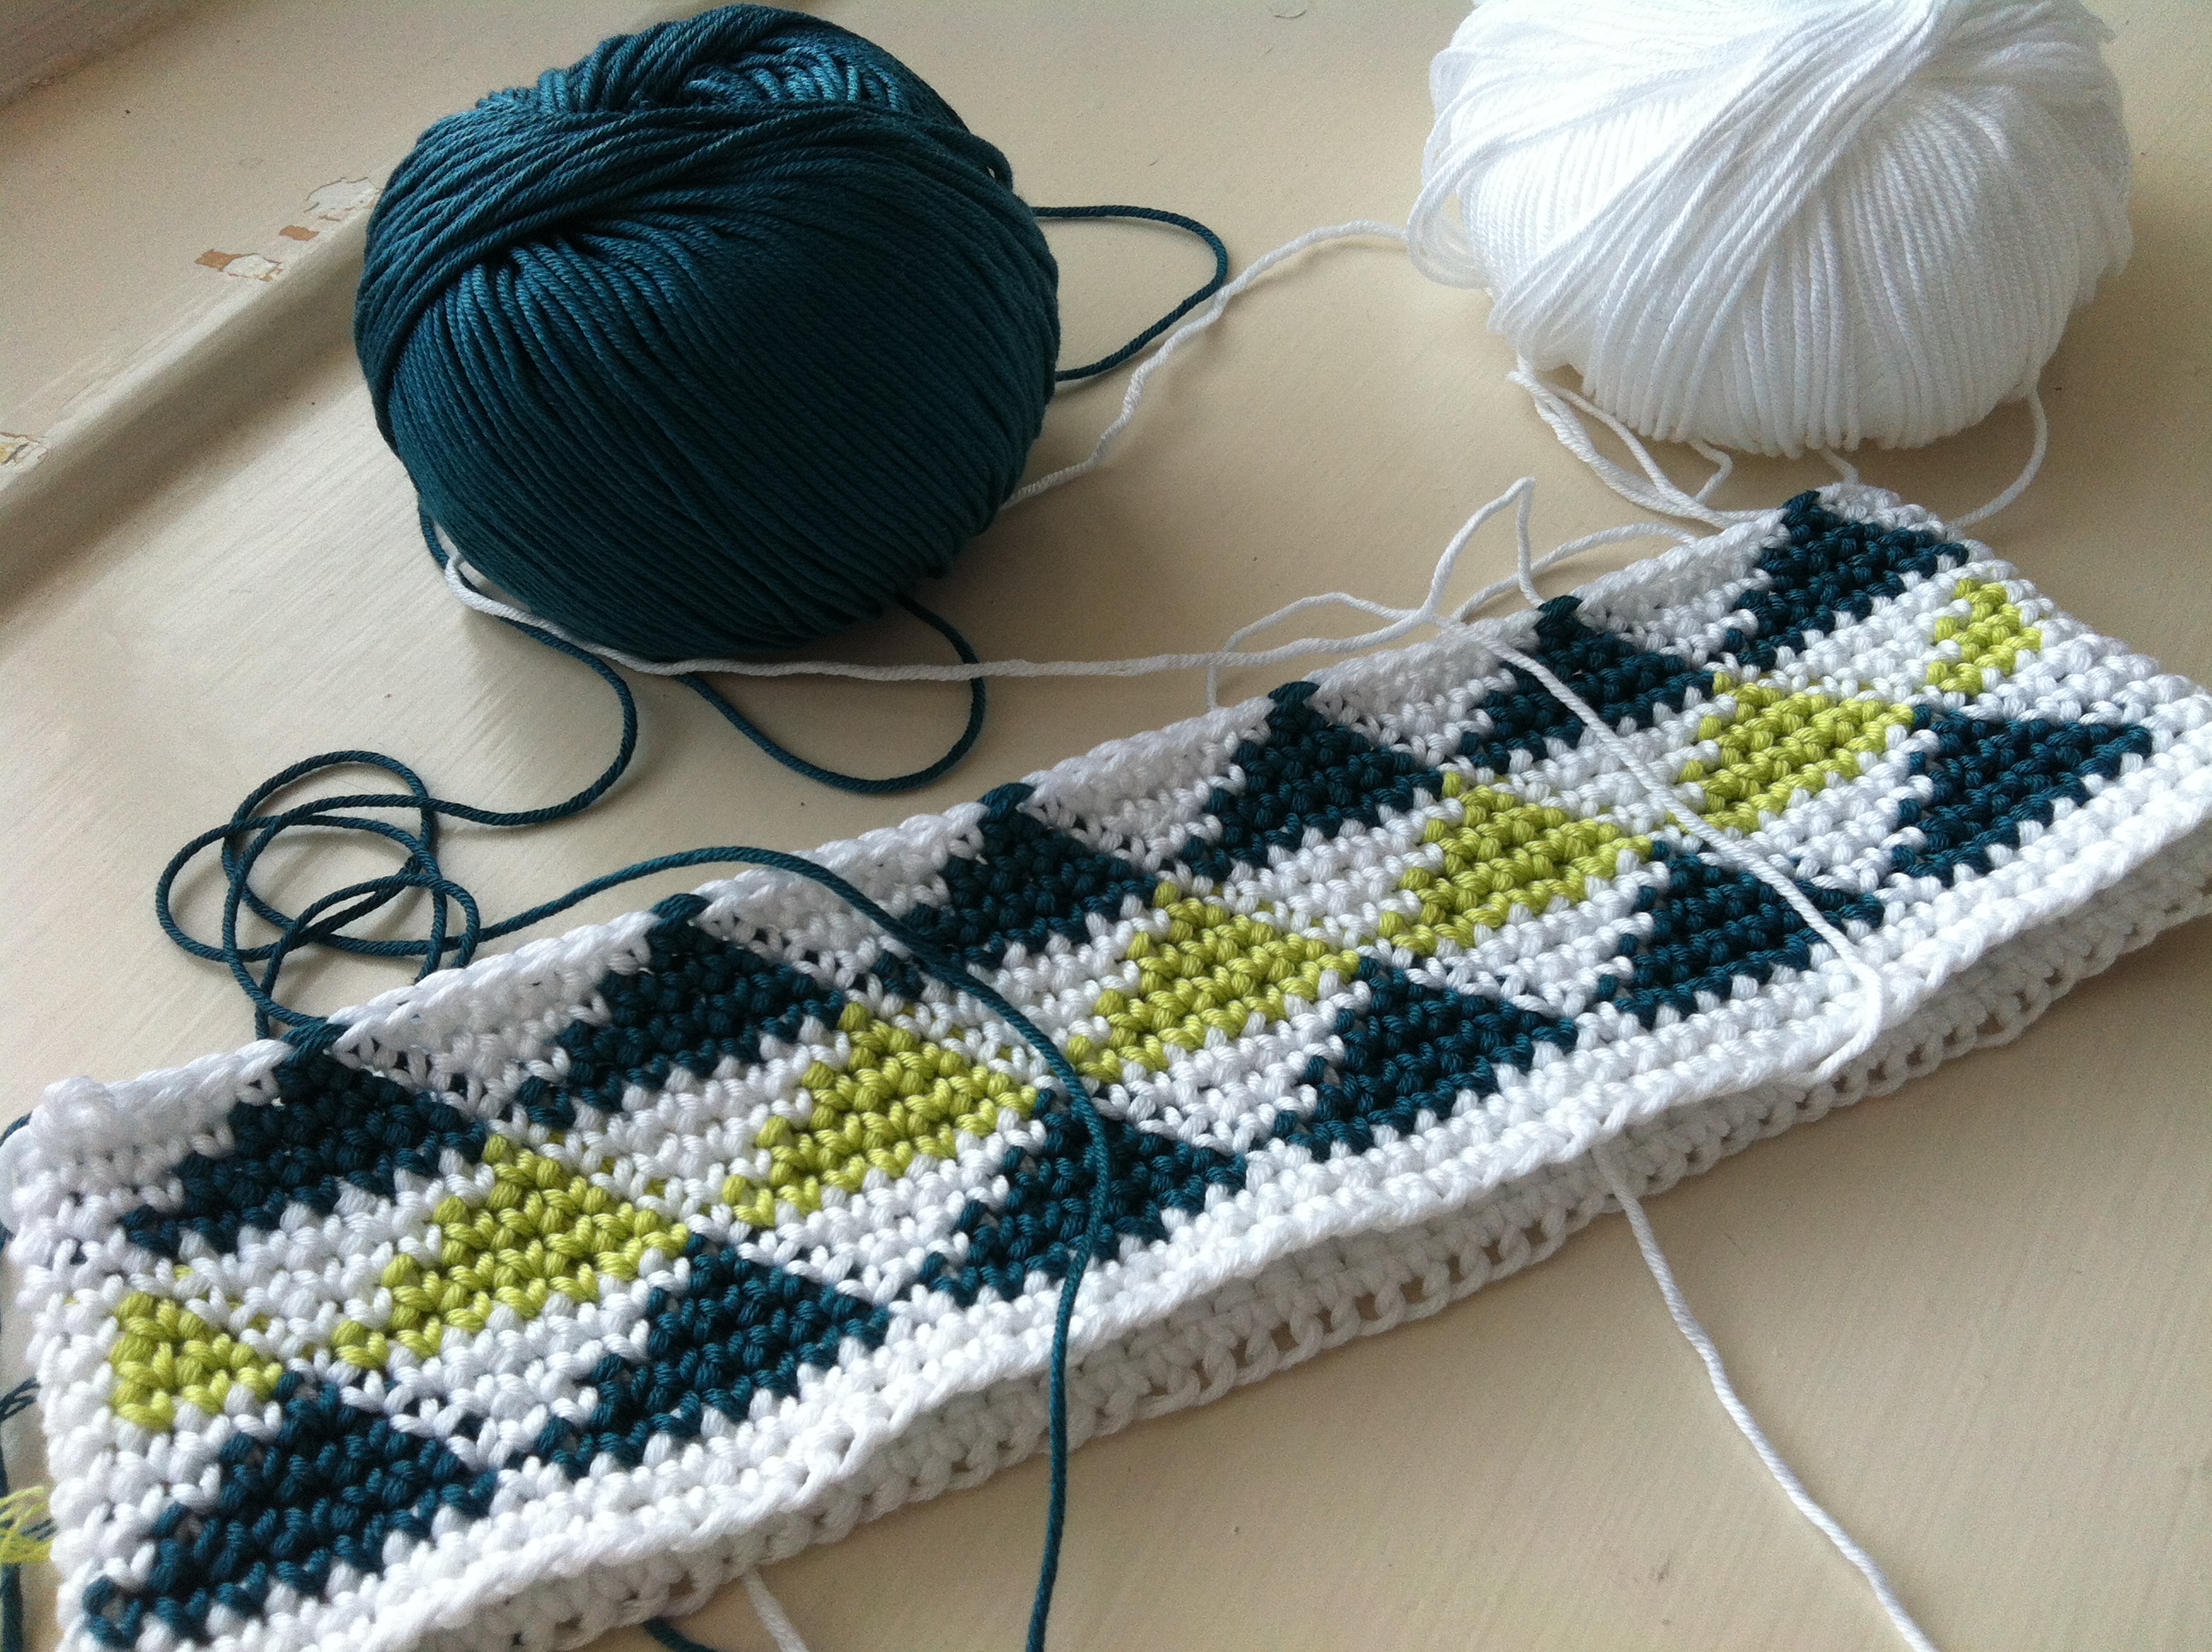
Lately I have been working on this geometric pattern I showed you last week, but had to start over after some problems with the tension. It will be a little purse with a fabric lining and a zip to store some pens, I am really liking it so far but I realised that the technique to keep your seams straight when working on the round works much better when you do stitches on the back loop only.
I have been doing the same technique as the wrist warmers on this project but the seam keeps moving, not as much as it would without it and it is less noticeable, but it is definitely a diagonal. I would work on the back loop if it weren’t for the dark green colour, it is too contrasting and the shapes of the triangles are not as clear when you work on the back loop but have bought lighter yarn to give it a try with a different sized purse.I think the shapes would be clearer if they were bigger but I wanted small triangles.
Working on the back loop only will also fix the slight tendency of the shapes to lean to the right side. I know I should’ve just started with the new purse with lighter colours and back loop only but it will be a good exercise to see the final result with both techniques. So, lord give me patience to finish them both!
I get so impatient when I spend too much time on a project, specially when it is small. This pattern is deceiving because all the colour changes make it more time-consuming than it seems, but I still love the final effect. I will keep you updated on my progress, the seam is just turning enough to start showing at the front so will see how much that bothers me soon 😛
Hope you are having a Sunday as lazy as mine, just nice food, time with my boyfriend, crochet and TV 😀 Above is a sneak peak to what I have been up to lately, if it turns out nice there will be another pattern on your way! I am writing the pattern for the Yeoman lace project, so I hope to post that soon.
I carried the yarn in strands at the back instead of inside the stitches as when doing tapestry crochet because the colours are very contrasting. I made sure to catch the unused yarn every 3 stitches regardless of the chart, e.g. if the chart says 7 stitches in the dark colour before changing to the lighter one I would do: two stitches in the dark colour, catch the strand in the third, two more dark, catch the strand on the 6th and then change to the light colour before ending stitch number 7. Shorter strands reduce the chance of catching them when you put them on.
To get a straight seam when joining each round I used this technique by Crochet Ever After which also makes the joining less visible. Basically, when you are working in rounds you usually do the last stitch, join with a slip stitch to the first stitch, chain one and then continue the pattern in the NEXT stitch to the one you slipped the hook through when joining. This makes the joining move one stitch with every round and then you get a diagonal seam. By doing your first stitch in the SAME stitch as where you did your slip stitch you always join in the same place. So if Round 1 and 2 of the pattern sound confusing check the video for further guidance.
You don’t really need a gauge for this pattern, you just have to check the size first. I added 4 stitches to the original pattern shown in the picture since my wrists are very small. Before starting the pattern, chain the number of stitches required, join to first chain and check if the circumference is large enough that it fits the part of your hand where your thumb starts, otherwise you won’t be able to put them on. If it is too small for you I have added some empty columns to the chart in this file: print it and fill in the squares randomly and adapt the rest of the pattern to your new number of stitches. Just remember the chart is for half the number of stitches since you repeat it once. You can also do more rounds of the solid colours depending on how long you want them.
This pattern is available for free to my dear readers, and you are welcome to sell finished products (but of course not the pattern), I only ask that you credit the pattern to me.
Finally, this is the first pattern I have ever written so I apologise for any mistakes and please ask any questions you may have, I will be happy to answer them.
Night to Day Wrist Warmers
This pattern is crocheted in the round, without turning your work and on the back loop only. The middle section of the pattern uses a fair isle technique to change colours and carry the unused colour as strands in the back, as explained in the comments above. The pattern is written for one standard size, but click here to download a printable chart that allows you to add stitches if the pattern is too small.
US terms
sc blo – single crochet in back loop only
ch – chain
st – stitches
Materials
Hook: 3.5mm
Yarn: 1 x 50g ball Excelana 4 ply in Cornflower Blue, 1 x 50g ball Excelana 4 ply in Nile Green (I only used approx. 15g of each colour)
Needle to weave in ends
Instructions
With darker colour chain 40, join to first chain (make sure not to twist them) with slip stitch and pull hard so that the chain just made is less visible.
Round 1: Ch 1, sc blo in first ch (where you just did the slip stitch) and in every ch across. Join with slip stitch to first sc. Don’t turn (40 st).
Round 2: Ch 1, sc blo in st where you joined with slip stitch in previous round, sc blo in next st until the end. Don’t turn (40 st).
Round 3 -10: Repeat Round 2.
Round 11-24 : Follow chart below from right to left and repeat once for each row (chart is for 20 stitches, in each round once you get to stitch number 20 go back to the first stitch of the row and repeat for the next 20).
Cut darker yarn and continue with lighter yarn only, leave a tail long enough to make it easy to weave in.
Round 25-31 : Ch 1, sc blo in st where you joined with slip stitch in previous round, sc blo in next st until the end. Don’t turn (40 st).
Fasten off, weave in ends.
I have added this pattern to Ravelry as well if you want to add it to your queue 😉
Please post a comment if you have any questions and enjoy!
Hello there, thank you for visiting my blog on this lovely day! It has been so sunny and warm in Edinburgh today that no one can talk about much else. I never thought that blue skies would be such a topic of conversation but if you live in Scotland you understand that once the sun is out everyone will comment about it wherever you go. I am even wearing shorts! (it took a while to find them). Ok will stop about the weather now, told you it’s all you can talk about…
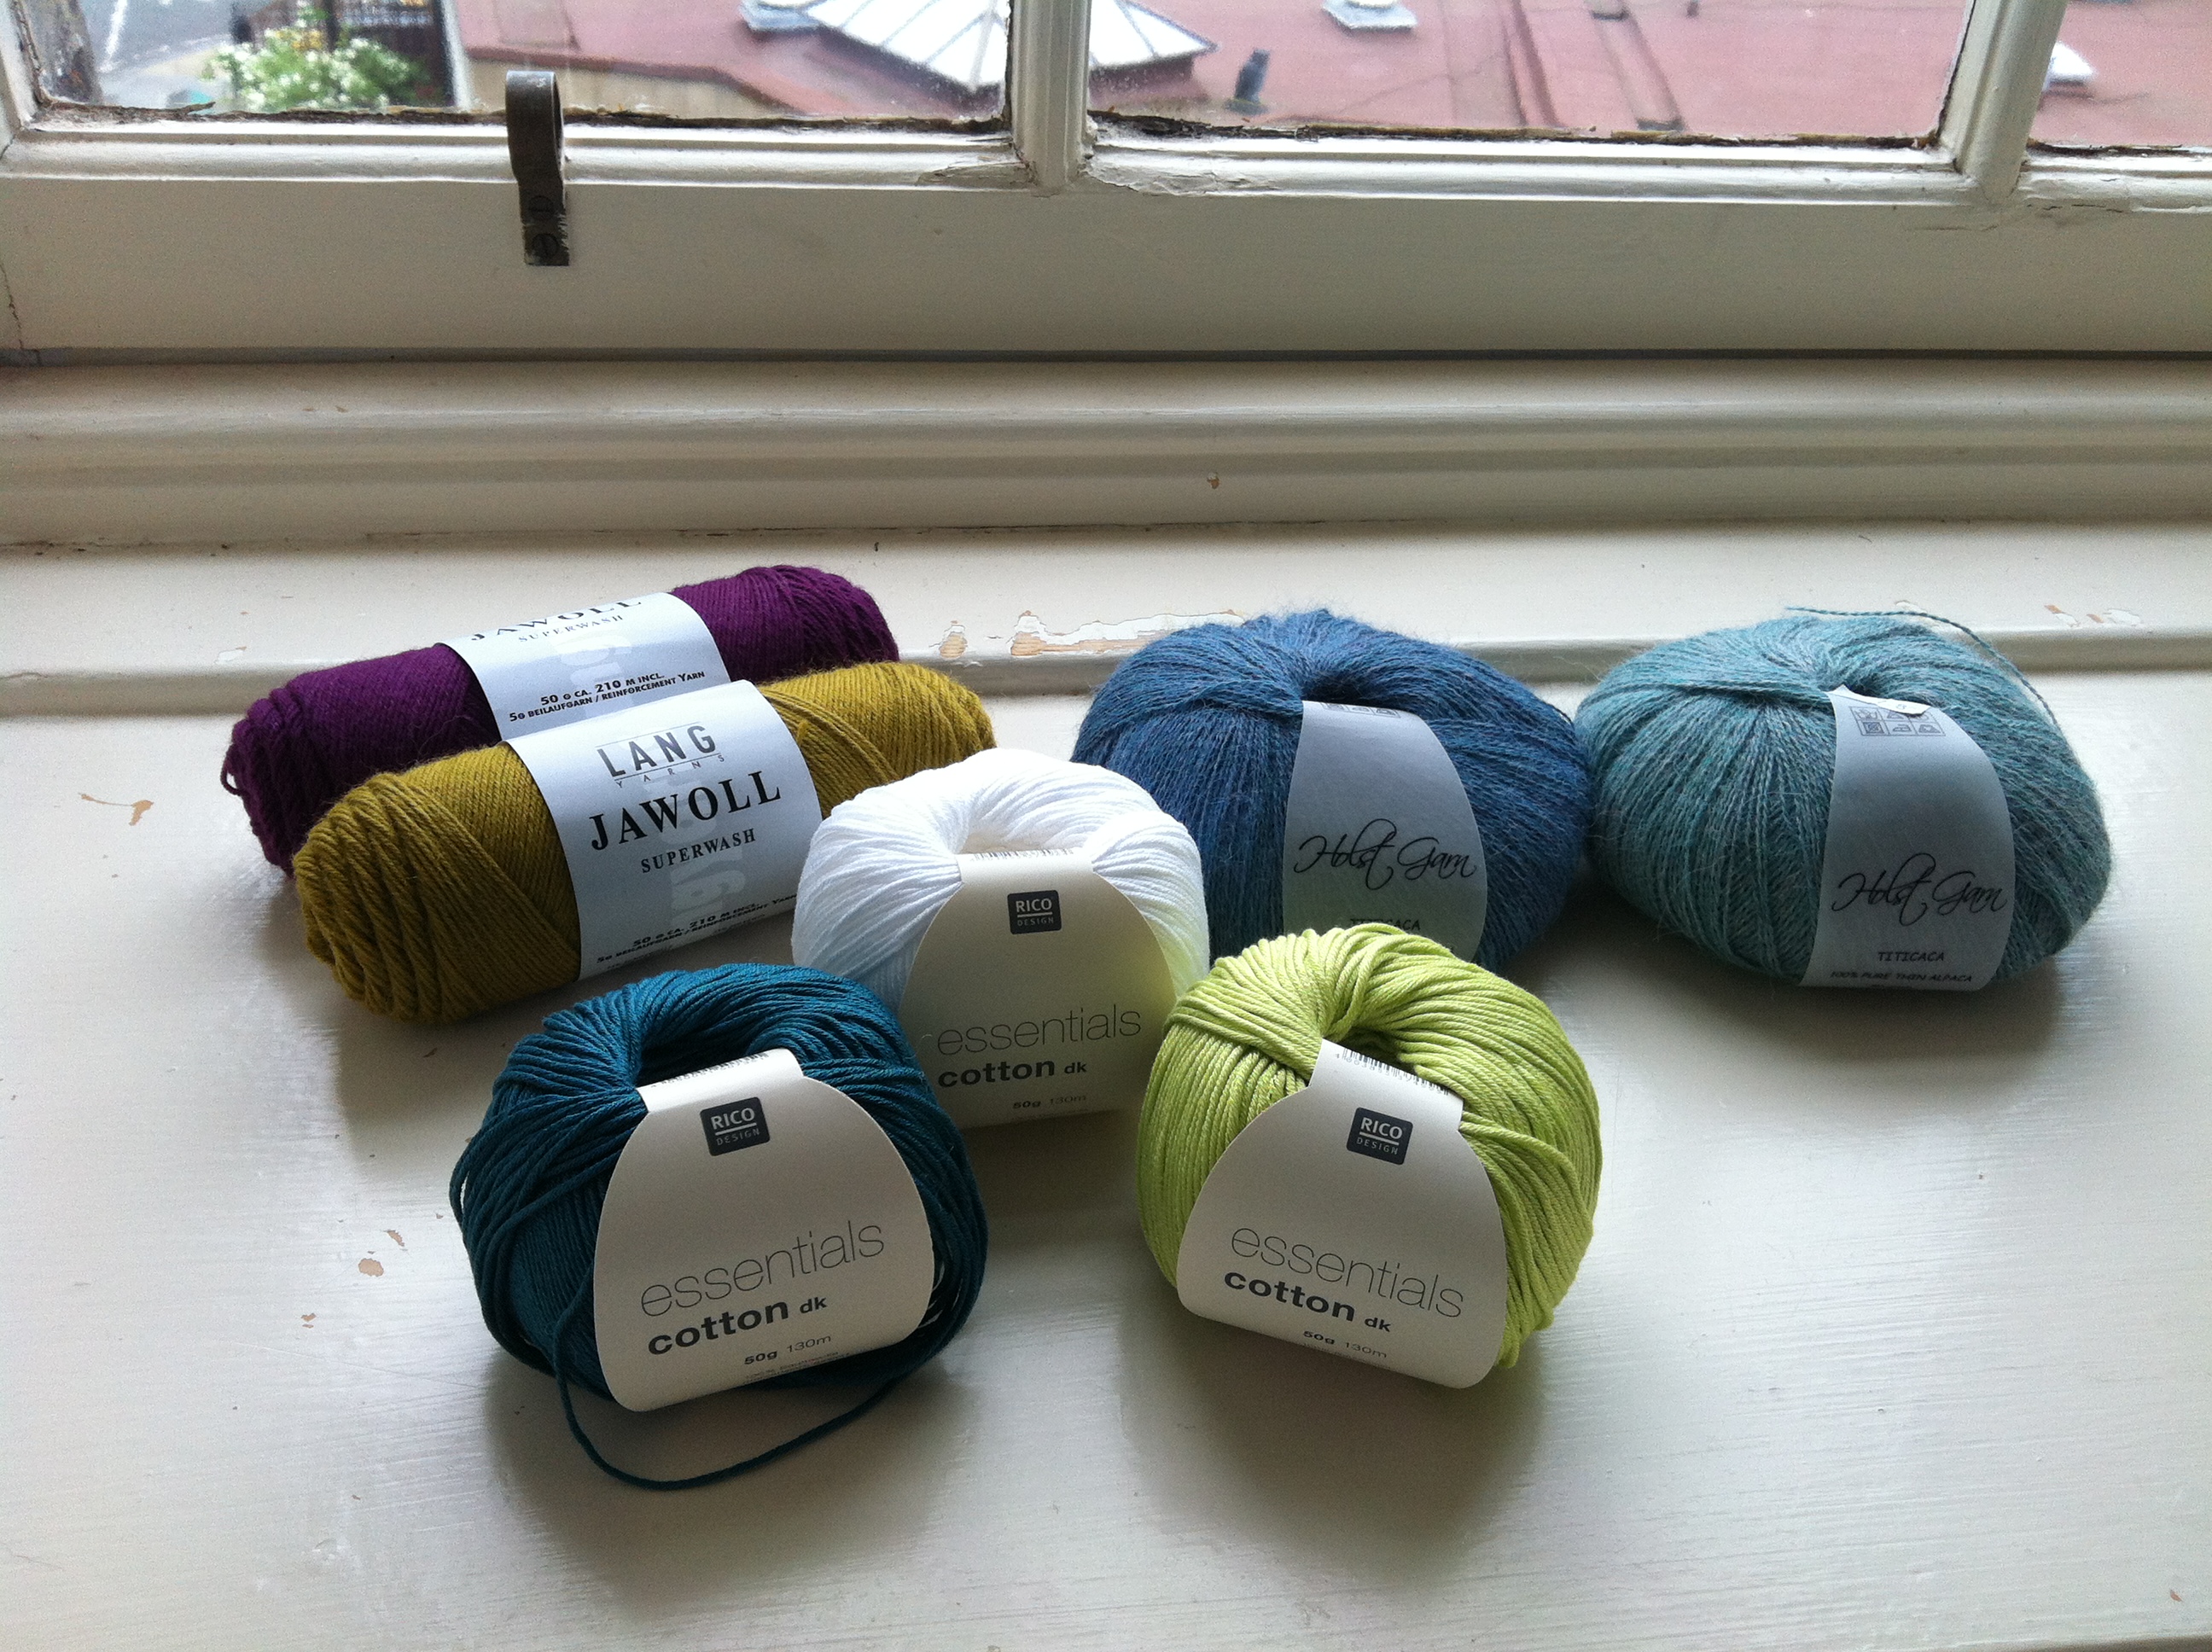
In this post I wanted to share with you some of the lovely yarn I bought while participating in the first ever yarn crawl in Edinburgh. If you don’t know what a yarn crawl is, it is basically a pub crawl but instead of shots you buy yarn and instead of a headache the next morning you get that amazing feeling of new yarn under your hands.
The yarn crawl included three shops in town: Ginger Twist Studio, Be Inspired Fibres and Kathy’s Knits. They are all lovely shops, each with its own unique identity and beautiful yarn. I joined a lucky dip group so we went to each shop together which I thought was loads of fun.
If you read my blog you know that I have set up a challenge for myself to use up my yarn stash and buy less yarn, BUT I thought that such occasion as a yarn crawl was clearly an exception since there was no way I was going to go to three yarn shops and not buy anything. So I set a budget, then increased it of course once I was there and ended up buying some beautiful yarn so I thought I could share it with you guys. I bought all of them for Be Inspired Fibres.
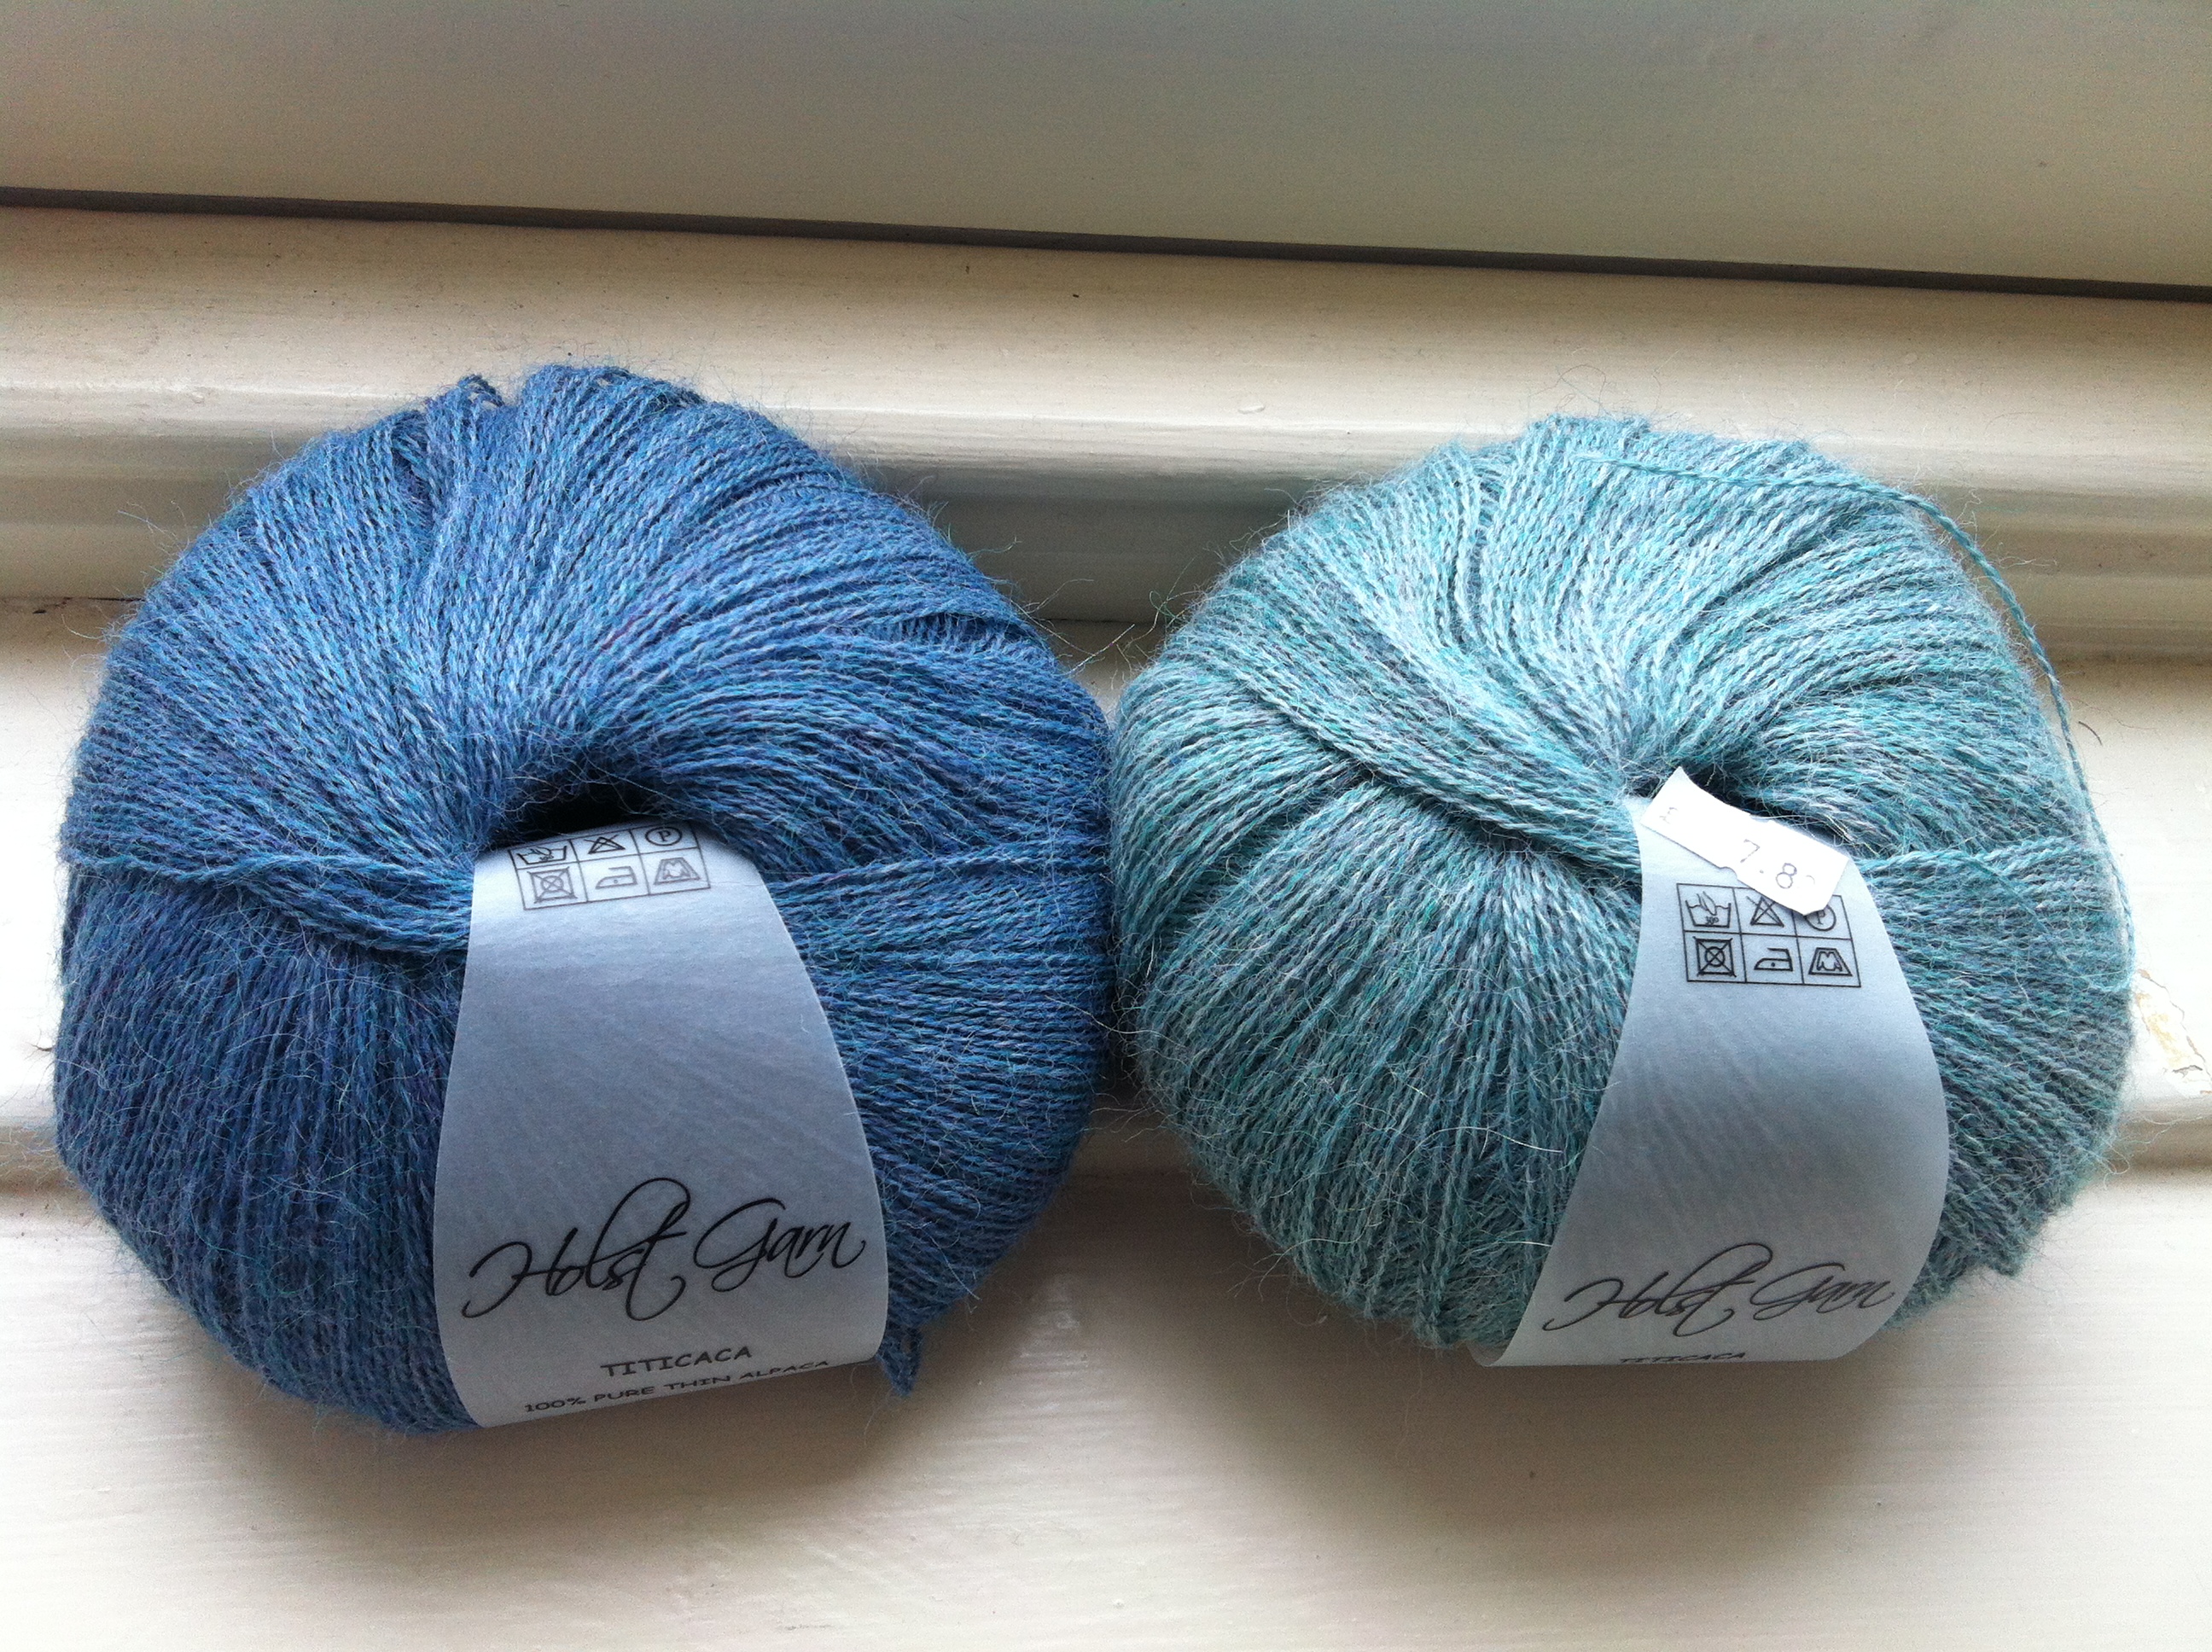
First, I wanted some lace since I have an idea in my head for a shawl ever since I started downloading japanese crochet books and fell in love with a stitch pattern in one of them. The yarn is called Holst Garn and it is SO soft, 100% pure thin alpaca. It smells amazing as well, reminds me of the south of my country.
Next, I wanted some cotton yarn for another project I have in mind for a pencil case (details to come!). I wanted bright, fun colours and these ones are perfect.
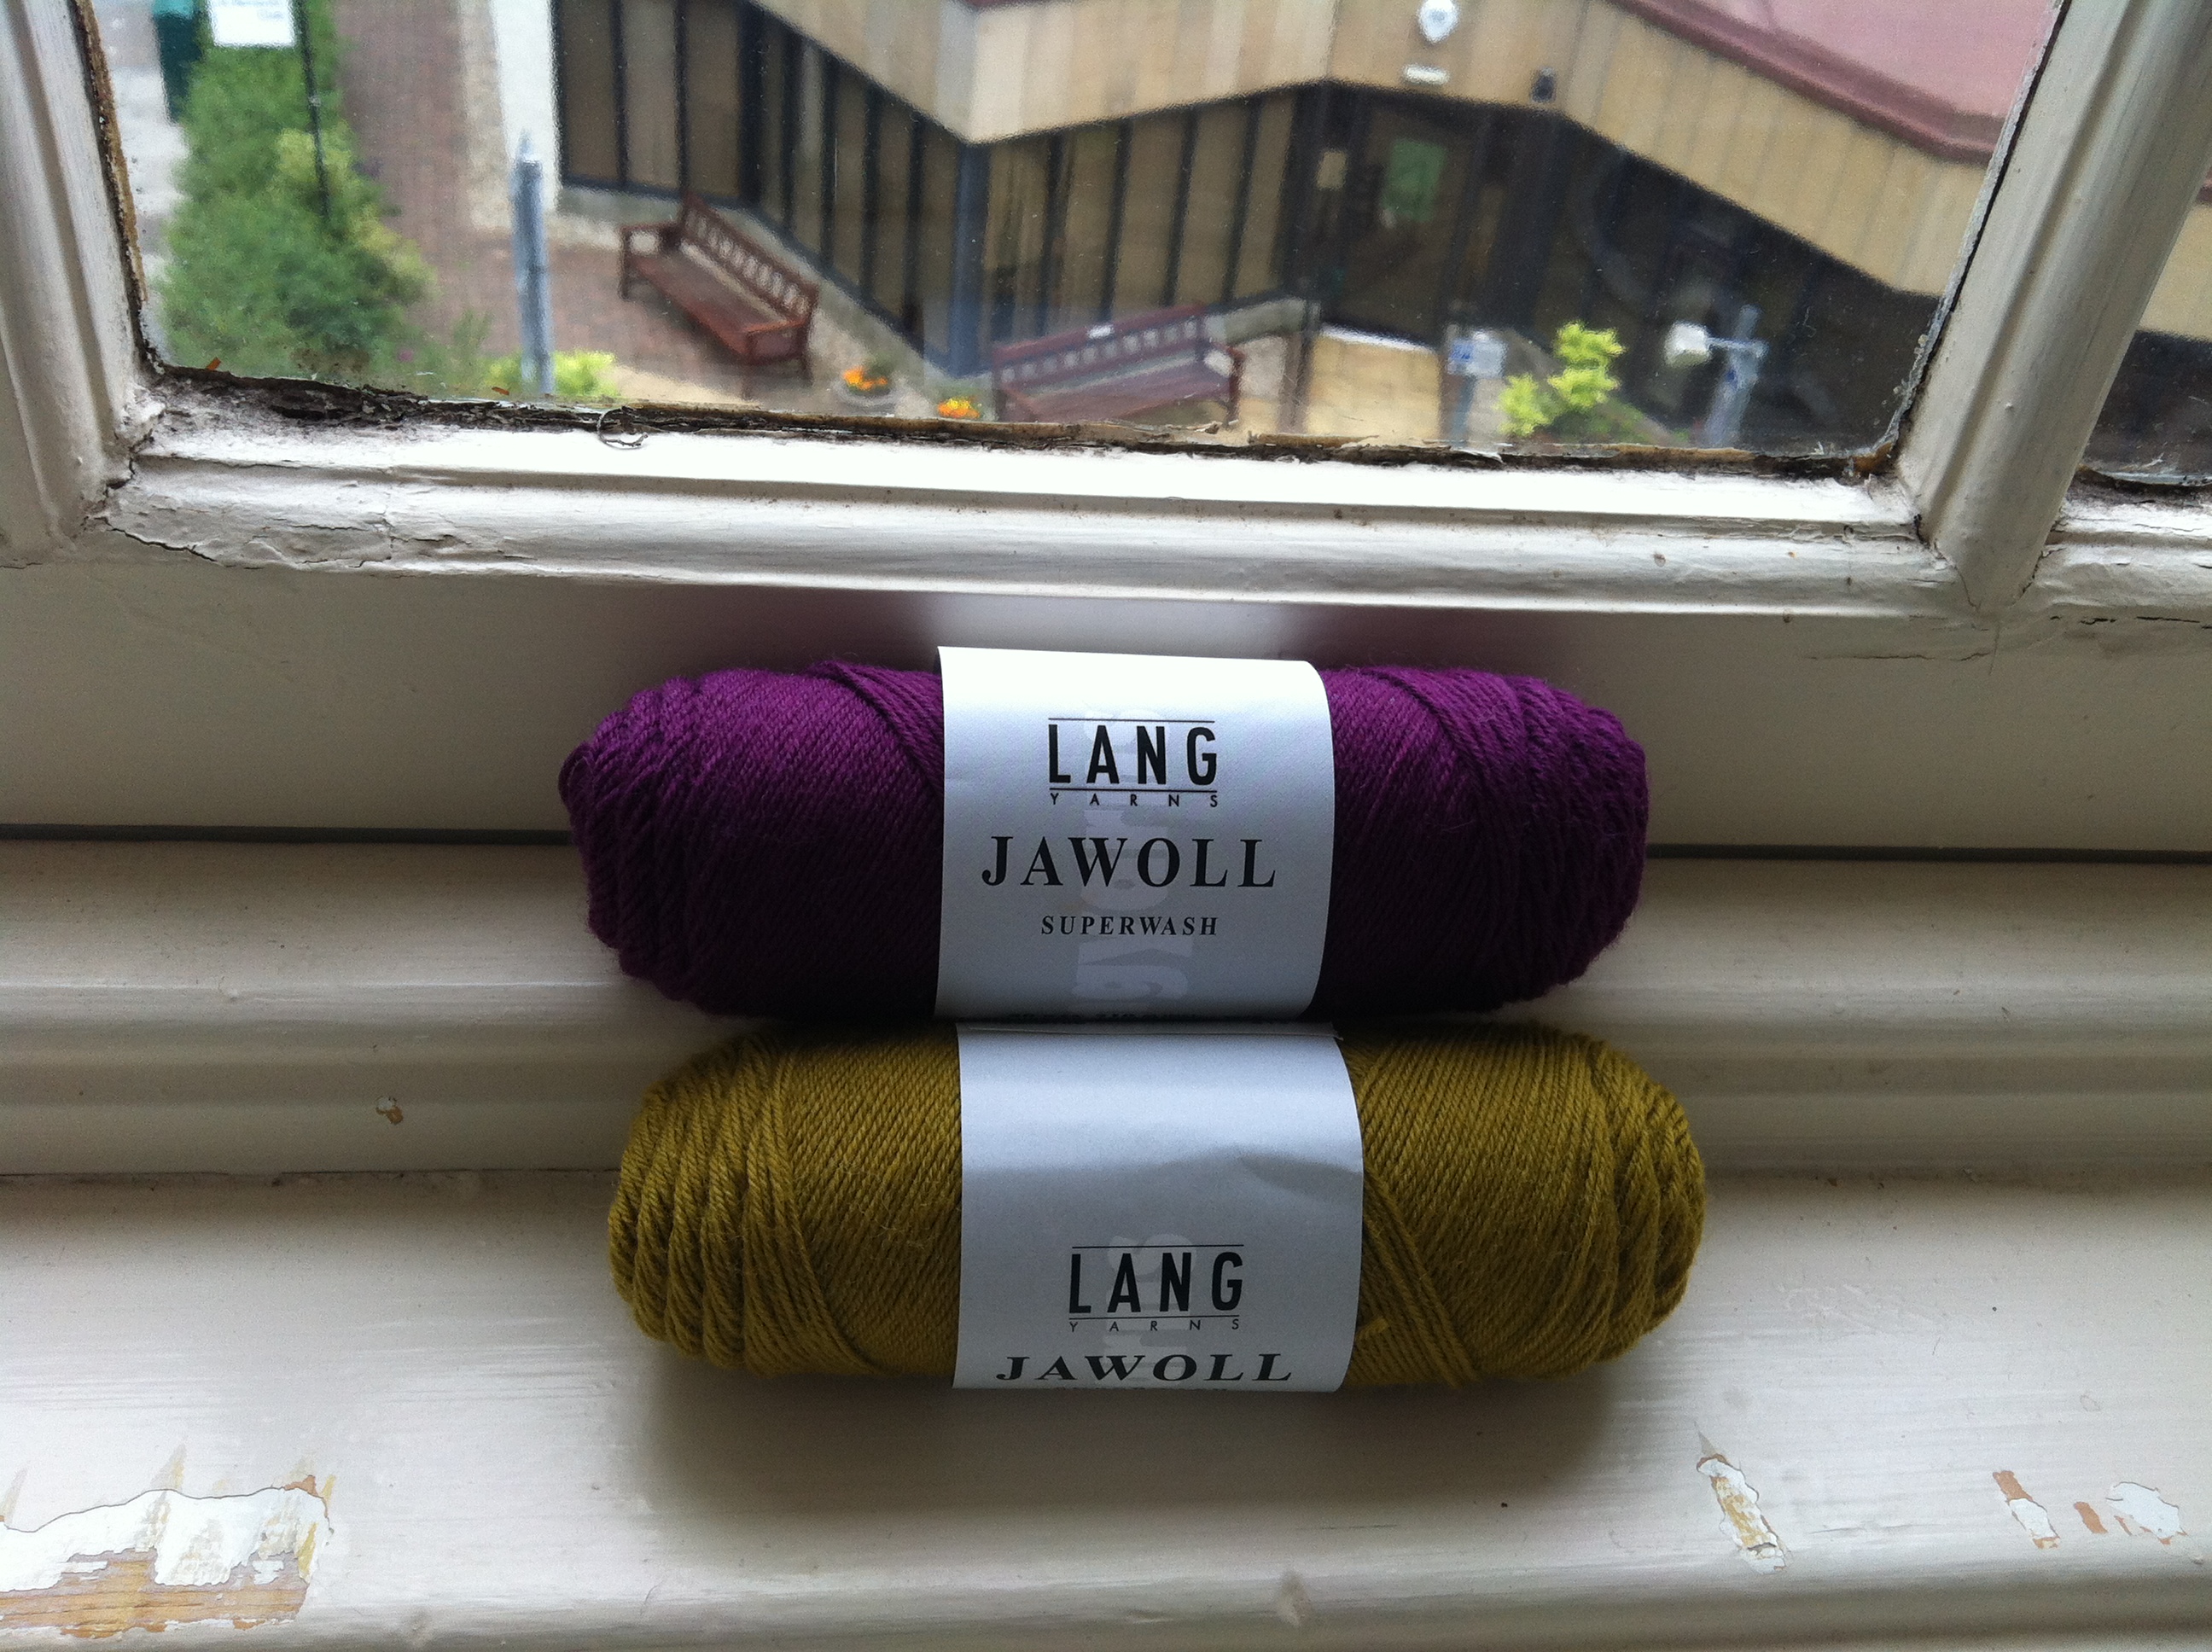
Finally I ended up picking up this superwash yarn called Jawoll by Lang Yarns, I just fell in love with the colours and thought they would make some lovely fair isle wrist warmers.
I am in a chart mood lately, I have been playing with my colours trying to put into paper some of the ideas I have and can’t wait to start swatching!
I have never been good with colour. From my clothes to my crochet projects it has always been hard to put them together, and I usually end up mixing two tones of the same colour. I think that is one of the reasons why I always used to crochet projects in one colour, well that and having to hide all those ends of course.
A few months ago I saw this blanket while browsing patterns in Ravelry and I fell in love. After avoiding colour for a long time I decided to take on the challenge of a granny square blanket! Crazy, I know. I was determined to get through it because of the beautiful end result but I didn’t think I would enjoy the process as much. I decided to go with the same colours as the pattern since picking so many colours on my own would take me years, bought a big storage bag to put it all in and set off.
It took only a few squares to realise how wrong I was and to name this project as my happy blanket: there is no other way of describing it as colour happiness. Every time I make a square there is this happy, cozy feeling inside and a smile on my face. 5 rows of squares later and the feeling hasn’t gone away, and I think I will actually finish this blanket one day!
And that’s not all. I am already looking for more blankets to do!
I want to share my new found love for audiobooks. This, my dear reader, was not an easy transition. As many of you out there I started my love affair with books at a time when they were thick, heavy and had that wonderful smell (new or old, books have an amazing smell). I was the kind of person that could be seen walking the streets of my home city while reading without ever running into any trees, lamp posts or people (just had a couple of close calls).
When the e-readers came out I was as offended as everyone else and declared my loyalty to “real books”. Then the fact that you could carry a huge title in a thin device and that you could download books in seconds instead of ordering them online and getting them a month later (the curse of international shipping to third world countries) won me over. I bought my Kindle and thought the days of change were over.
Then this crochet obsession began and when I started missing my books I decided to try audiobooks. I have never liked when people read to me but I thought it was worth the try. And it definitely was: audiobooks are the best thing ever. I use Audible so I can listen to the books on my phone, not only while I crochet but when I am walking or commuting to work. Reading on a vehicle is an old dream of mine that had never come true because I get motion sickness in any kind of moving vehicle that can be classified as being more sophisticated than a scooter. Who said dreams can’t come true?
If you want to try them the Audible membership is very reasonable, though always listen to the samples before buying, you don’t want to get stuck with a really annoying voice for more than 8 hours of your life. Some libraries offer free audiobooks, I have tried the ones offered at the Edinburgh Library, not many titles but they are free.
Is the title “killing my yarn stash” a bit too much? English is not my first language and where I come from we are a lot more exaggerated with our phrasing and we throw words like “kill”, “love” and “hate” to a conversation without adding more meaning to it.
The same applies to when we do something “a million times” when here it might be “a few times” (by the way anything more than a couple qualifies into the million category). So I apologise if the title startled you, no intentions of killing my yarn (no idea what that would imply… dividing the strands? setting it on fire?), just trying to get rid of some. Of course I am just kidding myself because as soon as I get rid of some I feel the right to buy more, but still.
Maybe I will change the title to something more polite… reducing my yarn stash? minimising my yarn stash? Ok, might need a bit of time to think about it 😛
As with most things, this pattern didn’t start the way it ended. I bought this yarn from the lovely Jess at Ginger Twist Studio with the idea of doing some tapestry crochet in the shape of diamonds, little woolie style. I bought a yellow colour along with the blue and light blue but they really didn’t look well together. The navy blue was too contrasting to carry it inside the stitches without being WAY too obvious.
I was thinking that the two tones of blue looked well together and started scratching my head looking for ideas. That is when I thought they looked like night and day and the pattern started forming in my head. I bought a notebook with little squares, loads of coloured pens and started to make a chart for a random transition from night to day.
Now, let me tell you that coming up with a random pattern of dots is actually not random at all and takes loads of attempts. When I was finally satisfied I thought I would do it with tunisian crochet and frame it for my wall (I have some granny squares framed and they look lovely, pictures soon).
If you have done colour changes with tunisian crochet you know that it can be done but if you have to change colours too often in a row it becomes a bit of a challenge. Fair isle crochet came to mind, but of course, this works much better in the round. So my nice “crochet painting” became a pair of wrist warmers, and I LOVE THEM. I really never expected they would turn out this nice so I am really proud and a bit more confident in myself and this little project of mine.
I have to write the pattern for these as well, though it might take a bit. I need to do the chart and probably add a few more columns since my wrists are incredibly small, I guess they are OK for a child size though 😛
If you are interested in fair isle crochet I used the tutorials from Crochet Ever After, as well as her technique for changing colours when closing each round so that it makes an almost invisible join.


